Welcome to ROSMASTER M1 PRO repository
5.OpenClaw Multimodal Vision
OpenClaw Multimodal Vision
OpenClaw Multimodal Vision1. Course ContentCourse OverviewLearning Objectives2. Preparation3. Vision-Related Control Interfaces4. Case Demonstration4.1 Start OpenClaw Interaction4.2 Visual Observation and Understanding4.3 Configuring SeeWhat Auto-Send Channels4.3.1 Configure WhatsApp Channel4.4 Get Target Bounding Box Coordinates4.5 Get Placement Point Coordinates (Depth Camera Only)5. Source Code Analysis5.1 SeeWhat() — Capture Camera Image5.2 GetBbox() — Get Target Bounding Box Coordinates5.3 GetPlacePoint() — Get Placement Point Coordinates5.4 visual_bounding and visual_positioning6. Function Q&A6.1 What should I do if the vision model does not accurately draw bounding boxes around target objects?
1. Course Content
Course Overview
OpenClaw's multimodal vision capability provides visual perception through MCP interfaces, enabling robots to "understand" their surroundings
Covers 3 core vision tools: SeeWhat (capture image), GetBbox (object detection bounding box), GetPlacePoint (get placement point coordinates)
Supports configuring SeeWhat auto-send channels to automatically push robot observation images to communication channels like WhatsApp
Learning Objectives
Understand the functionality and use cases of the 3 vision control interfaces provided by OpenClaw
Master the configuration method for SeeWhat auto-send channels
Master how to invoke vision tools directly via CLI
2. Preparation
Start the MCP service
ros2 launch yahboomcar_bringup mcp_service.launch.py use_camera:=true
If you need voice broadcast replies, you need to add the use_tts parameter:
ros2 launch yahboomcar_bringup mcp_service.launch.py use_camera:=true use_tts:=true, otherwise it can be omitted
3. Vision-Related Control Interfaces
Note
For the detailed functionality, parameters, and usage of the interfaces, please refer to the tutorials 【OpenClaw Connecting to Robot MCP Service】 and 【Robot CLI Command Tool】
| Tool Name | Function Description |
|---|---|
| SeeWhat | Capture camera image and return save path |
| GetBbox | Detect bounding box coordinates of target object |
| GetPlacePoint | Get placement point coordinates and check reachability |
4. Case Demonstration
4.1 Start OpenClaw Interaction
Use any interaction method to converse with OpenClaw, here demonstrating with Web Chat
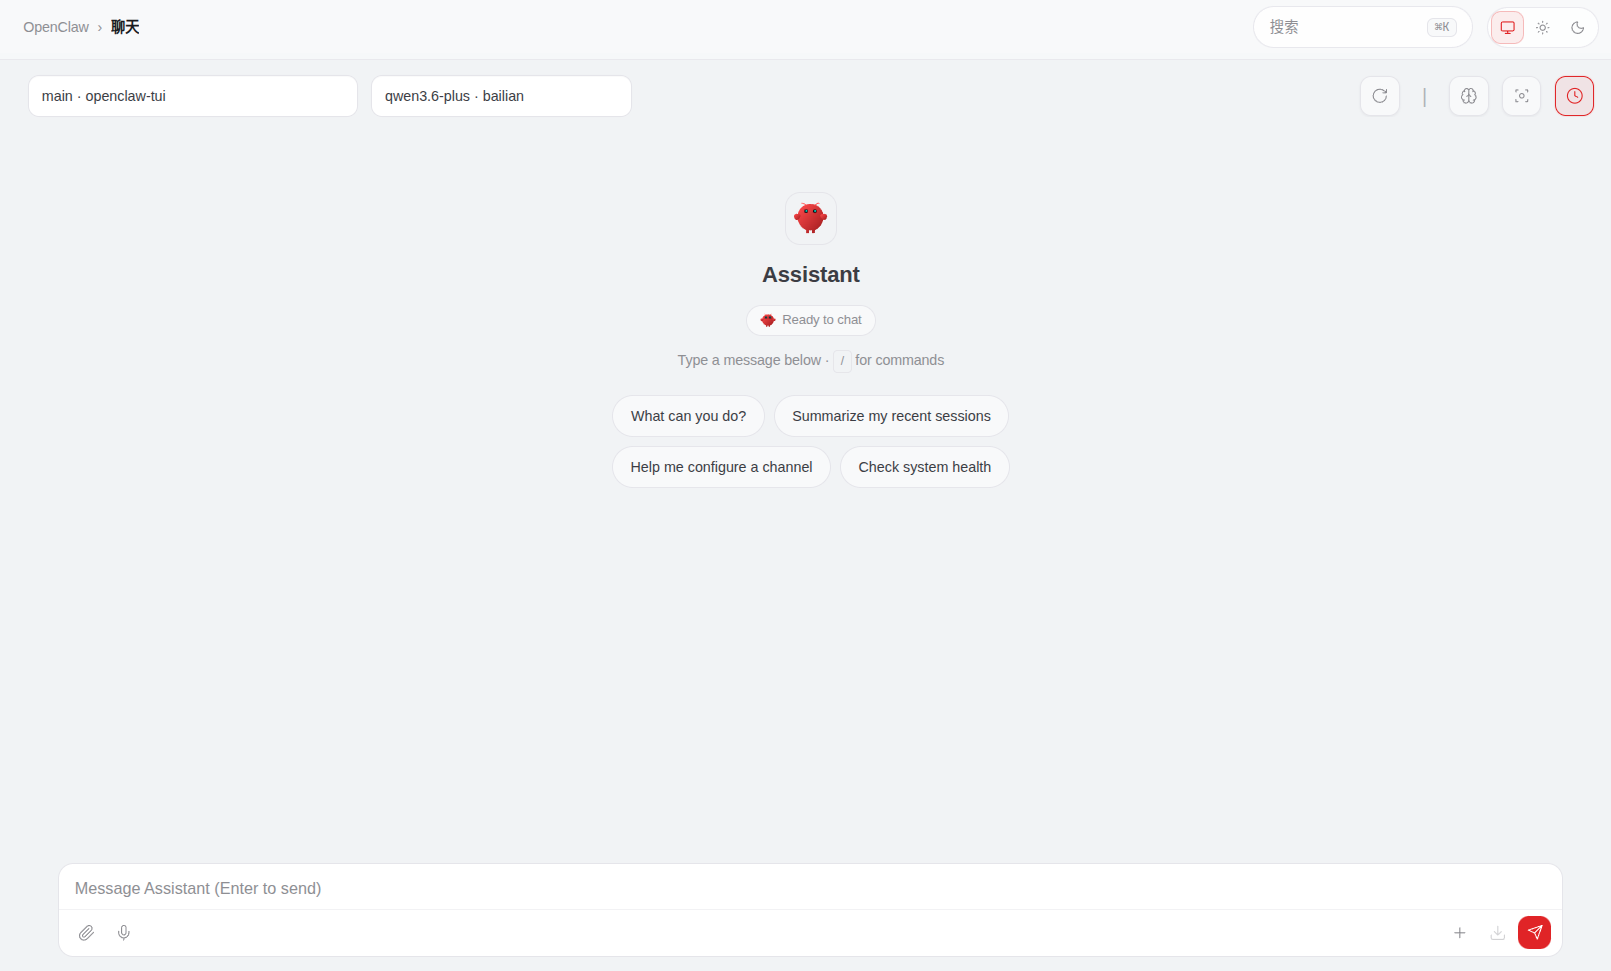
Tip
You can write conversation statements according to your own needs, following is the case demonstration
4.2 Visual Observation and Understanding
Take a look at what is in the environment in front of you
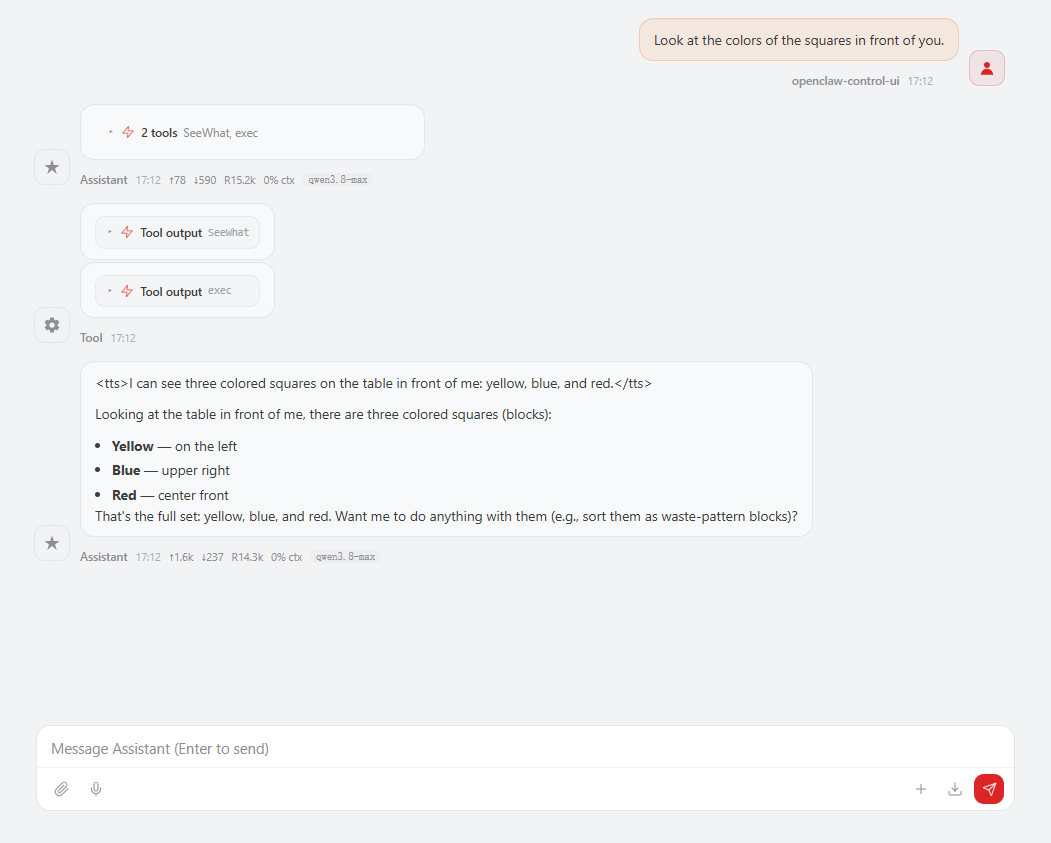
When the SeeWhat tool on the MCP server side is called, the image is automatically saved for checking the observed content, image path:
$HOME/yahboomcar_ros2_ws/yahboomcar_ws/cache/image.png
4.3 Configuring SeeWhat Auto-Send Channels
This feature is used for the robot to automatically send observation-perspective images to mobile communication channels when calling SeeWhat to observe the environment
Configuration parameter path:
$HOME/.openclaw/openclaw.json. You can directly modify the configuration file or configure it through CLI commands; the following uses CLI command configuration as an example
Important
SeeWhat_channels are the channels that need to be auto-sent; images will only be sent to the channels in the list
xxxxxxxxxx "robot-control": { "enabled": true, "config": { "SeeWhat_channels": [ "whatsapp", "weixin" ], "whatsapp_number": "+8615338xxxxxxx" } }Configuration Parameter Description:
SeeWhat_channels: Auto-send channel list, supportswhatsappandweixin. When SeeWhat is called, observation images are automatically sent to the channels in the listwhatsapp_number: WhatsApp recipient phone number, which must include the country code (e.g.,+86)
4.3.1 Configure WhatsApp Channel
xxxxxxxxxxopenclaw config set plugins.entries.robot-control.config.SeeWhat_channels '["whatsapp"]'
Set the SeeWhat_channels phone number
xxxxxxxxxxopenclaw config set plugins.entries.robot-control.config.whatsapp_number "+861533xxxxx"
Restart the gateway to apply
xxxxxxxxxxopenclaw gateway restart
During restart, the openclaw log will indicate the auto-send channel

Note
Now you can converse with OpenClaw; when a vision function is called, the image will be automatically sent to the configured communication channels
4.4 Get Target Bounding Box Coordinates
Get the outer bounding box of the target object. This tool is used for subsequent robotic arm grasping of objects and target tracking. The GetBbox tool provides the function of obtaining target Box bounding box coordinates based on a natural language description
You can directly call GetBbox via the robot_control CLI
xxxxxxxxxxrobot_control call-tool GetBbox --query yellow block on the table
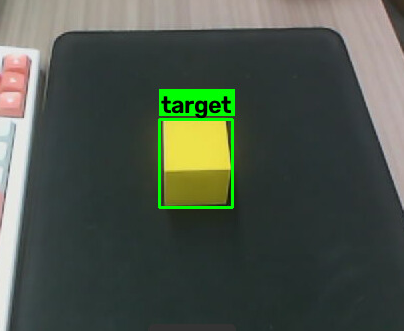
If the target object exists within the camera's field of view, it returns the Box bounding box coordinates and the path to the annotated verification image. The Box bounding box coordinates are used by OpenClaw to decide the next operation.

The auto-saved verification image path is:
xxxxxxxxxx~/yahboomcar_ros2_ws/yahboomcar_ws/cache/verify_image.png
You can check through the image whether the vision model accurately draws a bounding box around the target
Important
The accuracy of visual positioning and bounding box selection depends on the capability of the vision model, which will directly affect robotic arm grasping and visual tracking functions. If the vision model frequently produces inaccurate bounding boxes, refer to 6. Function Q&A to change the vision model or switch the detection method
4.5 Get Placement Point Coordinates (Depth Camera Only)
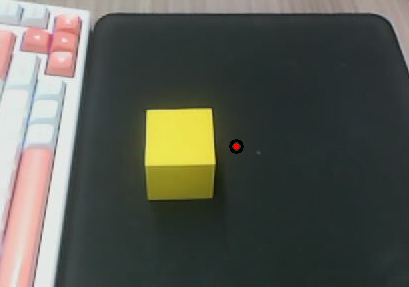
This tool is used for subsequent robotic arm placing objects to specified points. It obtains the spatial 3D coordinates of the target point based on a natural language description, and determines whether the point is within the robotic arm's working range
You can directly call GetPlacePoint via the robot_control CLI
xxxxxxxxxxrobot_control call-tool GetPlacePoint --query place to the right of the yellow block on the table
If a point matching the description exists within the camera's field of view, the tool returns the spatial coordinates of the target point in the vehicle's base_link coordinate system, the verification image path, and a prompt about whether the point is within the robotic arm's working range

Verification image save path:
xxxxxxxxxx~/yahboomcar_ros2_ws/yahboomcar_ws/cache/image_point_selected.png
5. Source Code Analysis
Source code path
xxxxxxxxxx~/yahboomcar_ros2_ws/yahboomcar_ws/src/multi_brains_pre/multi_brains_pre/action_controller.py
The following is the source code explanation of the three core vision functions in the ActionController class.
5.1 SeeWhat() — Capture Camera Image
xxxxxxxxxxdef SeeWhat(self)->list[bool,str]: '''To capture the scene before your eyes''' response:Trigger.Response=self.image_cllient.call(Trigger.Request()) if response.success: result=[True,response.message] self.image_path=response.message else: self.image_path=None result=[False,response.message] self.get_logger().error(response.message) return resultCode Description:
SeeWhat: Captures the current camera frame and saves the image, returning the image path for upper-level functions to useTrigger.Request(): Constructs a ROS2 Trigger service request with no parameters, triggering the camera to capture and save an imageself.image_cllient.call(...): Calls the/save_imageservice, returning aTrigger.Responsecontainingsuccess(whether it succeeded) andmessage(the image path or error information)self.image_path: Saves the image path for use by subsequent functions such asGetBboxandGetPlacePoint
Call the image service: Through
image_cllient(a ROS2 Trigger client), calls the/save_imageservice to trigger camera captureResult handling: On success, saves the image path to
self.image_path; on failure, logs an errorReturn value: Returns
[True, image_path]or[False, error_message]for upper-level functions to judge
5.2 GetBbox() — Get Target Bounding Box Coordinates
Code Description:
GetBbox: Gets the bounding box coordinates of the target object based on a natural language description, returning a bbox dictionary stringself.SeeWhat(): First refreshes the image to ensure detection is based on the current sceneself._get_bbox_tool(): Lazily loads the visual bounding box detection tool; on the first call, reads the vision LLM configuration (api_key, base_url, model) fromrobot_info.jsonand initializesRobotVisualPBoundingBoxtool.BoundingBoxDetection(image_path, target_description): Calls the vision LLM for target detection, returning aVisual_Resultcontainingfoundand thex1/y1/x2/y2coordinatesresult.error/result.found: Checks whether detection errored or the target does not exist, returning the corresponding error information respectively_get_bbox_tool: A lazy loading method that reads vision_LLM's api_key, base_url, and model from the configuration file, initializes aRobotVisualPBoundingBoxinstance, and supports thedetect_modeandyolo_model_pathparameters
Automatic image refresh: First calls
SeeWhat()to get the latest frame, ensuring detection is based on the current sceneDraw grid overlay: Via
draw_grid_overlay(grid_size=30), overlays a grid on the image to assist the Dify vision model in pixel localizationResult parsing: Extracts the
bboxlist from the JSON returned by the Agent, obtaining the four corner coordinatesx1/y1/x2/y2Verification image: Draws a green rectangular box on the original image and saves it to
verify_image.png, facilitating manual confirmation of whether the bounding box is accurate
x def GetBbox(self,query:str)->list[bool,str]: """Get the bounding box of an object in the scene""" res=self.SeeWhat() #Automatic image refresh if not res[0]: return [False,res[1],""] try: tool = self._get_bbox_tool() except Exception as e: self.get_logger().error(f"GetBbox init failed: {e}") return [False, f"GetBbox failed: {e}", ""] result = tool.BoundingBoxDetection(image_path=self.image_path, target_description=str(query)) if result.error: self.get_logger().error(result.error_message) return [False, f"GetBbox failed: {result.error_message}", ""] if not result.found: return [False, f"GetBbox: target '{query}' not found in the image", ""] self.get_logger().info(f"GetBbox: target bbox=({result.x1},{result.y1},{result.x2},{result.y2})") return [True, str({"x1": result.x1, "y1": result.y1, "x2": result.x2, "y2": result.y2})]
def _get_bbox_tool(self): """Lazy load the bounding box tool""" if self._bbox_tool is None: from robot_util.visual_positioning.visual_bounding import RobotVisualPBoundingBox from robot_util.robot_tool import GetRobotInfo vision_llm = GetRobotInfo().get("vision_LLM") or {} api_key = vision_llm.get("api_key") base_url = vision_llm.get("base_url") model = vision_llm.get("model") if not api_key or not base_url or not model: raise RuntimeError("vision_LLM api_key/base_url/model are not configured in robot_info.json") self._bbox_tool = RobotVisualPBoundingBox(api_key=api_key, base_url=base_url, model=model, detect_mode=self.bbox_detect_mode, yolo_model_path=self.yolo_model_path) return self._bbox_tool5.3 GetPlacePoint() — Get Placement Point Coordinates
Code Description:
GetPlacePoint: Gets the 3D spatial coordinates of the placement point based on a natural language description, and checks whether it is within the robotic arm's working rangeself.SeeWhat(): Refreshes the image to ensure positioning is based on the current sceneself._get_place_point_tool(): Lazily loads the visual positioning tool; on the first call, reads the vision LLM configuration fromrobot_info.jsonand initializesRobotVisualPositioningtool.FindTargetPoint(image_path, target_description): Calls the vision LLM to get the pixel coordinates(x, y)of the target point, returning aPositioningResultresult.found: Checks whether the target point exists; if not, returns an errorGetTargetPose.Request(x, y, radius=self.target_circle): Constructs the pose resolution service request, whereradiusis the radius of the circular sampling area (pixels)self.get_pose_client.call(request): Calls the/get_target_poseservice to convert the pixel coordinates into 3D spatial coordinates in thebase_linkcoordinate systemround(result.pose.position.x/y/z, 2): Rounds the 3D coordinates to 2 decimal places and converts them to a string format for returnself.place_distance[2]/[3]: The upper limits of the robotic arm's working range, used to determine whether the target point is reachable_get_place_point_tool: A lazy loading method that reads the vision_LLM configuration from the configuration file and initializes aRobotVisualPositioninginstance
Refresh image: Likewise first calls
SeeWhat()to get the latest sceneGrid overlay: Uses a
grid_size=20grid (finer than the 30 used by GetBbox), because the placement point requires higher-precision pixel localizationTarget non-existence determination: When
(-1, -1)is returned, it indicates that the target point is not in the frameVerification image drawing: A black circle marks the
target_circlesampling range, and a red solid dot marks the detection center, saved toplace_verify_image.png3D coordinate conversion: Through
get_pose_client(the/get_target_poseservice), converts the pixel coordinates(x, y)into 3D spatial coordinates(x, y, z)in thebase_linkcoordinate systemWorking range detection: Determines whether the converted 3D coordinates are within the
place_distance[2]/[3]range, returning a readable prompt message
xxxxxxxxxx    def GetPlacePoint(self,query:str)->list[bool,str]:        save_result=self.SeeWhat()        if  not save_result[0]:            return [False, f"SeeWhat error:{save_result[1]}",""]        try:            tool = self._get_place_point_tool()        except Exception as e:            self.get_logger().error(f"GetPlacePoint init failed: {e}")            return [False, f"GetPlacePoint failed: {e}", ""]        # Grid overlay and target-point annotation are handled inside FindTargetPoint        result = tool.FindTargetPoint(image_path=self.image_path, target_description=str(query))        if result.error:            self.get_logger().error(result.error_message)            return [False, f"GetPlacePoint failed: {result.error_message}", ""]        if not result.found:            return [False, "point is empty; the target point may not exist in the frame.", ""]        x, y = result.x, result.y                request = GetTargetPose.Request(x=float(x), y=float(y), radius=self.target_circle)        result:GetTargetPose.Response = self.get_pose_client.call(request)                if not result.success:            self.get_logger().error(f"GetTargetPose failed: {result.message}")            return [False, str(result.message),""]                point = str({"x": round(result.pose.position.x, 2),                      "y": round(result.pose.position.y, 2),                     "z": round(result.pose.position.z, 2)                     })        self.get_logger().info(                f'Target Point:x:{result.pose.position.x:.2f}, '                f'y:{result.pose.position.y:.2f}, '                f'z:{result.pose.position.z:.2f}')        if result.pose.position.x<=self.place_distance[2] and result.pose.position.y <= self.place_distance[3]:            msg="✅ The target point is within the working range of the robotic arm"        else:            msg="❌ The target point is outside the working range of the robotic arm"        return [True,msg,point]
    def _get_place_point_tool(self):        """Lazy load the placement-point positioning tool"""        if self._place_point_tool is None:            from robot_util.visual_positioning.visual_positioning import RobotVisualPositioning            from robot_util.robot_tool import GetRobotInfo            vision_llm = GetRobotInfo().get("vision_LLM") or {}            api_key = vision_llm.get("api_key")            base_url = vision_llm.get("base_url")            model = vision_llm.get("model")            if not api_key or not base_url or not model:                raise RuntimeError("vision_LLM api_key/base_url/model are not configured in robot_info.json")            self._place_point_tool = RobotVisualPositioning(api_key=api_key, base_url=base_url, model=model)        return self._place_point_tool
5.4 visual_bounding and visual_positioning
Source code path
xxxxxxxxxx~/yahboomcar_ros2_ws/yahboomcar_ws/src/robot_util/robot_util/visual_positioning/visual_bounding.py
xxxxxxxxxx~/yahboomcar_ros2_ws/yahboomcar_ws/src/robot_util/robot_util/visual_positioning/visual_positioning.py
_online_detection(visual_bounding.py): Online visual detection functionEncodes the image as base64, calls the vision LLM through
litellm.completion(), sending the system prompt + target description + imageHandles exceptions such as authentication errors, rate limits, and general API exceptions
Parses the JSON returned by the model, extracting
foundand thex1/y1/x2/y2bounding box coordinatesWhen the target exists, creates a
Visual_Resultand draws the verification image; when it does not exist, returnsfound=False
FindTargetPoint(visual_positioning.py): Target point pixel localization functionReads the image and computes the number of grid rows and columns (based on
grid_size)Overlays a grid with indices and orientation labels, saving it as
_grid.pngfor the vision model to recognizeBuilds the system prompt, including the image dimensions, grid size, maximum index, and orientation labels
Calls the vision LLM; the model returns the grid index
(col, row)where the target is locatedClamps the grid index to the legal range and computes the grid center pixel coordinates
(x, y)Marks the detection point on the original image and returns a
PositioningResultcontaining the pixel coordinates
xxxxxxxxxx    def _online_detection(self, image_path: str, target_description: str) -> Visual_Result:        image_base64, err = self._encode_image(image_path)        if err:            return Visual_Result(error=True, error_message=f"Image encoding error: {err}")
        try:            response = completion(                model=self.model,                messages=[                    {"role": "system", "content": PROMPT},                    {                        "role": "user",                        "content": [                            {"type": "text", "text": f"Target: {target_description}"},                            {"type": "image_url", "image_url": {"url": f"data:image/jpeg;base64,{image_base64}"}},                        ],                    },                ],                api_base=self.base_url,                api_key=self.api_key,            )        except litellm.AuthenticationError as e:            return Visual_Result(error=True, error_message=f"Bad API key: {e}")        except litellm.RateLimitError as e:            return Visual_Result(error=True, error_message=f"Rate limited: {e}")        except Exception as e:            return Visual_Result(error=True, error_message=f"API error: {e}")
        data, parse_err = self._parse_model_json(response)        if parse_err:            return parse_err        if data.get("found"):            result = Visual_Result(found=True, x1=data["x1"], y1=data["y1"], x2=data["x2"], y2=data["y2"])            if self._annotate_selected(image_path, result) is None:                logger.warning("OnlyOnline: selected-target annotation failed")            return result        return Visual_Result(found=False, error_message="Target not found in image")         def FindTargetPoint(self, image_path: str, target_description: str) -> PositioningResult:        '''Find the pixel coordinates (x, y) of the target point described in natural language.        The visual model returns the grid cell containing the target, and the grid center        pixel coordinates are computed locally'''        img = cv2.imread(image_path)        if img is None:            return PositioningResult(error=True, error_message=f"Image not found: {image_path}")        img_h, img_w = img.shape[:2]        cols = math.ceil(img_w / self.grid_size)        rows = math.ceil(img_h / self.grid_size)
        # Overlay the indexed grid (with orientation labels) and save it next to the original for the online model        grid_img = draw_grid_overlay(img, grid_size=self.grid_size, orientation_labels=self.orientation_labels)        base, _ = os.path.splitext(image_path)        grid_path = f"{base}_grid.png"        if not cv2.imwrite(grid_path, grid_img):            return PositioningResult(error=True, error_message=f"Failed to save grid image: {grid_path}")
        image_base64, err = self._encode_image(grid_path)        if err:            return err
        system_prompt = Template(PROMPT_TEMPLATE).substitute(            width=img_w, height=img_h, grid_size=self.grid_size,            max_col=cols - 1, max_row=rows - 1,            top_label=self.orientation_labels["top"], bottom_label=self.orientation_labels["bottom"],            left_label=self.orientation_labels["left"], right_label=self.orientation_labels["right"]        )
        try:            response = completion(                model=self.model,                messages=[                    {"role": "system", "content": system_prompt},                    {                        "role": "user",                        "content": [                            {"type": "text", "text": f"Target: {target_description}"},                            {"type": "image_url", "image_url": {"url": f"data:image/jpeg;base64,{image_base64}"}},                        ],                    },                ],                api_base=self.base_url,                api_key=self.api_key,            )        except litellm.AuthenticationError as e:            return PositioningResult(error=True, error_message=f"Bad API key: {e}")        except litellm.RateLimitError as e:            return PositioningResult(error=True, error_message=f"Rate limited: {e}")        except Exception as e:            return PositioningResult(error=True, error_message=f"API error: {e}")
        data, parse_err = self._parse_model_json(response)        if parse_err:            return parse_err        if not data.get("found"):            return PositioningResult(found=False, error_message="Target point not found in image")
        col = self._to_int(data.get("col"))        row = self._to_int(data.get("row"))        if col is None or row is None:            return PositioningResult(error=True,                                     error_message=f"The visual model returned an invalid grid index: {data}")
        # Clamp the indices into the legal range, then compute the grid center point        col = max(0, min(col, cols - 1))        row = max(0, min(row, rows - 1))        x = min(col * self.grid_size + self.grid_size // 2, img_w - 1)        y = min(row * self.grid_size + self.grid_size // 2, img_h - 1)        logger.info(f"Positioning: target cell (col={col}, row={row}), center point (x={x}, y={y})")
        if self._annotate_selected(image_path, x, y) is None:            logger.warning("Positioning: selected-point annotation failed")        return PositioningResult(found=True, x=x, y=y, grid_col=col, grid_row=row)
6. Function Q&A
6.1 What should I do if the vision model does not accurately draw bounding boxes around target objects?
Start RobotManager through the icon or CLI
xxxxxxxxxxrobot_manage gui
Option 1: Directly replace the vision model
In Configuration — Vision Model, you can switch to vision models from different providers for the visual bounding box localization feature
Tip
Recommended models for visual positioning: qwen-vl-max, qwen3.8-max, kimi2.5
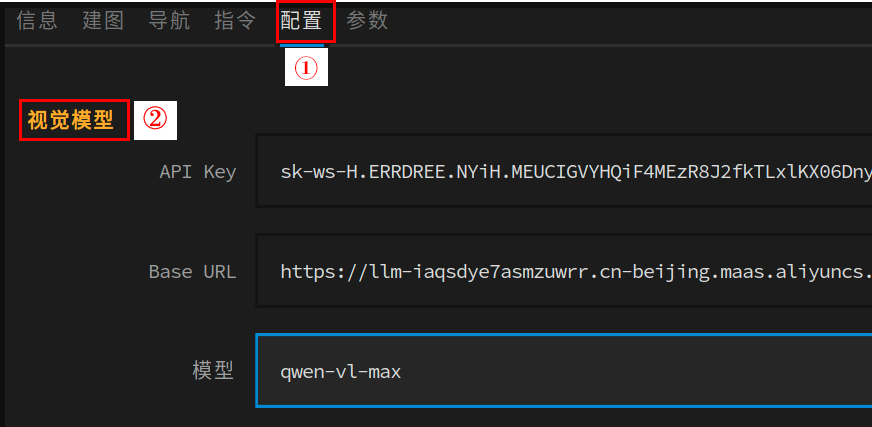
Option 2: Switch the visual localization mode to Hybrid (mixed detection) mode
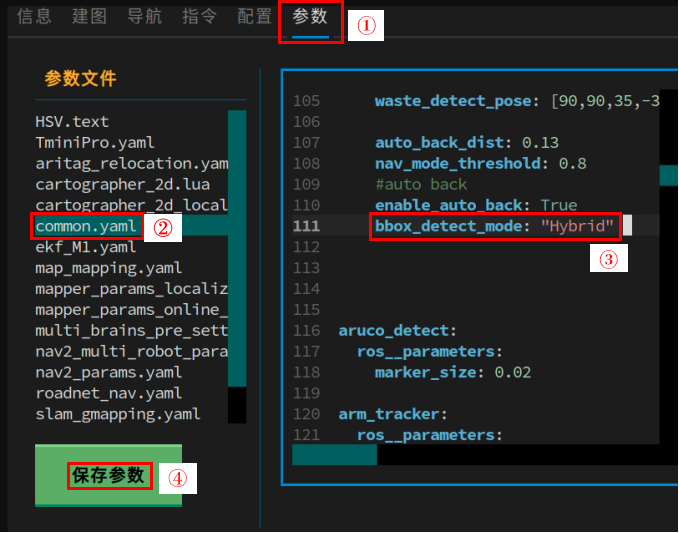
Note
This is a pre-research feature that can significantly improve the bounding box localization capability of vision models that lack pixel-level localization. The core logic is: the vision model provides several words describing target features, then the yolo-world open-vocabulary model detects all candidate words for pixel localization, and finally vision performs semantic decision-making to determine the final target object. For the detailed program implementation, refer to the aforementioned visual_bounding.py
The factory detection mode is OnlyOnline (online detection only)