yahboom
HomeTutorialsProduct
Solution
Blog
Online Store
About Us
EN/中文
Store
ROSMASTER A1 PRO📖
00.Configuration and Operation Guide
  • 0. Unboxing and Review
  • 1.Assembly Videos
  • 2.User Manual
  • 3.Enter Docker (For Raspberry Pi)
  • 4.A1Pro Front Wheel Servo Calibration
  • 5.USB Camera Calibration
  • 6.Depth Camera Calibration
  • 7.FAQ
  • 8.Desktop Configuration Center and Remote Control Guide
01.Chassis Control Course
  • 1.Robot Information Publishing
  • 2.Robot Handle Control
  • 3.Robot Keyboard Control
  • 4.Linear Velocity Calibration
  • 5.Angular Velocity Calibration
  • 6.Robot URDF Model
  • 7.Robot EKF State Estimation
02.Lidar Course
  • 1.Lidar Introduction and Use
  • 2.Lidar Obstacle Avoidance
  • 3.Lidar Following
  • 4.Lidar Patrol
  • 5.GMapping-SLAM Mapping
  • 6.Cartographer-SLAM Mapping
  • 7.Slam-Toolbox Mapping
  • 8.Lifelong Mode Mapping
  • 9.Navigation2 Single Point Navigation
  • 10.Navigation2 Multi Point Navigation
  • 11.Cartographer Relocalization Navigation
  • 12.Slam-Toolbox Localization Navigation
  • 13.Synchronous Mapping And Navigation
  • 14.Aruco Visual Relocalization Navigation
  • 15.Mobile App Mapping And Navigation
  • 16.AprilTag Transport
  • 17.Color Block Transport
03.USB Camera-Depth Camera Course
  • 1.USB Camera Introduction
  • 2.USB Camera Intrinsic Calibration
  • 3.Nuwa-HP60C Camera Introduction (Depth Camera Only)
  • 4.Depth Camera Distance Measurement (Depth Camera Only)
  • 5.Depth Pseudo Color Image (Depth Camera Only)
  • 6.Block Volume Calculation (Depth Camera Only)
  • 7.Edge Detection (Depth Camera Only)
  • 8.RTAB-Map SLAM Mapping (Depth Camera Only)
  • 9.RTAB-Map Navigation (Depth Camera Only)
04.Robotic Arm and 3D Space Gripping Course
  • 0.Robotic Arm Basic Usage
  • 1.Robotic Arm Kinematics
  • 2.Robotic Arm Chassis Coordination Control
  • 3.AprilTag ID Sorting
  • 4.AprilTag Height Anomaly Sorting
  • 5.AprilTag Tracking and Grasping
  • 6.Color Block Sorting
  • 7.Color Block Height Anomaly Sorting
  • 8.Color Block Tracking and Grasping
  • 9.Wood Block Shape Sorting
  • 10.KCF Tracking and Grasping Objects
  • 11.Mediapipe Gesture ID Sorting AprilTag
  • 12.Mediapipe Gesture Height Sorting AprilTag
  • 13.Desktop Tracking and Grasping AprilTag
  • 14.3D Spatial Tracking AprilTag
  • 15.Line Following Obstacle Clearing
  • 16.Transformer Model Tracking Algorithm
05.Road Network Planning and Navigation
  • 1.Introduction To Road Network Planning
  • 2.Road Network Annotation
  • 3.Planning And Navigation Between Waypoints
  • 4.Road Network Navigation In Any Pose
  • 5.Path Re-planning
06.OpenClaw Basic Course
  • 1.Introduction to OpenClaw
  • 2.OpenClaw Core Concepts
  • 3.OpenClaw API-KEY Configuration
  • 4.OpenClaw Switch Models
  • 5.OpenClaw System Prompt Words
  • 6.OpenClaw Common CLI Commands
07.OpenClaw Interaction Method
  • 1.OpenClaw Webchat Interaction
  • 2.OpenClaw Tui Interaction
  • 3.OpenClaw Voice Dialogue Interaction
  • 4.OpenClaw WhatsApp Interaction
08.OpenClaw Development
  • 1.OpenClaw Connecting to Robot MCP Service
  • 2.Robot CLI Command Tool
  • 3.robot-control plugin tool
  • 4.reply-bridge plugin tool
  • 5.OpenClaw Multimodal Vision
  • 6.OpenClaw Chassis Control
  • 7.OpenClaw Robotic Arm Control
  • 8.OpenClaw Skills Development
  • 9.OpenClaw Scheduled Tasks
  • 10.OpenClaw Multi-Agent Intelligent Agent
  • 11.OpenClaw Active Interaction
  • 12.OpenClaw Vector Memory
09.OpenClaw Embodied Intelligent Application
  • 1.OpenClaw Target Tracking
  • 2.OpenClaw Arm Tracking And Grasping
  • 3.OpenClaw Arm Fixed-point Placement
  • 4.OpenClaw Waste Sorting
  • 5.OpenClaw SLAM Mapping And Navigation
  • 6.OpenClaw Navigation Transport
  • 7.OpenClaw AprilTag Grasping
  • 8.OpenClaw Color Line Patrol
  • 9.OpenClaw Visual Distance Measurement
10.OpenClaw Scenario Sandbox
  • 1.Map Description and Prop Placement
  • 2.Build Sand Table Map
  • 3.Visual Relocation Markers
  • 4.Map Mapping Markers
  • 5.OpenClaw Scenario Sandbox Comprehensive Case
11.AI Model Basics
  • 1.AI Large Model Types and Principles
  • 2.RAG Retrieval Enhancement and Model Training Samples
  • 3.Embodied Intelligent Robot System Architecture
  • 4.Embodied Intelligent Functions Core Source Code
12.AI Model Development
  • 1.Register a Model Service Provider Aaccount
  • 2.Configuring API-KEY
  • 3.Introduction to Dify
  • 4.Basic Dify Features
  • 5.AI Large Model Development - chatbot
  • 6.Deploy the RAG Knowledge Base
  • 7.RAG Knowledge Base + chatbot
  • 8.AI Agent Workflow
  • 9.Custom Wake-up Response
13.AI Model - Text Version
  • 1.Semantic Understand and Command Follow
  • 2.Multimodal Visual Understand
  • 3.Multimodal Visual Understand + Robotic Arm Gripping
  • 4.Multimodal Visual Understand+SLAM Navigation
  • 5.Robotic Arm Gripping+Multimodal Visual Understand+SLAM Navigation
  • 6.Intention Estimation
14.AI Model - Voice Version
  • 1.Semantic Understand and Command Follow
  • 2.Multimodal Visual Understand
  • 3. Multimodal Large Model+Robotic Arm Gripping
  • 4.Multimodal Visual Understand+SLAM Navigation
  • 5.Robotic Arm Gripping+Multimodal Visual Understand+SLAM Navigation
  • 6.Intention Estimation
15.Mediapipe Visual Course
  • 1.Hand Detection
  • 2.Posture Detection
  • 3.Overall Detection
  • 4.Facial Landmark Detection
  • 5.Face Detection
  • 6.Face Special Effects
  • 7.3D Object Recognition
  • 8.Brush
  • 9.Finger Control
  • 10.Palm Target Positioning
  • 11.Fingertip Trajectory Recognition
  • 12.Fingertip Gesture Control Cobotic Arm
  • 13.Gesture Grabbing and Releasing Objects
  • 14.Finger Control Robotic Arm
  • 15.Medipipe Gesture Control Robotic arm Cction Group
16.MoveIt2 Simulation Course
  • 1.MovelT2 Configuration
  • 2.MovelT2 Simulation-Reality Linkage
  • 3.Random Movement
  • 4.Forward Kinematics Design
  • 5.Inverse Kinematics Design
  • 6.Cartesian Path
  • 7.Scene Design
  • 8.Trajectory Planning
  • 9.Collision Detection
  • 10.3D Perception Obstacle‑Avoidance
17.Multi-vehicle Course
  • 1.Multi-vehicle Control
  • 2.Multi-vehicle Navigation
  • 3.Multi-vehicle Formation
18.YOLO26 Development
  • 1.CLI Use
  • 2.Object Detection
  • 3.Instance Segmentation
  • 4.Pose Estimation
  • 5.Image Classification
  • 6.Oriented Object Detection
  • 7.YOLOv26 + DeepSORT Tracking
  • 8.Monocular Depth Estimation
19.Control Board STM32 Driver Course
  • 0.Notes (Must Read)
  • 1.About Expansion Board
  • 2.STM32 Development Environment
  • 3.Button Control
  • 4.FreeRTOS Application
  • 5.Serial Communication
  • 6.SBUS Model Aircraft Remote Control
  • 7.CAN Bus Communication
  • 8.RGB Colorful Light Bar
  • 9.Timer Interrupt to Control PWM Servo
  • 10.Control Serial Port Servos
  • 11.Nine-axis Attitude Sensor to Obtain Data
  • 12.Control Motor
  • 13.Timer Captures the Encoder Data
  • 14.1 Kinematic Analysis of Mecanum Wheel
  • 14.2 Kinematic Analysis of Ackerman
  • 14.3 Kinematic Analysis of 4WD
  • 15.PID Control Robot Movement
20.Docker Course
  • 1.Docker Introduction and Installation
  • 2.Docker Basic Commands
  • 3.Docker Submission and Multi-Terminal Access
  • 4. Docker Startup Script
  • 5.Docker-Vscode Environment Construction
21.Image Processing Basics Course
  • 1. Introduction to Open Source CV
  • 2. Image reading and display
  • 3. Image writing
  • 4. Image quality
  • 5. Pixel Operation
  • 6. Image zoom
  • 7. Image cutting
  • 8. Image translation
  • 9. Image Mirroring
  • 10. Affine Transformation
  • 11. Image Rotation
  • 12. Perspective Transformation
  • 13. Grayscale processing
  • 14. Image Binarization
  • 15. Edge Detection
  • 16. Line drawing
  • 17. Rectangle and circle drawing
  • 18. Drawing text and pictures
22.Linux System Course
  • 1.Introduction to Linux system
  • 2.Ubuntu file system
  • 3.Ubuntu common commands
  • 4.Ubuntu common editors
  • 5.Ubuntu software operation commands
  • 6.Virtual machine installation
  • 7.SSH remote control
  • 8.VNC remote control
  • 9.Transfer files remotely
  • 10.Driver library and communication
  • 11.Static IP and hotspot mode
  • 12.Bind device ID
  • 13.Capacity expansion and resource allocation
  • 14.Update system software sources
  • 15.Set root user password
  • 16.sudo free password
  • 17.Connect to WiFi network
  • 18.View system version
  • 19.Customized service management
  • 20.Back up system image
23.ROS2 Basic Course
  • 1.Introduction to ROS2
  • 2.ROS2 install Humble
  • 3.ROS2 development environment
  • 4.ROS2 workspace
  • 5.ROS2 function package
  • 6.ROS2 node
  • 7.ROS2 topic communication
  • 8.ROS2 service communication
  • 9.ROS2 action communication
  • 10.ROS2 custom interface message
  • 11.ROS2 parameter service case
  • 12.ROS2 meta-function package
  • 13.ROS2 distributed communication
  • 14.ROS2 DDS
  • 15.ROS2 time related API
  • 16.ROS2 common command tools
  • 17.ROS2 rviz2 use
  • 18.ROS2 rqt toolbox
  • 19.ROS2 Launch startup file configuration
  • 20.ROS2 recording and playback tool
  • 21.ROS2 URDF model
  • 22.ROS2 Gazebo simulation platform
  • 23.ROS2 TF2 coordinate transformation
24.Main Control Course
Jetson Orin Nano_NX
  • 1.Jetson Orin board introduction
  • 2.Restore the factory image system
  • 3.Backup SSD system
  • 4.SSD expansion
  • 5.Network configuration
  • 6.SSH remote login
  • 7.VNC remote control
  • 8.Remote file transfer
  • 9.Jtop tool
  • 10.Exchange space expansion
Raspberry Pi
  • 1. Introduction to Raspberry PI 5
  • 2. Raspberry PI system installation and backup
  • 3. Powering the Raspberry PI 5
  • 4. Startup of Raspberry PI 5
  • 5. Update and upgrade operating system
  • 6. Introduction to raspi-config tool
  • 7. config.txt file description
  • 8. Network Configuration
  • 9. remote access
  • 10. Transfer files remotely
  • 11. Set display resolution and rotation
  • 12. Set screen to sleep
  • 13. Play audio and video
  • 14. Using USB camera
  • 15. Using MIPI camera
  • 16. Get real-time temperature of Raspberry Pi
RDKX5
  • 1.Introduction to RDK X5 board
  • 2.Write system file
  • 3.Hardware interface description
  • 4.Install case and other accessories
  • 5.Network configuration
  • 6.Remote login
  • 7.Update system
  • 8.srpi-config user guide
  • 9.config. txt configuration file
  • 10.Self-startup setting
  • 11.RDK exclusive command usage
  • 12.Linux command usage
  • 13.GPIO readwrite operation
  • 14.Image classification algorithm
  • 15.Use USB camera
  • 16.Use MIPI camera
  • 17.Binocular camera depth algorithm
  • 18. Controlling RGB Cooling Fans
Download
  • SystemFile
  • Code
  • 3D_Model_File
  • Software_Tools
  • Hardware_Info
  • Introduction_Manual
  • Script_File
  • Dify AI Agent
Download ZIP

Welcome to ROSMASTER A1 PRO repository

14.ROS2 DDS

14. ROS2 DDS

1. Introduction to DDS

DDS stands for Data Distribution Service. Published and maintained by the Object Management Group (OMG) in 2004, it is a data distribution/subscription standard designed specifically for real-time systems. It was first adopted by the US Navy to address compatibility issues with large-scale software upgrades within the complex network environments of ships. It has now become a mandatory standard.

DDS emphasizes data-centricity and provides a rich set of quality-of-service policies to ensure real-time, efficient, and flexible data distribution, meeting the needs of various distributed real-time communication applications.

References

  • Fast DDS Official Documentation: 3.3.0
  • ROS2 official document DDS advanced functions: Using Fast DDS Discovery Server as discovery protocol community-contributed] — ROS 2 Documentation: Humble documentation

2. Communication Model

The topics, services, and actions we learned about in the previous course all rely on DDS for their underlying communication implementation. DDS is equivalent to the neural network in the ROS robot system.

The core of DDS is communication. Numerous models and software frameworks exist to implement this communication. Here we list four commonly used models.
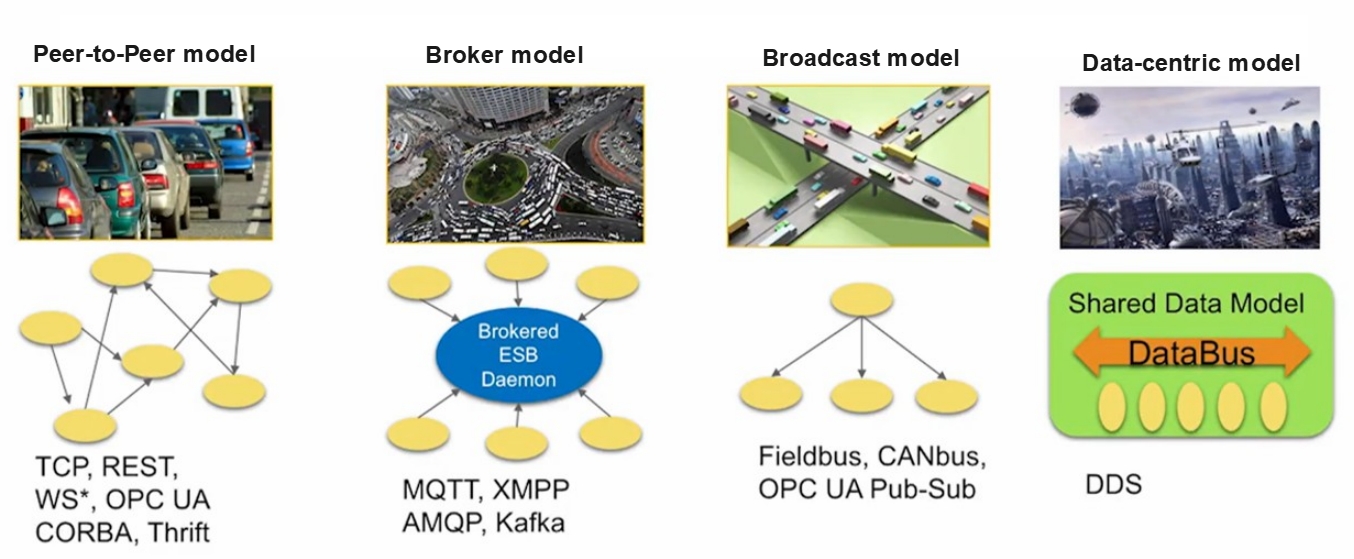
image-20220528020740057

  • The first, the Peer-to-Peer model, involves many clients connecting to a single server. Each communication requires a connection between the two parties. As the number of communicating nodes increases, the number of connections also increases. Furthermore, each client needs to know the server's specific address and the services it provides. If the server's address changes, all clients are affected.
  • The second, the Broker model, optimizes the peer-to-peer model. The broker centrally processes all requests and then identifies the roles that can truly respond to the service. This eliminates the need for clients to worry about the server's specific address. However, the problem is obvious: as the core, the broker's processing speed affects the efficiency of all nodes. Once the system scales to a certain level, the broker can become a performance bottleneck for the entire system. Furthermore, if the broker fails, the entire system can cease to function properly. The previous ROS1 system used a similar architecture.
  • The third model is the Broadcast model, in which all nodes can broadcast messages on a channel and receive them. This model solves the server address problem and eliminates the need for separate connections between communicating parties. However, the sheer number of messages on the broadcast channel forces all nodes to pay attention to every message, many of which are irrelevant to them.
  • The fourth model is the data-centric DDS model. This model is somewhat similar to the broadcast model, in which all nodes can publish and subscribe to messages on the DataBus. However, its advantage lies in the fact that communication involves multiple parallel pathways, allowing each node to focus only on messages of interest and ignore those it doesn't. It's a bit like a rotating hot pot, with all the delicious food being transferred across the DataBus. Each node only needs to take what it wants; the rest is irrelevant to it.

Of these communication models, DDS has a clear advantage.

3. Application of DDS in ROS2

DDS plays a crucial role in the ROS2 system. All upper-layer infrastructure is built on DDS. In this ROS2 architecture diagram, the blue and red components represent DDS.
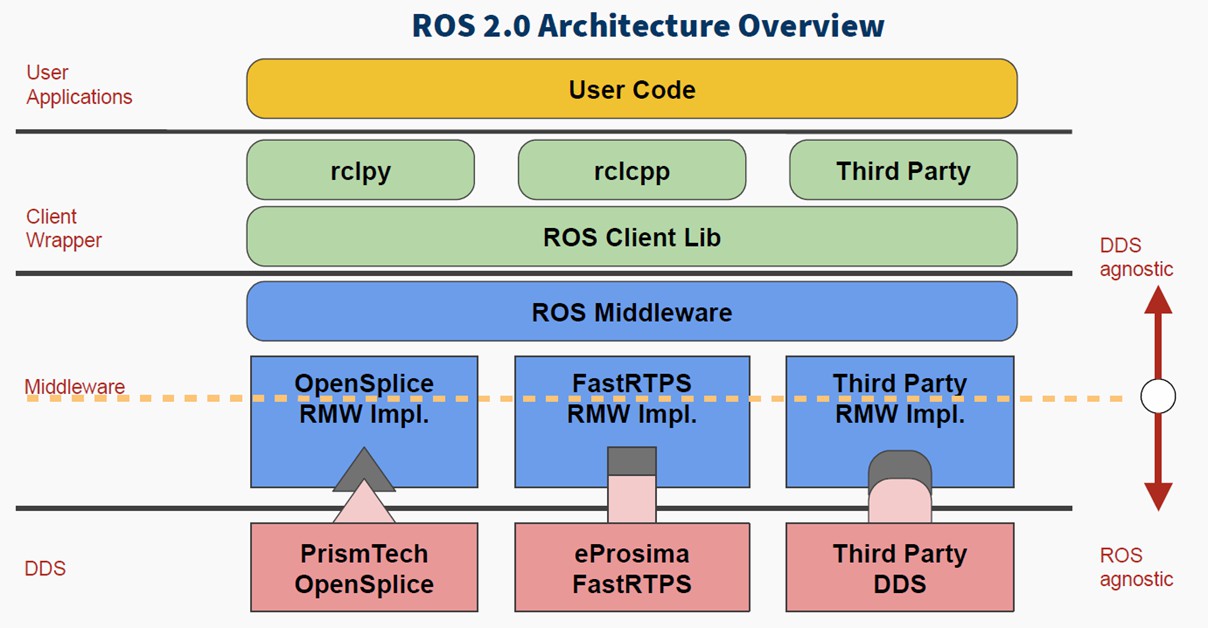
image-20220528020937717

Among the four major components of ROS, the addition of DDS greatly enhances the comprehensive capabilities of the distributed communication system. This allows us to avoid worrying about communication issues during robot development and focus more time on other application development components.

4. Quality of Service (QoS)

The basic structure in DDS is the domain. A domain binds applications together for communication. Recall that when we configured communication between the Raspberry Pi and the computer, the domain ID we configured earlier defines the grouping of the global data space. Only nodes within the same domain group can communicate with each other. This prevents useless data from occupying resources.

Another important feature of DDS is the quality of service (QoS).

QoS is a network transmission policy. Applications specify the desired network transmission quality behavior, and the QoS service implements this behavior to meet the client's communication quality requirements as much as possible. It can be thought of as a contract between data providers and receivers.

The policies are as follows:

  • DEADLINE policy: This policy requires data to be transmitted within a certain deadline.
  • HISTORY policy: This policy specifies the cache size for historical data.
  • RELIABILITY policy: This policy specifies the data communication mode. Configuring BEST_EFFORT ensures smooth data transmission even when network conditions are poor, which may result in data loss. Configuring RELIABLE ensures reliable communication and maximizes image integrity. We can choose the appropriate communication mode based on the application scenario.
  • DURABILITY policy: This policy ensures that a certain amount of historical data is sent to late-joining nodes, allowing new nodes to quickly adapt to the system.

5. Test Cases

5.1 Case 1—Configuring DDS via the Command Line

  • Open the first terminal and publish the topic using the following command:
xxxxxxxxxx
ros2 topic pub /chatter std_msgs/msg/Int32 "data: 66" --qos-reliability best_effort

image-20250827115245194

  • Open another terminal and print the topic using a different QoS. If the QoS policy used differs from the publisher's, a warning message will appear indicating that the topic data cannot be received properly:
xxxxxxxxxx
ros2 topic echo /chatter --qos-reliability reliable

image-20250827115358309

  • We can receive topic data using the same QoS policy as the topic publisher.
xxxxxxxxxx
ros2 topic echo /chatter --qos-reliability best_effort

image-20250827120250112

5.2 Example 2—Configuring QoS Service Policies for Topic Nodes

  • Create a new function package using the following command
xxxxxxxxxx
ros2 pkg create learning_dds --build-type ament_python --dependencies rclpy std_msgs
  • Create a new file, dds_controller_pub.py, as the publisher for topic communication. Fill in the following content:
xxxxxxxxxx
import rclpy
from rclpy.node import Node
from std_msgs.msg import String
# Import QoS related classes
from rclpy.qos import QoSProfile, QoSReliabilityPolicy, QoSHistoryPolicy
​
class ControllerPublisher(Node):
    def __init__(self, name):
        super().__init__(name)
        #1. Configure QoS policy: reliable transmission, retain the last historical data
        self.qos_profile = QoSProfile(
            reliability=QoSReliabilityPolicy.RELIABLE,  # Reliable transmission (retransmission of lost data)
            history=QoSHistoryPolicy.KEEP_LAST,         # Keep the last N pieces of data
            depth=1                                     # Keep 1 historical data
        )
        # 2. Create a publisher: topic name /robot_cmd, message type String, QoS policy
        self.publisher = self.create_publisher(
            String, 
            "/robot_cmd", 
            self.qos_profile
        )
        # 3. Create a timer: send a command once per second
        self.timer = self.create_timer(1.0, self.timer_callback)
        self.cmd_list = ["forward", "backward", "stop"]  # Instruction List
        self.cmd_index = 0  #Instruction index, loop switching
​
​
    def timer_callback(self):
        # Cycle switching instructions (forward → backward → stop → forward...)
        current_cmd = self.cmd_list[self.cmd_index % 3]
        # Create a message and fill it with data
        msg = String()
        msg.data = current_cmd
        # Publish a message
        self.publisher.publish(msg)
        # Print log (shows issued commands)
        self.get_logger().info(f"发布控制指令:{msg.data}")
        # Update command index
        self.cmd_index += 1
​
​
def main(args=None):
    # Initializing ROS2
    rclpy.init(args=args)
    # Create a publisher node
    node = ControllerPublisher("robot_controller_pub")
    # Looping nodes
    rclpy.spin(node)
    # Destroy the node and shut down ROS2
    node.destroy_node()
    rclpy.shutdown()
​
​
if __name__ == "__main__":
    main()


  • To implement the subscriber code, create a new dds_robot_sub.py file and fill in the following subscriber implementation code
xxxxxxxxxx
import rclpy
from rclpy.node import Node
from std_msgs.msg import String
from rclpy.qos import QoSProfile, QoSReliabilityPolicy, QoSHistoryPolicy
​
class RobotSubscriber(Node):
    def __init__(self, name):
        super().__init__(name)
        # 1. Configure a QoS policy compatible with the publisher
        self.qos_profile = QoSProfile(
            reliability=QoSReliabilityPolicy.BEST_EFFORT,
            history=QoSHistoryPolicy.KEEP_LAST,
            depth=1
        )
        # 2. Create a subscriber: topic name/robot_cmd, callback function, QoS policy
        self.subscription = self.create_subscription(
            String,
            "/robot_cmd",
            self.cmd_callback,  # Callback function executed after receiving data
            self.qos_profile
        )
​
    def cmd_callback(self, msg):
        # Callback function: Processes received instructions
        self.get_logger().info(f"接收控制指令:{msg.data} → 执行对应动作")
​
​
def main(args=None):
    rclpy.init(args=args)
    node = RobotSubscriber("robot_subscriber")
    rclpy.spin(node)
    node.destroy_node()
    rclpy.shutdown()
​
​
if __name__ == "__main__":
    main()
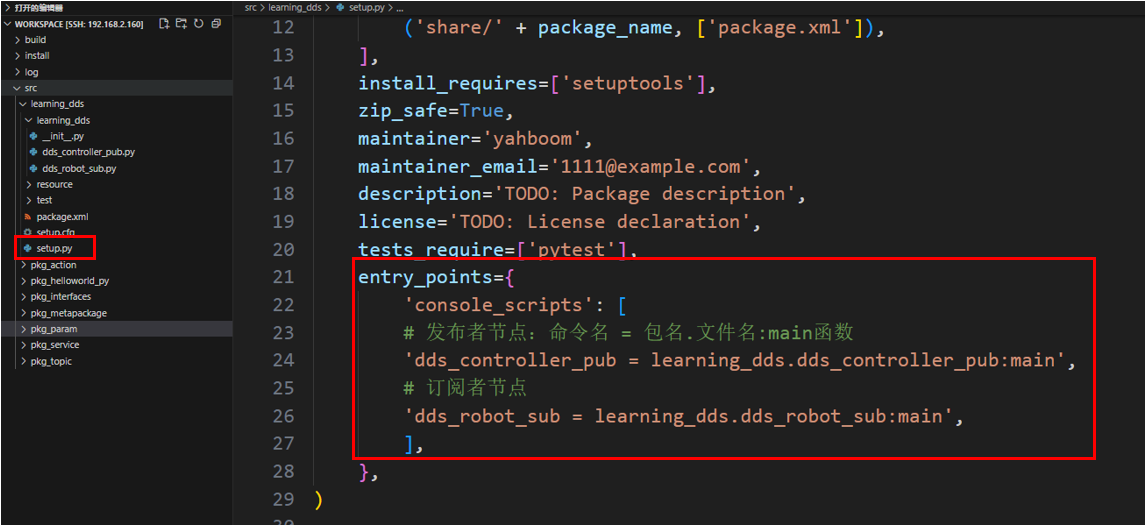
  • Configure the compilation file (setup.py)
xxxxxxxxxx
entry_points={
    'console_scripts': [
        # Publisher node: command name = package name. file name: main function
        'dds_controller_pub = learning_dds.dds_controller_pub:main',
        # Subscriber Node
        'dds_robot_sub = learning_dds.dds_robot_sub:main',
    ],
},

image-20250905153513257


  • Open the terminal in the workspace directory and compile the function package
xxxxxxxxxx
colcon build --packages-select learning_dds
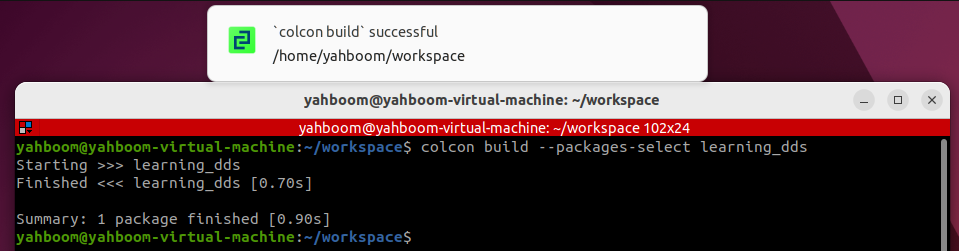
image-20250905153611086


  • Set environment variables. You need to set environment variables every time you recompile.
xxxxxxxxxx
source install/setup.bash
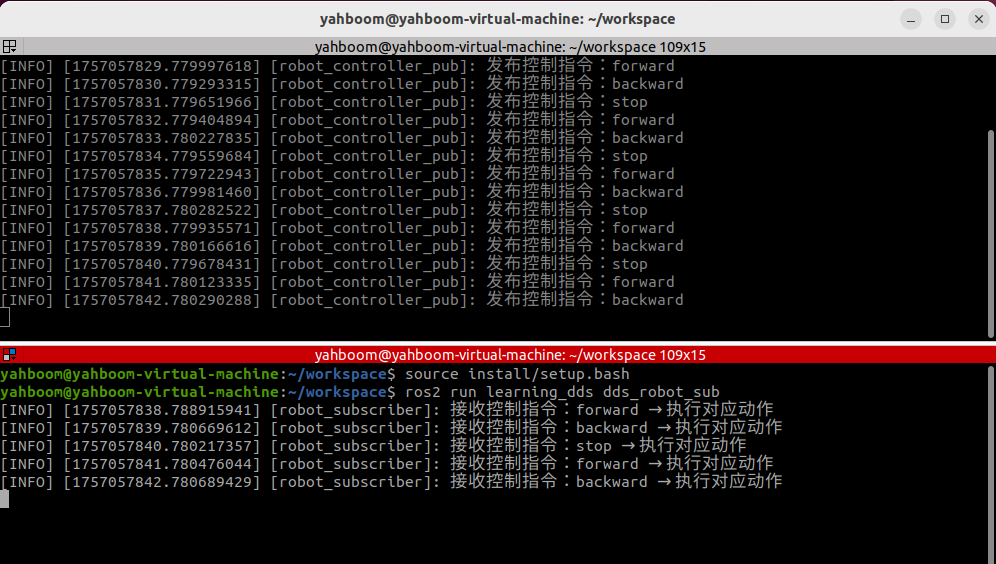
  • Running publisher and subscriber nodes
xxxxxxxxxx
ros2 run learning_dds dds_controller_pub
xxxxxxxxxx
ros2 run learning_dds dds_robot_sub

image-20250905153734043


Advanced Robot Development:

  • Typically, publishers and subscribers of topic communications should maintain the same QoS communication strategy to avoid potential communication layer issues.
  • QoS communication strategy settings should be selected based on the specific application scenario.
  • If the application scenario involves drone communication, encrypted communication, real-time communication, or other scenarios with special communication layer requirements, the official Fast-DDS manual is included in the tutorial introduction for a more detailed description of DDS features.
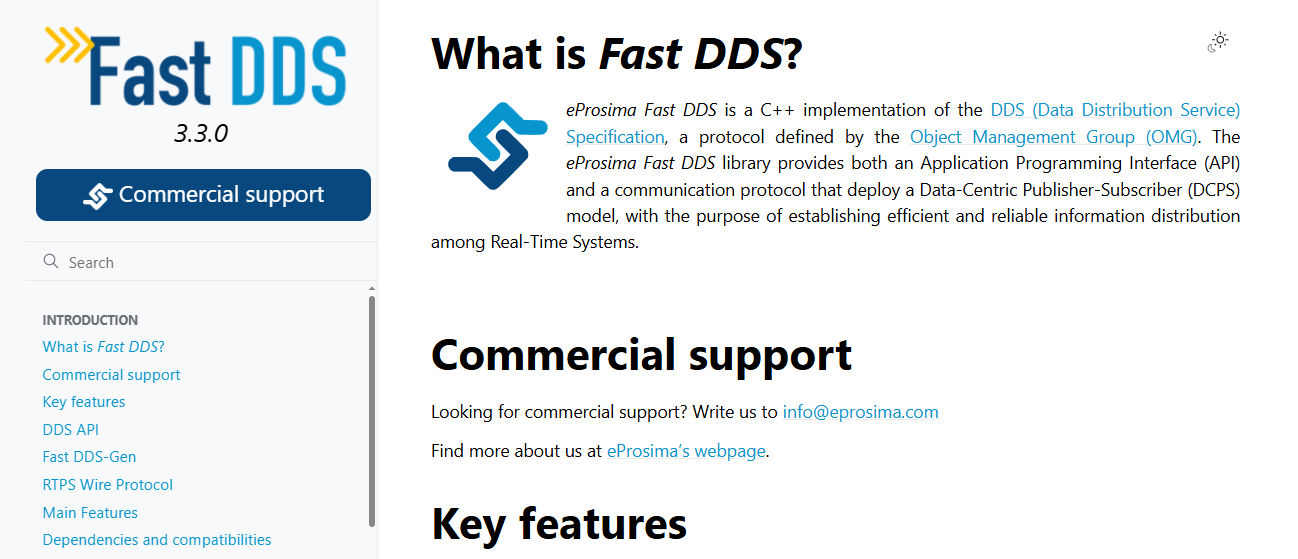
image-20250905155146210

ROS2 distributed communication
ROS2 time related API

COMPANY

  • About us
  • Team Style
  • Blog

LEARNING & EXPLORATION

  • Tutorials
  • Edge AI hardware
  • Educational robots
  • Embedded intelligent hardware

WHERE TO BUY

  • Yahboom Online Store
  • Amazon
  • Alibaba
  • AliExpress
  • Mercado

TECHNOLOGY SUPPORT

  • Email: support@yahboom.com

BE A DISTRIBUTOR

  • Email: sales@yahboom.com
QR Code

Copyright © 2017-2026 Yahboom. All Rights Reserved.

EN/中文