Welcome to ROSMASTER A1 PRO repository
8.Desktop Configuration Center and Remote Control Guide
Desktop Configuration Center and Remote Control Guide
0. Course Content and Tools Overview
Important
To facilitate developers and end users from the tedious work of modifying YAML configuration files, repeatedly executing colcon build compilation, and manually typing complex ROS 2 terminal commands, the system has two built-in modern lightweight graphical interaction tools. The two tools have independent responsibilities and work together:
🛠️
robot_config_app(Yahboom Robot System Comprehensive Configuration Center): Specialized in centralized configuration of system bottom layer and algorithm parameters. Includes bottom hardware peripheral selection, Ackerman chassis power limit and odometry calibration, robotic arm space grasping and monocular depth compensation, embodied vision positioning large model, OpenClaw gateway and Dify agent credential management.🎮
robot_joy_app(Yahboom Robot Remote Control System): Specialized in real-time robot motion and joint control. Provides joystick remote control and keyboard control dual-mode drive, built-in chassis driver intelligent anti-pull-up mechanism, thoroughly solving the underlying serial exclusive conflict problem.
Part 1: robot_config_app Comprehensive Configuration Center Detailed Guide
1.1 Tool Positioning and Application Scenarios
robot_config_app is the car's "Control Brain Central Settings Console". When you need:
Replace LiDAR model (Slamtec C1 / Ydlidar T-mini Plus) or camera type (USB 2D / Angstrong 3D);
Adjust ROS Domain ID to avoid multi-car communication interference on LAN, or enable CycloneDDS acceleration;
Limit chassis maximum traveling speed, or fine-tune odometry straight-line/turning accuracy;
Calibrate robotic arm grasping millimeter-level spatial physical offset when grabbing targets;
Configure embodied vision large model (Base URL, API Key, Model) and Dify / OpenClaw agent credentials;
One-click sync modifications to
srcsource andinstallrun image directories.
1.2 robot_config_app Startup Methods
You can start the system comprehensive configuration center in the following three ways:
Method A: Desktop Shortcut Direct Open (Most Intuitive)
On the robot system desktop, double-click the 【System Comprehensive Configuration Center】 icon to start directly.
Method B: Terminal Graphical Interface Startup (Recommended for Development and Debugging)
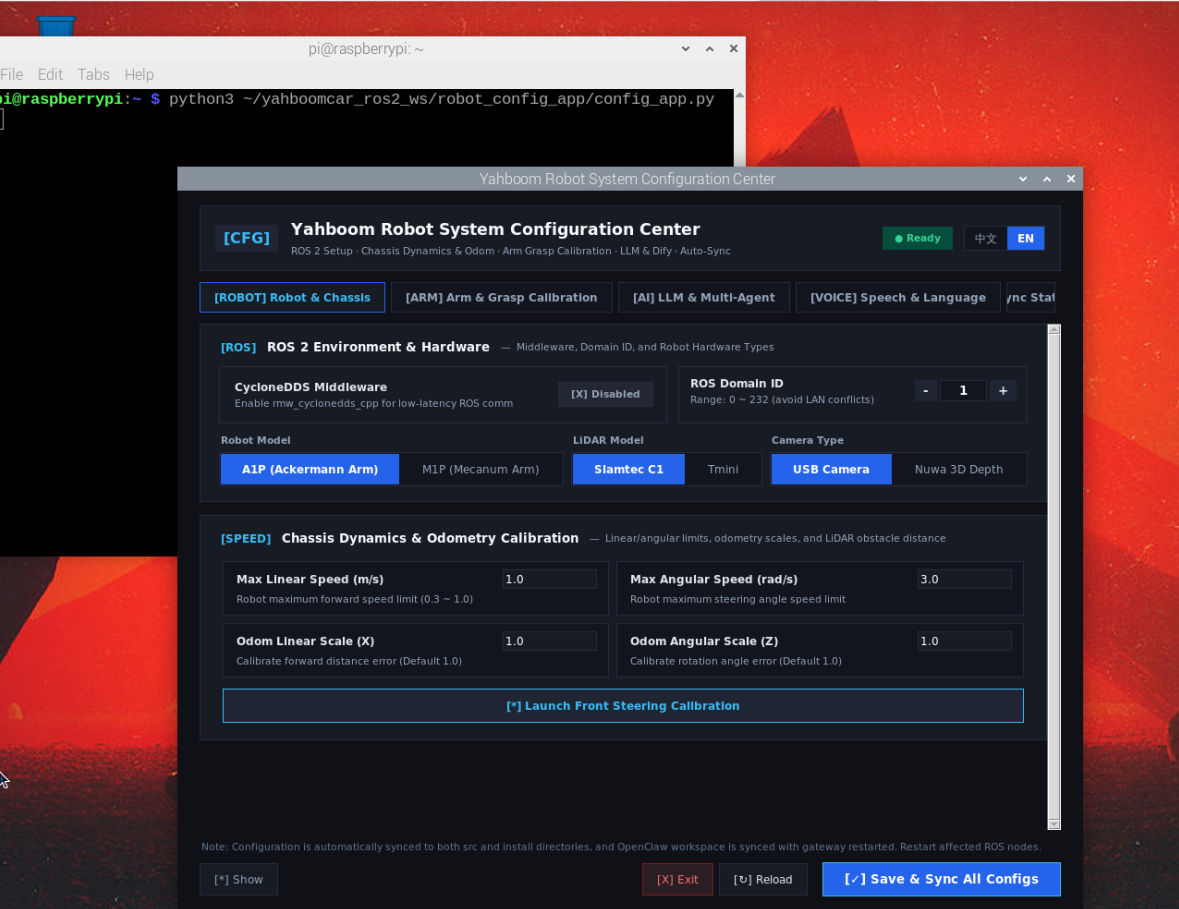
In the vehicle screen terminal or VNC desktop terminal, enter:
xxxxxxxxxxpython3 ~/yahboomcar_ros2_ws/robot_config_app/config_app.pyThe system will automatically pop up a modern dark GUI configuration main window:
Method C: Pure Terminal Command-Line Interaction Mode (Desktop-free, SSH Environment Dedicated)
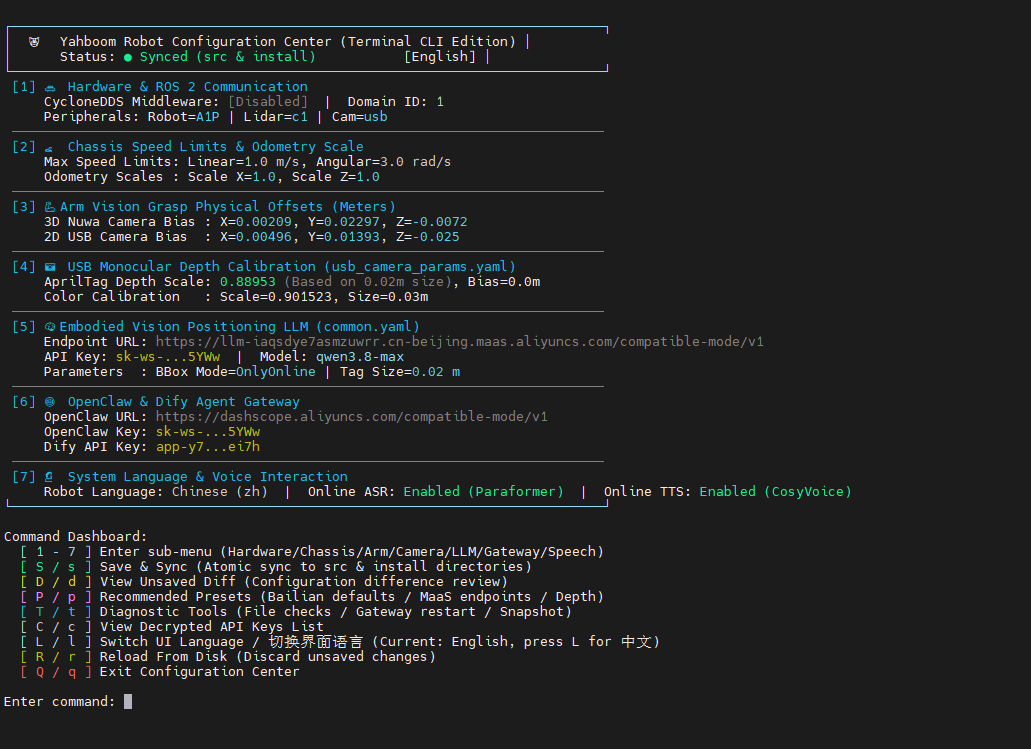
In a pure SSH terminal connection without monitor or graphical desktop, enter:
xxxxxxxxxxpython3 ~/yahboomcar_ros2_ws/robot_config_app/config_app.py --cli# Or directly execute python3 ~/yahboomcar_ros2_ws/robot_config_app/config_app.py (system will automatically detect no desktop and downgrade to terminal mode)The system will directly display a clean dashboard and digital modification menu in the terminal, supporting direct numeric input, modification and save without graphics:
Tip
If you only need to quickly view all current system parameter configurations, use the ultra-fast read-only command:
xxxxxxxxxxpython3 ~/yahboomcar_ros2_ws/robot_config_app/config_app.py --show1.3 robot_config_app Five Core Function Panel Details
The interface is divided into 5 major core tabs, each tab is for a dedicated scenario:
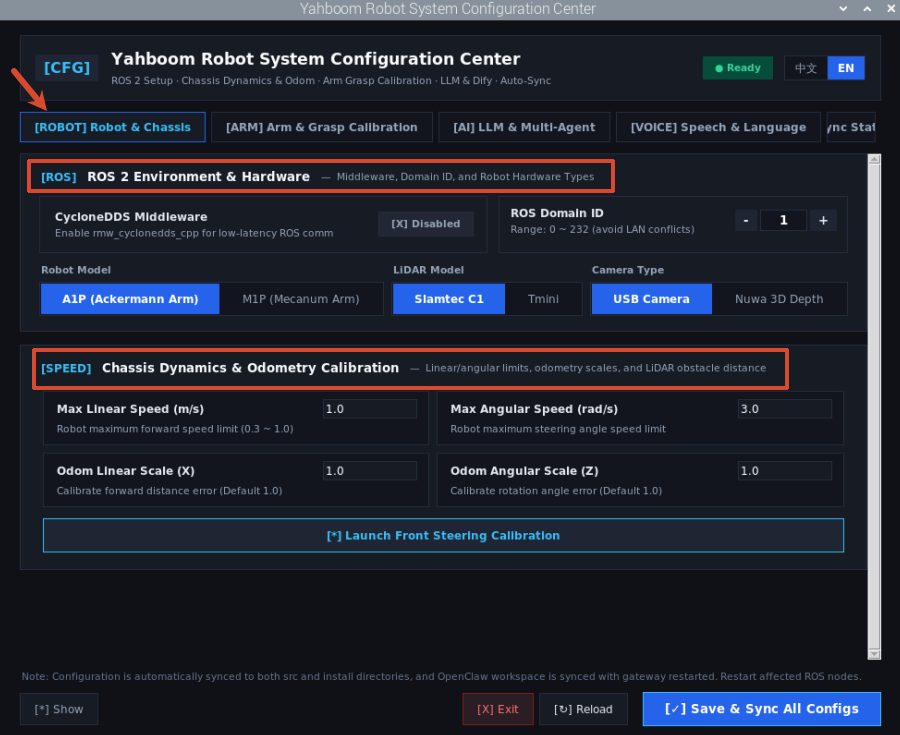
1.3.1 Tab 1: Robot Hardware and Chassis (Hardware & Chassis)
This page is responsible for underlying ROS 2 communication network and chassis motion dynamics parameter configuration:
ROS 2 Basic Environment and Peripheral Selection:
CycloneDDS Middleware Switch: When enabled, will enable
rmw_cyclonedds_cpp, which can significantly reduce ROS 2 communication latency and packet loss rate on Wi-Fi LAN.ROS Domain ID: Range is
0 ~ 232. When multiple cars are on the same Wi-Fi router, be sure to assign different Domain ID to each car, to prevent topics and nodes from interfering with each other.Vehicle Model Selection: Supports
A1P(Ackerman steering wheel robotic arm) andM1P(Mecanum wheel robotic arm) quick switch.LiDAR Model: Quickly switch
c1(Slamtec C1) andtmini(Ydlidar T-mini Plus).Camera Type: Quickly switch
usb(monocular USB 2D camera) andnuwa(Angstrong 3D depth camera).
After modification, saving will automatically write to the corresponding environment variables in
~/.bashrc.Chassis Power Limit and Odometry Calibration:
Maximum Linear Velocity (m/s): Limit chassis maximum straight-line speed (default 1.0 m/s, indoor beginner debugging recommended to set to 0.3 ~ 0.5 m/s to prevent collision).
Maximum Angular Velocity (rad/s): Limit steering servo maximum angular velocity (default 3.0 rad/s).
Odometry Linear Velocity Scaling Factor (
odom_linear_scale_x): When the car actually travels 1 meter but odometer shows deviation, compensate by this factor product (default 1.0).Odometry Angular Velocity Scaling Factor (
odom_angular_scale_z): Compensate when car in-place rotation or turning angle has deviation (default 1.0).【Start Front Wheel Servo Center Angle Calibration Tool】 Button: One-click call
calibrate_akm_angle.pyinteractive graphical program, calibrate Ackerman steering center and 1-meter straight-line yaw.
1.3.2 Tab 2: Robotic Arm and Grasping Calibration (Arm & Vision Calibration)
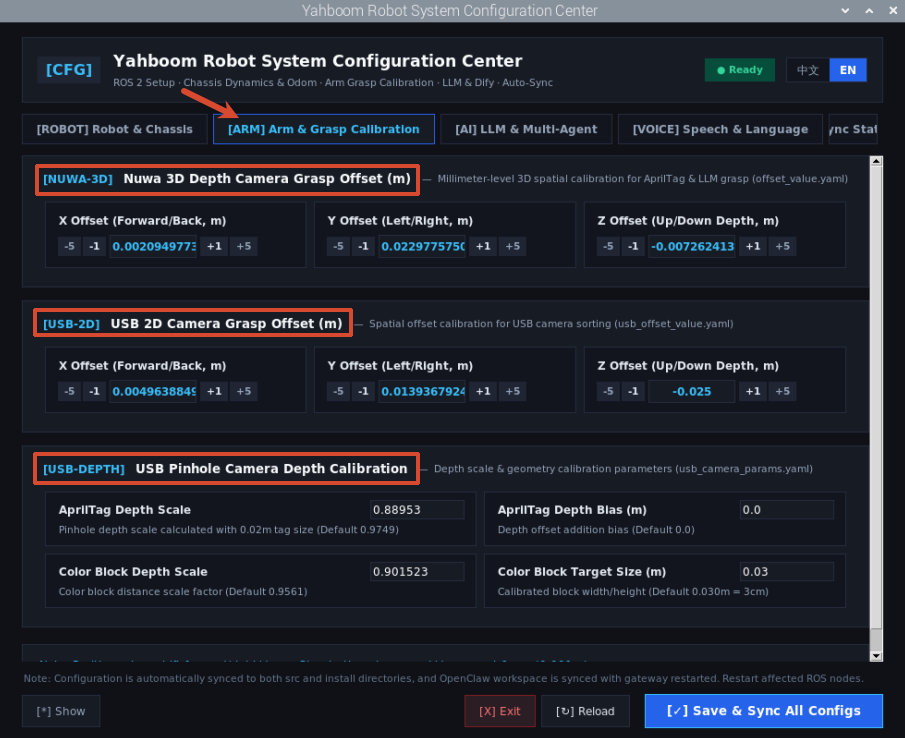
This page is specifically for solving robotic arm vision grasping spatial coordinate offset and monocular ranging error:
Angstrong 3D Depth Camera Vision Grasping Offset (
offset_value.yaml):Adjust X-axis (front-rear), Y-axis (left-right), Z-axis (up-down depth) grasping offset in 3D space.
Provide
-5,-1,+1,+5millimeter-level fine adjustment step buttons, each click can precisely step adjust 1mm (0.001m).
USB 2D Camera Vision Grasping Offset (
usb_offset_value.yaml):Used for USB 2D camera color block sorting and AprilTag label grasping end offset correction.
USB Monocular Camera Depth Estimation and Calibration Parameters (
usb_camera_params.yaml):AprilTag Depth Compensation Factor (
apriltag.depth_scale): QR code monocular ranging scaling factor (default0.9749).AprilTag Depth Bias (
apriltag.depth_bias): Monocular ranging fixed constant bias (default0.0meters).Color Block Depth Compensation Factor (
color.depth_scale): Color wooden block monocular ranging scaling factor (default0.9561).Color Block Reference Length/Width (
color.target_width): Calibrated color wooden block physical size (default0.03mi.e. 3cm).
Note
📐 depth_scale Calibration Principle
Monocular camera has no depth sensor, ranging relies on small hole imaging formula:
Measured distance = focal length × object actual size ÷ object pixel width
Focal length: Obtained from camera calibration (this camera is 558.96)
Object actual size: AprilTag calibration block side length is 2cm (0.02m) the size of the black border inside the machine code circle
Pixel width: How many pixels the recognized QR code occupies in the picture
Because wide-angle lens has distortion, the distance calculated by the formula will have deviation. For example, placing the calibration block at true distance 0.225m, the formula calculates 0.231m, biased larger, compensate with factor:
Calibration factor = 0.225 ÷ 0.231 ≈ 0.9749
Final ranging formula: True distance = measured distance × calibration factor + offset correction.
1.3.3 Tab 3: AI Large Model and Multi-Agent Gateway (AI & Multi-Agent)
Integrate high-level embodied decision model and knowledge base gateway into two clean core cards:
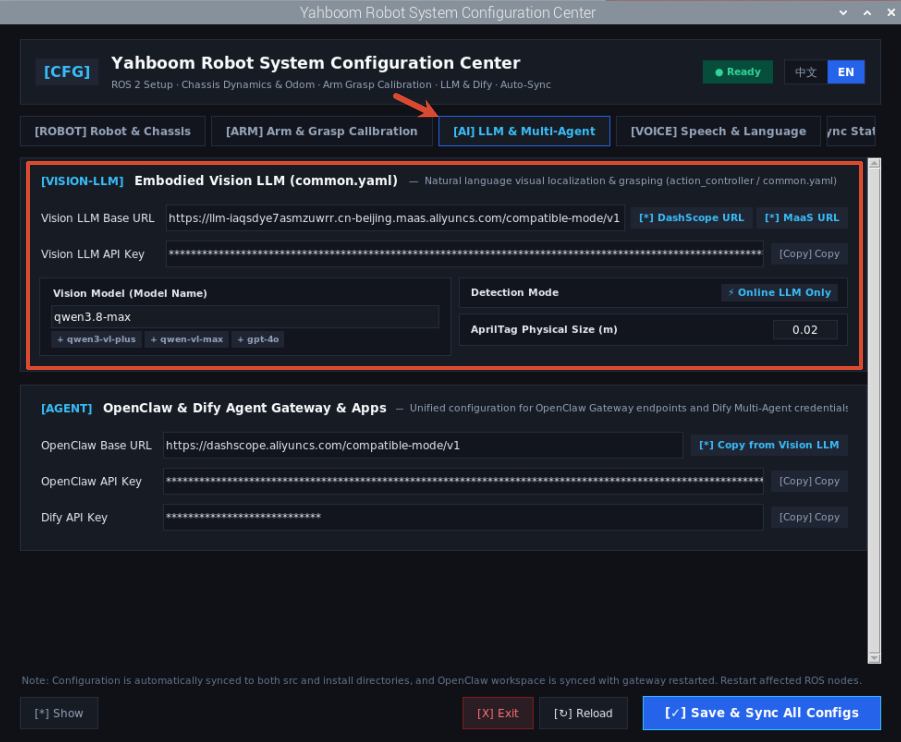
Card 1: Embodied Vision Positioning Large Model (common.yaml: mcp_service)
Specialized for natural language embodied robotic arm grasping positioning, natural object recognition and 3D bounding box inference:
Vision Positioning Base URL: OpenAI protocol compatible endpoint, click the
[*]button on the right to one-click fill 【Bailian Compatible Endpoint】 or 【Bailian MaaS Endpoint】;Vision Positioning API Key: Alibaba Cloud Bailian platform credential key (starts with
sk-), right side provides one-click copy and password mask toggle;Vision Model Name (Model): Supports any OpenAI protocol multimodal vision large model (click to quickly fill recommended
qwen3-vl-plus,qwen-vl-maxorgpt-4o);Target Detection Recognition Mode:
OnlyOnline(Online large model only): Large model directly end-to-end outputs spatial bounding box and labels;Hybrid(Offline + online hybrid): First local YOLO real-time detects candidate targets, then large model performs semantic verification;
AprilTag Actual Side Length (meters): Corresponding to factory calibrated square label physical side length default
0.02mthe size of the black border inside the machine code circle, USB camera subsequent letting large model grasp machine code will calculate depth based on this size.
Card 2: OpenClaw & Dify Agent Gateway Application
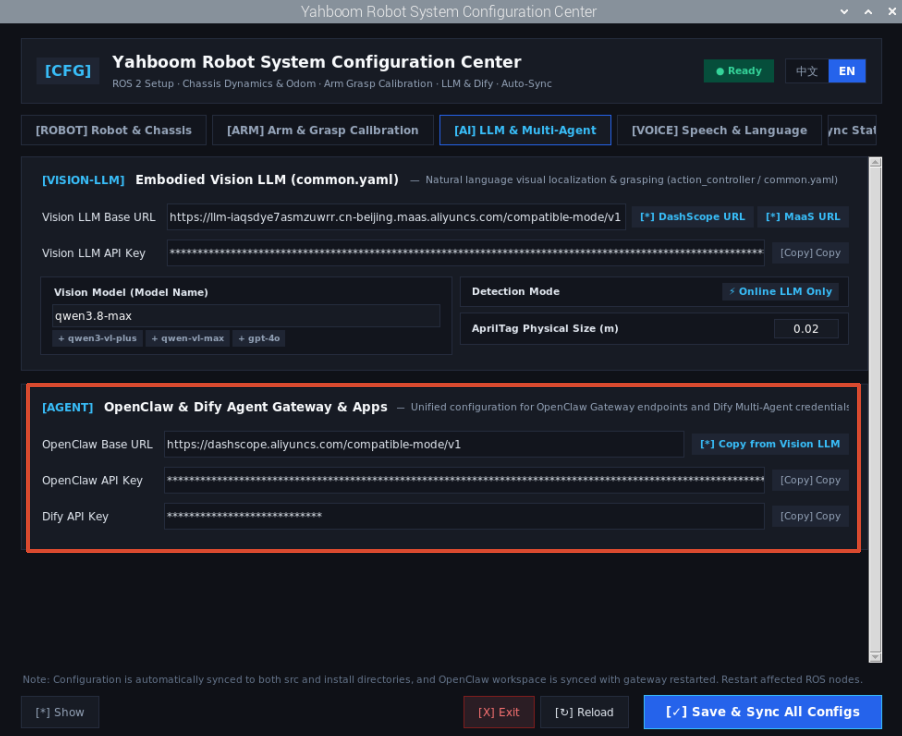
Unified management of high-level autonomous scheduling brain and knowledge base agent:
OpenClaw Base URL: Alibaba Cloud Bailian link (supports clicking【
[*] Same as Vision Model Configuration】to one-click clone);OpenClaw API Key: Alibaba Cloud Bailian obtained key;
Dify API Key: Corresponds to
multi_brains_setting.yamlmiddleDIFY_API_KEY, need to go to Dify backend to get the corresponding agent's application key.
1.3.4 Tab 4: Voice and Interaction Language (Speech & Language)
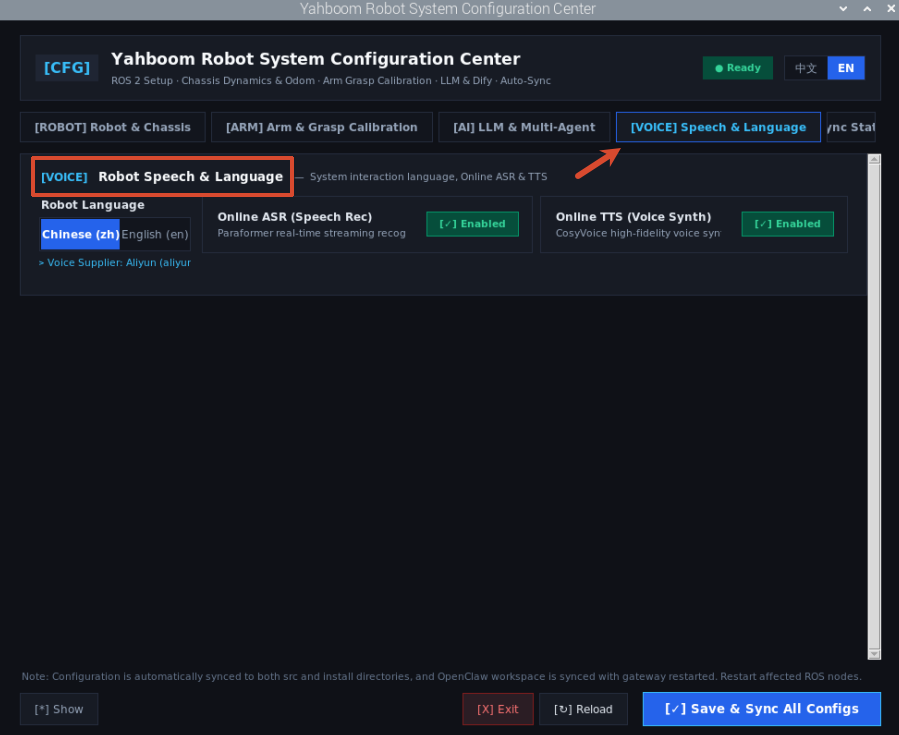
Configure the car's interactive voice recognition and synthesis engine:
System Interaction Language: Switch
Chinese (zh)orEnglish (en).When Chinese is selected, the system bottom automatically associates the service provider as Alibaba Cloud (aliyun), streaming ASR uses Alibaba Paraformer, TTS uses high-fidelity CosyVoice;
When English is selected, the system bottom automatically associates the service provider as iFlytek (xunfei).
Online ASR / Online TTS Switch: Can separately enable or disable online cloud transcription and voice broadcast functions.
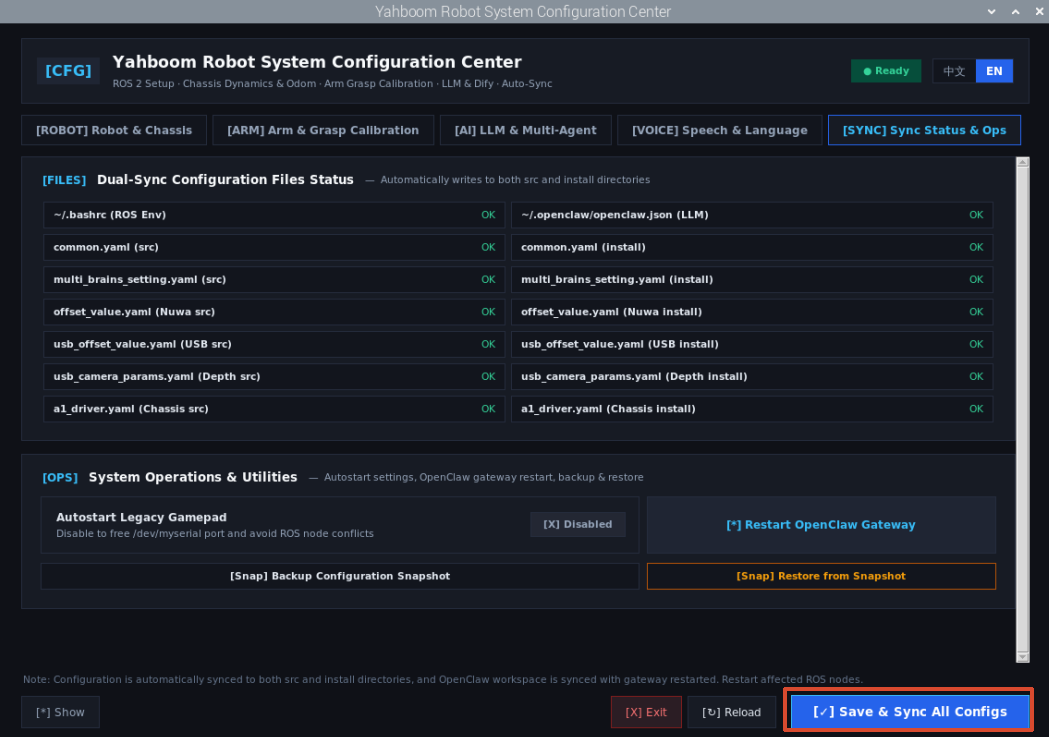
1.3.5 Tab 5: File Sync and System Operations (Diagnostics & Ops)
Configuration File Bidirectional Sync Status Monitoring:
Real-time monitoring of the existence status of the underlying 7 groups of core configuration files (display green
Normalor redNot Found).
Native Joystick Boot Auto-Start Switch:
Enable: After the car is powered on and boots up, automatically pull up joystick remote control service, control as you open it;
Disable: Do not load joystick service on boot, automatically release
/dev/myserialchassis serial port, convenient to directly run mapping, navigation, keyboard control and other ROS 2 custom nodes.
Operations Tool Box:
One-Click Restart OpenClaw Gateway: Seamlessly restart agent gateway process;
Backup Current Configuration Snapshot: Export all current interface configurations to
~/.yahboom_config_snapshot.json;Restore Configuration from Snapshot: If parameters were messed up during debugging, can one-click restore backup snapshot.
1.4 Core Guarantee of Save Mechanism: Dual-Sync Bidirectional Security Sync
Important
In ROS 2 system development, after conventionally modifying configuration files in src/ source directory, if colcon build is not executed, the configuration in the install/ run image directory will not be updated, often causing users to think the configuration has not taken effect.
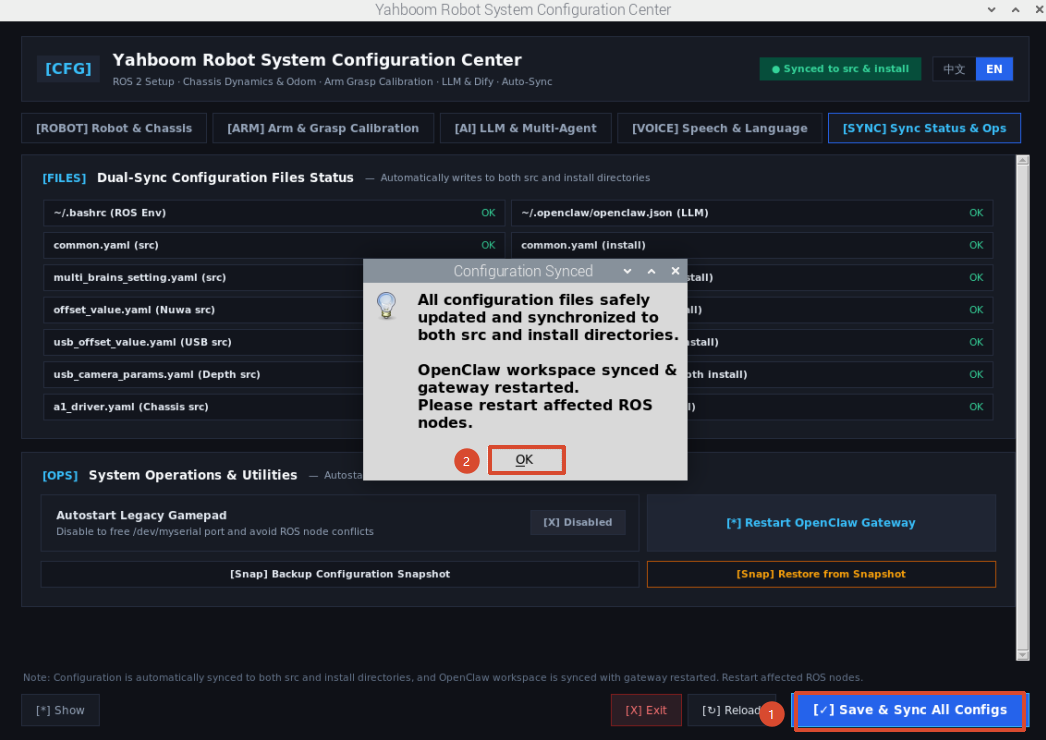
When clicking 【Save and Sync All Configurations】 at the bottom, this configuration center automatically adopts atomic bidirectional write mechanism:
Simultaneously write to
src/source file andinstall/run image file;Automatically sync OpenClaw corresponding language workspace;
Completely avoid the tedious process of interrupting the development flow to re-compile
colcon buildafter each parameter modification!
Part 2: robot_joy_app Robot Remote Control System Detailed Guide
2.1 Tool Positioning and Core Anti-Pull Mechanism
robot_joy_app is the car's "Real-Time Manipulation Interaction Console". Used for wireless joystick control without keyboard monitor, or for using keyboard on computer to quickly test chassis movement and robotic arm posture.
Warning
🛡️ Core Mechanism: Chassis Driver Intelligent Anti-Pull-Up (Ackman_driver_A1P)
The Ackerman car bottom motor and steering servo driver node communicates with the lower computer through serial device node /dev/myserial. This serial port has exclusive ownership under Linux.
If multiple ROS nodes simultaneously try to open /dev/myserial, the system will throw SerialException: Device or resource busy fatal error.
robot_joy_app internally implements a set of highly reliable intelligent process management logic:
When starting joystick control:
Automatically pull up chassis driver and joystick control node;
When starting keyboard control:
If chassis driver is already running (for example, previously started via joystick, or system background already has driver): The App will automatically detect driver process PID, only separately start keyboard control node, never pull up chassis driver again, thoroughly preventing serial conflict errors;
If chassis driver is not running: The App will first auto-start chassis driver in the background, wait for driver to be ready, then seamlessly start keyboard control terminal!
When clicking【Stop All Control】:
Safely and smoothly terminate joystick node and chassis driver process, release underlying serial port resources.
2.2 robot_joy_app Startup Methods
Method A: Desktop Shortcut Direct Open
On the robot system desktop, double-click the 【Robot Remote Control Center】 icon to start directly.
Method B: Terminal Graphical Interface Startup
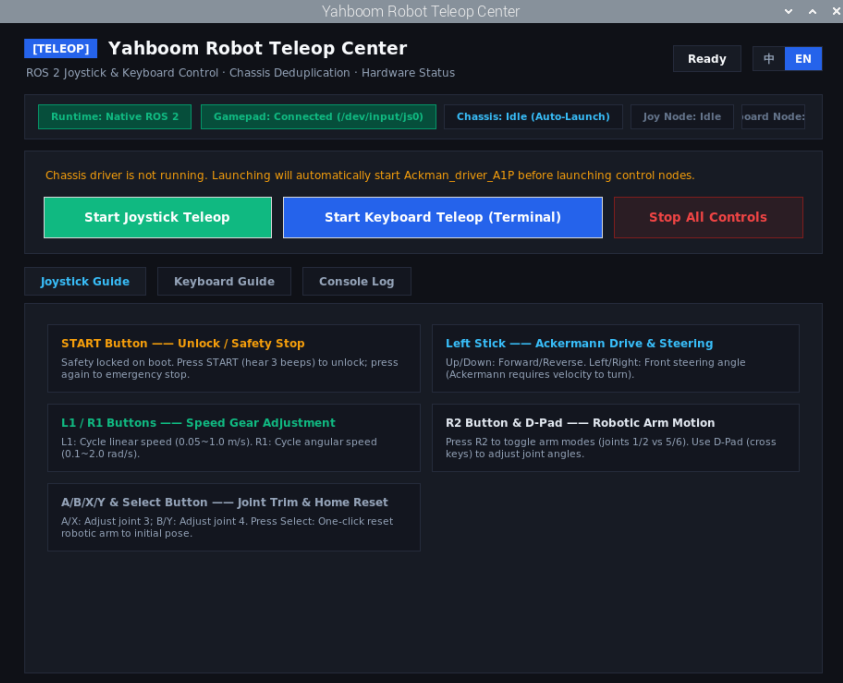
xxxxxxxxxxpython3 ~/yahboomcar_ros2_ws/robot_joy_app/joy_app.pyThe system will pop up a control window containing real-time hardware sensing capsules:
Method C: Pure Terminal Command-Line Interaction Mode (Desktop-free, SSH Environment Dedicated)
In an SSH command-line terminal without desktop, enter:
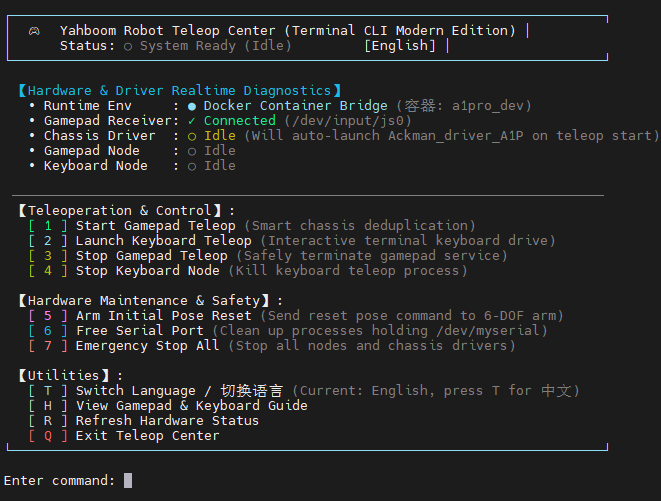
xxxxxxxxxxpython3 ~/yahboomcar_ros2_ws/robot_joy_app/joy_app.py --cli# Or directly execute python3 ~/yahboomcar_ros2_ws/robot_joy_app/joy_app.py (automatically downgrade to terminal mode)The system will output hardware sensing dashboard and numeric shortcut commands in the terminal, input 1 to start/stop joystick, input 3 to directly enter keyboard remote control in the current terminal foreground!
Tip
When you only need to quickly view the current joystick, chassis driver and keyboard PID running status, enter:
xxxxxxxxxxpython3 ~/yahboomcar_ros2_ws/robot_joy_app/joy_app.py --status2.3 Mode 1: Wireless Joystick Remote Control Practice
Hardware preparation:
Insert the USB wireless receiver attached to the joystick into any USB port on the car;
Turn on the joystick power switch, ensure the indicator light on the joystick is solidly lit (indicating successful pairing with the receiver).
Start control:
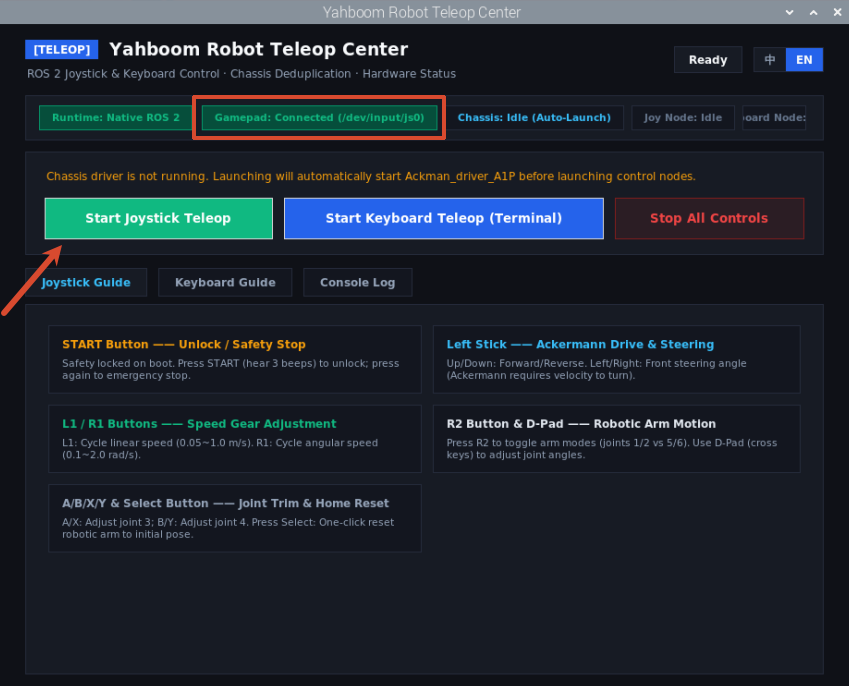
Click the 【Start Joystick Control】 button on the interface;
The top status capsule will turn green:
Chassis Driver: Running,Joystick Node: Running.
Key Function Mapping Quick Reference:
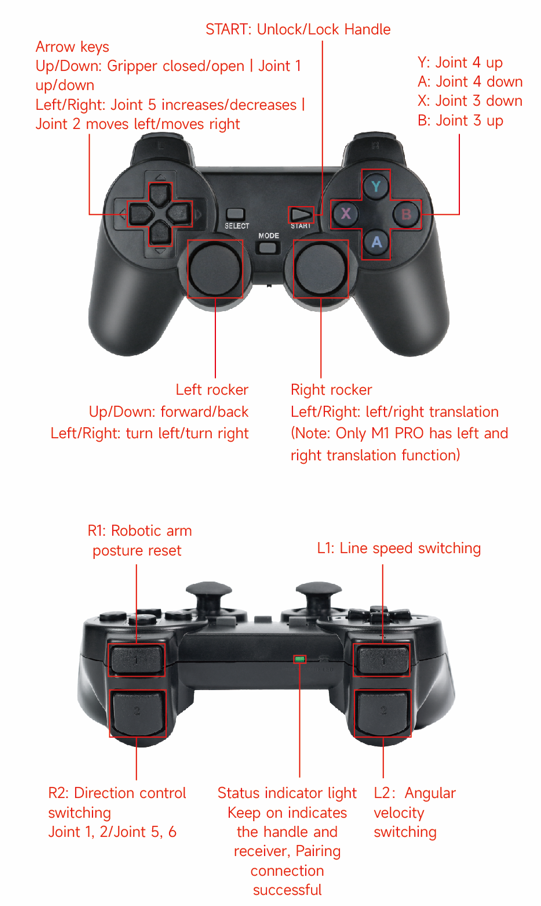
START key: Safety unlock / emergency stop lock. Boot anti-misoperation lock, press START key once to hear 3 beeps from the car's buzzer to unlock and take effect; press again for emergency stop lock.
Left rocker: Push/pull to control chassis forward and backward; push rocker left/right to control front wheel servo steering (Ackerman car does not support in-place rotation, needs initial speed).
L1 / L2 keys: Press L1 to cycle fine-tune linear velocity (0.05~1.0 m/s); press L2 to cycle fine-tune angular velocity.
R2 key: Press R2 to switch control mode (joints 1/2 or 5/6).
A/X/Y/B and Back keys: A/X adjust joint 3; Y/B adjust joint 4; key 7 (Back/Select) robotic arm one-click posture safe reset.
Directional pad: Control the two joints in current mode (such as 1/2 or 5/6 joints)
2.4 Mode 2: Keyboard Control Car Practice (Ultra-Fast Call)
For scenarios where joystick battery is dead or no joystick is at hand, keyboard control provides an excellent debugging channel.
Start control:
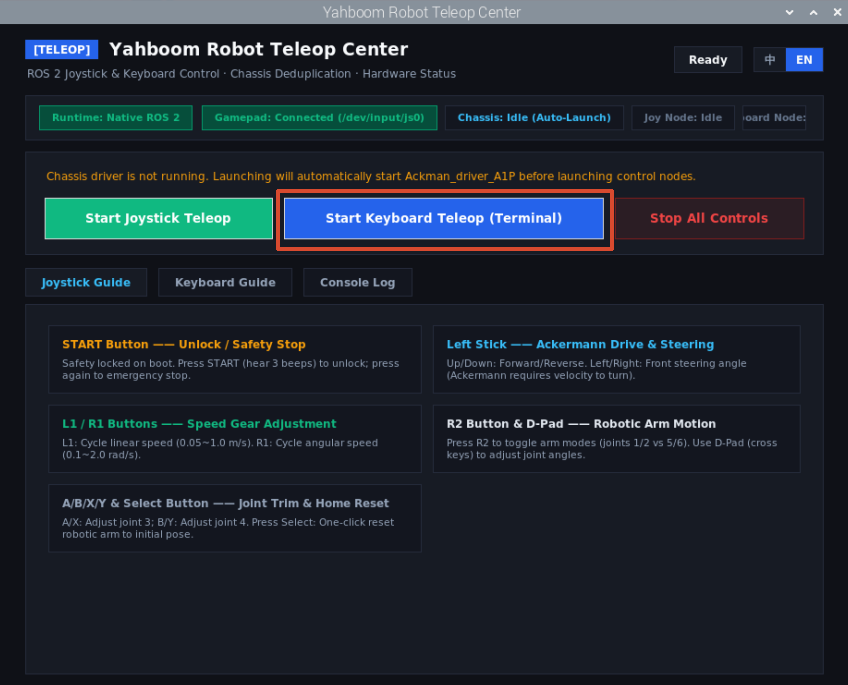
Click the 【Start Keyboard Control (Independent Terminal)】 button on the interface;
The App will automatically call the system's graphical terminal (such as
gnome-terminal/xfce4-terminal), pop up a dedicated keyboard key interaction window.
Key Control Mapping Table (Classic ROS Key Layout):
| Key | Function Description | Key | Function Description |
|---|---|---|---|
i | Forward (straight line) | k | Decelerate to stop (park) |
, | Backward (straight line) | Space | Emergency brake |
u | Accelerate left turn | o | Accelerate right turn |
q / z | Max linear velocity increase / decrease 10% | w / x | Linear velocity increase / decrease 10% only |
e / c | Max angular velocity increase / decrease 10% | r / v | Angular velocity increase / decrease 10% only |
1 ~ 6 | Select robotic arm joints 1 to 6 | a / d | Increase / decrease selected joint angle (±5°) |
0 | Robotic arm posture one-click reset | s | Temporarily stop control |
Exit keyboard control:
In the popped-up key terminal window, directly press keyboard combination key
Ctrl + Cto exit keyboard control, the car will automatically safety brake and stop.