Welcome to ROSMASTER A1 PRO repository
6.Block Volume Calculation (Depth Camera Only)
📦 3D Block Volume and Height Real-time Calculation (Block Volume Calculation)
1. Course Content
Combining the RGB image and aligned depth point cloud matrix from the Angstrong Nuwa-HP60C 3D Depth Camera, identify color blocks placed on the desktop (Square, Rectangle, Circle/Cylinder - identified as Cylinder in code), calculate their bottom area, 3D physical thickness (height), and estimate the physical volume of the object in real-time.
Important
This course is only applicable to users with the Angstrong Nuwa-HP60C Depth Camera version.
2. Preparation
2.1 Prepare Test Materials
Prepare standard wooden blocks (30mm×30mm×60mm cuboid or 30mm cube);
Place the color block steadily under the robotic arm camera's working area.
2.2 Start Camera and Volume Calculation Program
This case requires opening 2 terminals to start the system:
Terminal 1 (Start low-level driver and camera):
xxxxxxxxxxros2 launch dofbot_pro_driver A1pro_camera_arm.launch.pyTerminal 2 (Start volume calculation node):
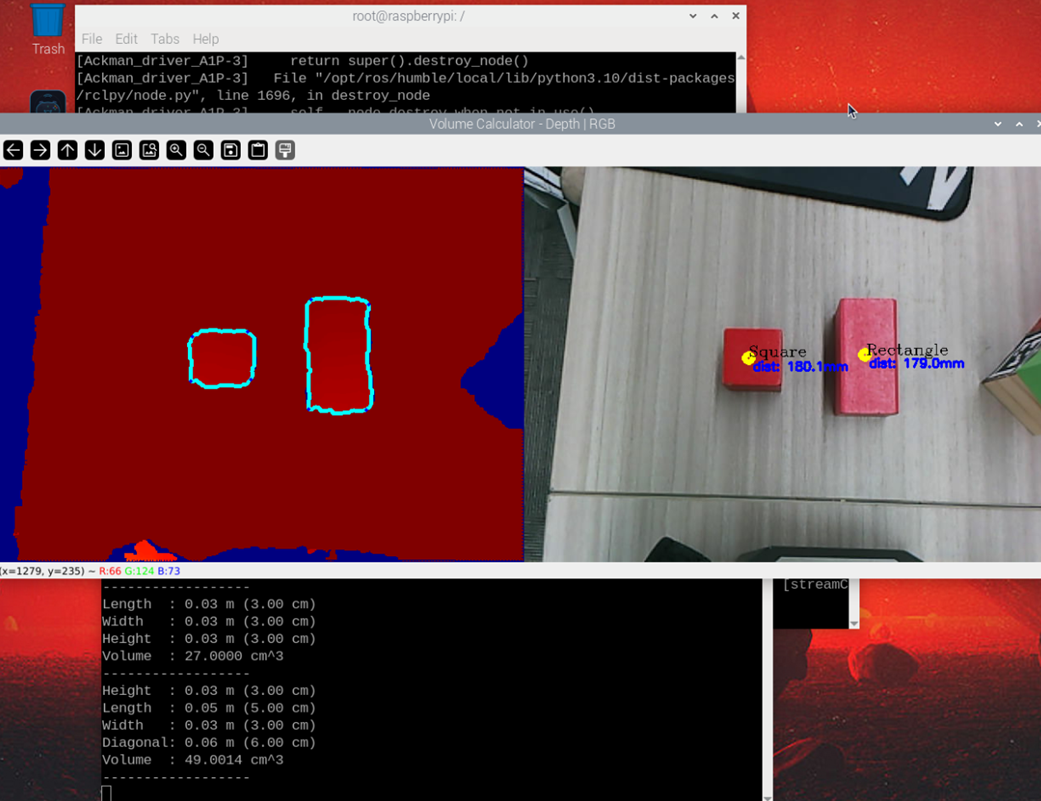
xxxxxxxxxxros2 run dofbot_pro_driver calculate_volumeAfter startup is complete, place a rectangular wooden block and a cube wooden block as flatly as possible directly below the camera (this ensures the depth information is as accurate as possible). Then click on the block in the image frame, and then press the spacebar. The program will calculate the coordinates of the center point and shape vertices in the world coordinate system based on the detected depth information and the robotic arm's posture. This value is generally represented as (x, y, z) in meters, indicating the distance from the base coordinate system arm_base_link (0, 0, 0). Combined with the detected block shape, the volume is calculated. As shown in the figure below, the detected block shape is rectangular, and the calculated volume of the cube is displayed in the terminal:
3. Core Source Code and Algorithm Principle
Source Code Path:
xxxxxxxxxxdofbot_pro_ws/src/dofbot_pro_driver/dofbot_pro_driver/calculate_volume.py
The program uses the spatial ranging capability of the depth camera, combined with forward kinematics of the robotic arm and geometric models, to achieve non-contact automated measurement of volume. The core process is divided into the following four steps:
3.1 Depth Image Segmentation and Contour Extraction
The program performs noise reduction and binary morphological processing on the 32-bit floating-point depth map through process_depth_image(), accurately separating the desktop and protruding object contours:
xxxxxxxxxx# calculate_volume.py —— Depth image edge contour extractiondef process_depth_image(self, depth_image):    # Map physical depth matrix to pseudo-color and grayscale image    depth_to_color = cv2.applyColorMap(        cv2.convertScaleAbs(depth_image, alpha=1.0), cv2.COLORMAP_JET)    gray_image = cv2.cvtColor(depth_to_color, cv2.COLOR_BGR2GRAY)        # Crop working field of view and filter environmental noise    # 50 is the grayscale threshold used to remove darker regions: grayscale range is 0~255, this sets pixels below 50 to black, keeping the rest. When doing subsequent binarization and contour detection, the cleared regions usually won't be treated as targets.
    # Increasing 50: filters more regions, may reduce interference but may also filter out objects.    # Decreasing 50: keeps more regions, but may increase noise and extra contours.    black_image = np.zeros_like(gray_image)    black_image[0:320, 0:640] = gray_image[0:320, 0:640]    black_image[black_image < 50] = 0        # Gaussian blur + threshold binarization + open/close operations    gauss_image = cv2.GaussianBlur(black_image, (3, 3), 1)    _, threshold_img = cv2.threshold(gauss_image, 0, 255, cv2.THRESH_BINARY)    erode_img = cv2.erode(threshold_img, np.ones((5, 5), np.uint8))    dilate_img = cv2.dilate(erode_img, np.ones((5, 5), np.uint8))        contours, _ = cv2.findContours(dilate_img, cv2.RETR_EXTERNAL, cv2.CHAIN_APPROX_NONE)    return contours, depth_to_color
3.2 Polygon Fitting and Geometric Shape Determination
The program uses cv2.approxPolyDP() to perform polygon approximation on detected external contours, and intelligently determines the geometric type of the object based on the number of vertex corners and side length ratios:
xxxxxxxxxx# calculate_volume.py —— Contour geometric classificationdef detect_shape(self, approx): corner_num = len(approx) if corner_num == 4: # Quadrilateral: calculate four side lengths side_lengths = [] for i in range(4): p1 = approx[i] p2 = approx[(i + 1) % 4] side_lengths.append(np.linalg.norm(p1 - p2)) side_lengths = np.array(side_lengths) # Check if adjacent sides are equal (tolerance 50 pixels) if np.allclose(side_lengths[1], side_lengths[0], atol=50): return "Square" # Square / cube else: return "Rectangle" # Rectangle / cuboid elif corner_num > 5: return "Cylinder" # Cylinder judged by more than 5 fitting points else: return "None"3.3 Pinhole Model Back Projection and Robot Arm Eye-in-Hand Coordinate Transformation
Using the camera's intrinsic matrix $(f_x, f_y, c_x, c_y)$, convert the image 2D pixel $(u, v)$ and ranging depth $Z$ to 3D point in camera coordinate system; then combined with the hand-eye calibration matrix END_TO_CAM_MAT and robotic arm end-effector pose matrix, calculate the real world coordinates and spatial physical height $h$ of the object in the base coordinate system:
xxxxxxxxxx# calculate_volume.py —— Pixel back projection and coordinate transformationdef pixel_to_camera_depth(self, pixel_coords, depth):    fx, fy = self.camera_info_K[0], self.camera_info_K[4]    cx, cy = self.camera_info_K[2], self.camera_info_K[5]    px, py = pixel_coords    x = (px - cx) * depth / fx    y = (py - cy) * depth / fy    z = depth    return np.array([x, y, z])
def compute_heigh(self, x, y, z):    # Calculate real physical spatial coordinates (X, Y, Z) in base coordinate system using robotic arm forward kinematics matrix    camera_location = self.pixel_to_camera_depth((x, y), z)    PoseEndMat = np.matmul(self.END_TO_CAM_MAT, self.xyz_euler_to_mat(camera_location, (0, 0, 0)))    EndPointMat = self.get_end_point_mat()    WorldPose = np.matmul(EndPointMat, PoseEndMat)    pose_T, _ = self.mat_to_xyz_euler(WorldPose)    return pose_T
3.4 3D Spatial Volume Mathematical Calculation
After obtaining the center 3D coordinate center_pose, edge vertex coordinate corner_pose, and spatial actual height, the program calculates the volume according to geometric formulas and converts to $\text{cm}^3$:
xxxxxxxxxx# calculate_volume.py —— calculate_volume core functiondef calculate_volume(self, shape_type, height, center_pose, corner_pose=None): if shape_type == "Square": # Cube: V = h^3 volume = (height ** 3) * 100000 elif shape_type == "Rectangle" and corner_pose is not None: # Cuboid: Use center point and corner point distance to solve diagonal length of bottom face, derive bottom area diagonal = math.sqrt((center_pose[1] - corner_pose[1]) ** 2 + (center_pose[0] - corner_pose[0]) ** 2) * 2 height_val = corner_pose[2] volume = (height_val ** 2) * math.sqrt(diagonal ** 2 - height_val ** 2) * 100000 elif shape_type == "Cylinder" and corner_pose is not None: # Cylinder: Use center to edge distance to calculate radius r, V = π * r^2 * h radius = math.sqrt((center_pose[1] - corner_pose[1]) ** 2 + (center_pose[0] - corner_pose[0]) ** 2) height_val = corner_pose[2] volume = height_val * (radius ** 2) * math.pi * 100000 return round(volume, 1) # Return volume value with one decimal place (cm³)