Welcome to ROSMASTER A1 PRO repository
6.Cartesian Path
Cartesian Path
1. Content Description
This course introduces how to implement Cartesian path planning of the robot arm in MoveIt2.
Conventional joint-space trajectory planning usually only guarantees the poses of the start and end points, and the trajectory of the robot arm's end effector during motion is typically a curve or an arc; however, in industrial tasks such as welding, cutting, glue application, and straight-line pick-and-place, the end effector is often required to strictly move along a 3D straight-line trajectory.
MoveIt provides a Cartesian path planning service that allows us to specify a series of spatial waypoints. The algorithm automatically performs continuous inverse-solution interpolation along the end-effector straight line in tiny steps, generating a smooth linear motion trajectory.
2. Launch and Operation Steps
2.1 Launching the MoveIt2 Simulation Environment
Enter the following command in the terminal to launch the MoveIt2 simulation environment:
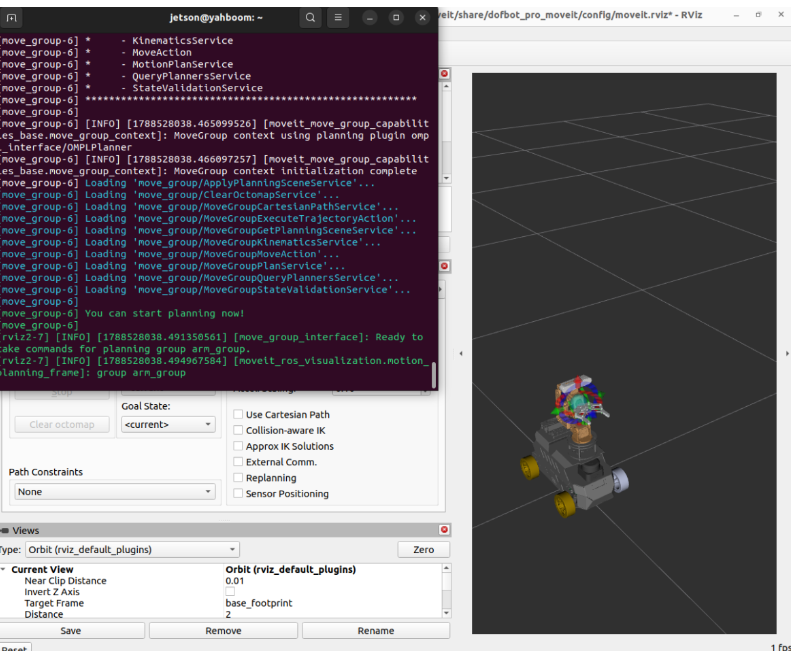
xxxxxxxxxxros2 launch dofbot_pro_moveit demo_3d.launch.pyOnce the program starts, when You can start planning now! is output in the terminal, it means the MoveIt2 planning node is ready, as shown in the figure below:
2.2 Starting Real-Machine Linkage (Optional)
If you want the simulated robot arm motion to synchronously control the real physical robot arm, open another terminal and run the driver conversion node:
xxxxxxxxxxros2 run movelt_demo SimulationToMachine(It is recommended not to start this node during the initial test. First verify that the obstacle-avoidance trajectory is correct in the pure RViz simulation environment before connecting to the real machine).
2.3 Configuring the Trajectory Visualization Plugin in RViz
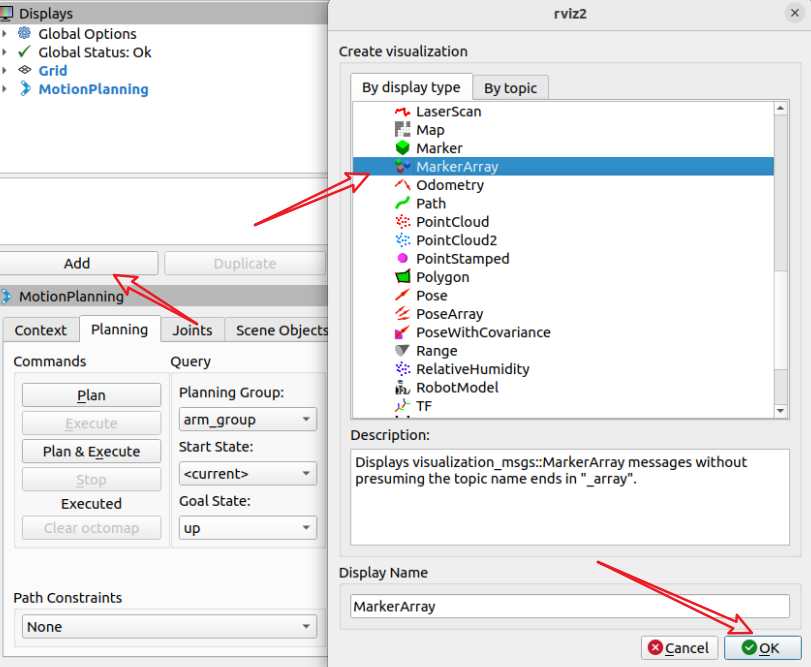
In order to intuitively see the green spatial straight-line trajectory planned for the robot arm's end effector in RViz, we need to add a MarkerArray display item:
Click the 【Add】 button in the lower left corner of RViz, find and select 【MarkerArray】 in the list, and click 【OK】 to add it, as shown in the figure below:
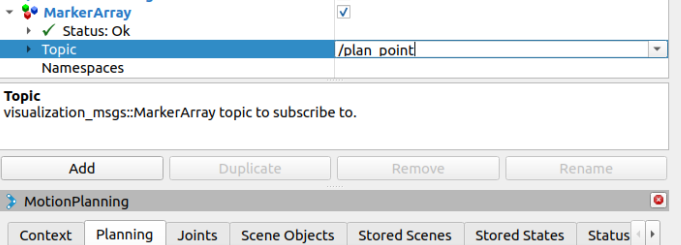
Expand the just-added 【MarkerArray】 in the Displays list, and change the subscribed Topic to
/plan_point, as shown in the figure below:
2.4 Running the Cartesian Path Planning Program
Open a new terminal and enter the following command to run the Cartesian path planning script:
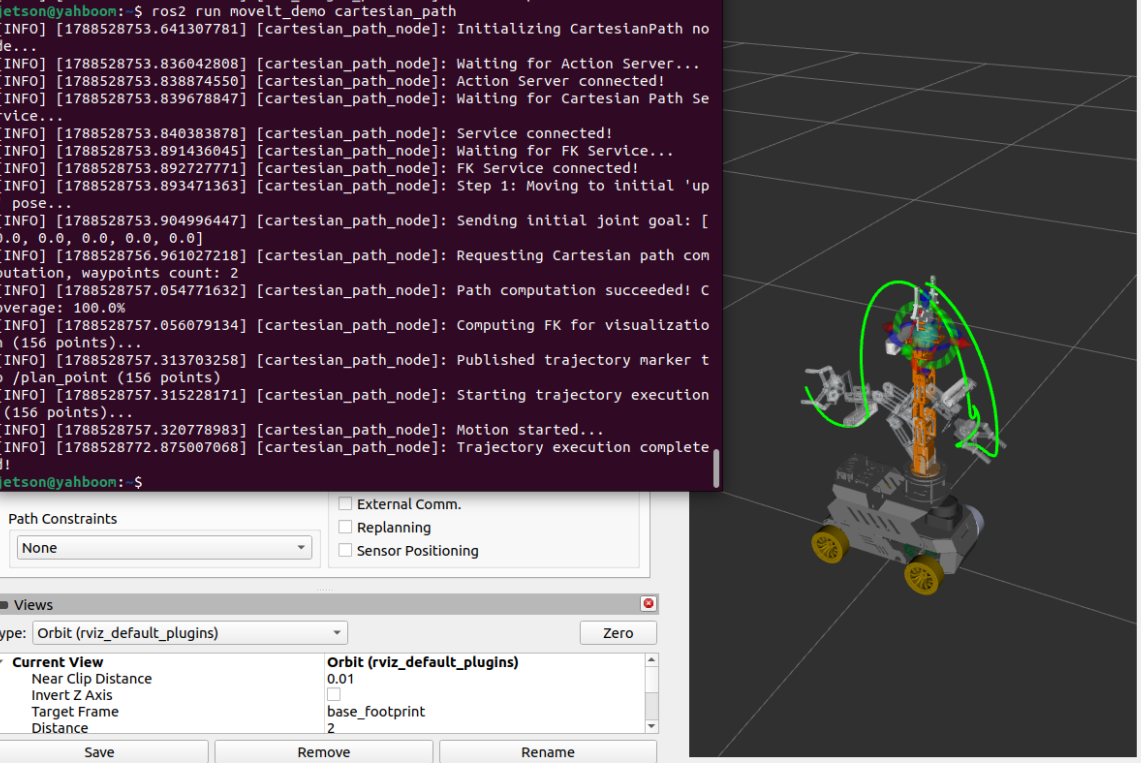
xxxxxxxxxxros2 run movelt_demo cartesian_pathAfter running, the robot arm first automatically moves to the initial vertical pose, then starts to compute the Cartesian straight-line trajectory between the two groups of spatial waypoints, and draws a bright green 3D path line (Line Strip) in RViz. The end effector strictly moves smoothly along the straight line, as shown in the figure below:
3. Core Code Analysis
Program source code path:
~/yahboomcar_ros2_ws/dofbot_pro_ws/src/movelt_demo/movelt_demo/cartesian_path.py
3.1 Node Initialization and Interface Definition
The program is natively developed in ROS 2 Python. The node class CartesianPath inherits from rclpy.node.Node and defines four core communication clients:
FollowJointTrajectoryAction client: Sends trajectories to the/arm_group_controller/follow_joint_trajectoryaction server for execution;GetCartesianPathservice client: Calls MoveIt's/compute_cartesian_pathservice to compute the Cartesian linear trajectory;GetPositionFKservice client: Calls the/compute_fkservice to perform forward kinematics computation on the trajectory points, inversely deriving the end-effector 3D Cartesian coordinates;MarkerArraypublisher: Publishes visualization line segment messages to the topic/plan_pointfor RViz rendering.
xxxxxxxxxximport rclpyfrom rclpy.node import Nodefrom rclpy.action import ActionClientfrom control_msgs.action import FollowJointTrajectoryfrom trajectory_msgs.msg import JointTrajectory, JointTrajectoryPointfrom builtin_interfaces.msg import Durationfrom geometry_msgs.msg import Pose, Pointfrom moveit_msgs.srv import GetCartesianPath, GetPositionFKfrom visualization_msgs.msg import Marker, MarkerArrayfrom std_msgs.msg import ColorRGBA
class CartesianPath(Node):    def __init__(self):        super().__init__('cartesian_path_node')        self.get_logger().info("Initializing CartesianPath node...")                # 1. Trajectory execution Action client        self._action_client = ActionClient(            self,             FollowJointTrajectory,             '/arm_group_controller/follow_joint_trajectory'        )                # 2. Cartesian path planning service client        self._cartesian_client = self.create_client(GetCartesianPath, '/compute_cartesian_path')                # 3. The 5 robot arm joint names        self.joint_names = [            "arm1_Joint", "arm2_Joint", "arm3_Joint",             "arm4_Joint", "arm5_Joint"        ]                # 4. MarkerArray visualization publisher        self._marker_pub = self.create_publisher(MarkerArray, '/plan_point', 1)
        # 5. Forward kinematics (FK) service client: used to compute the spatial trajectory point positions        self._fk_client = self.create_client(GetPositionFK, '/compute_fk')
3.2 Cartesian Path Solving Mechanism
In the compute_cartesian_path function, we construct a GetCartesianPath.Request() request:
group_name = "arm_group": Specifies the planning group as the 5-DOF arm;link_name = "Gripping": Specifies the end-effector constraint tool link as the gripper;waypoints: Passes in the target waypoint list;max_step = 0.01: The maximum step size for end-effector interpolation is 1 centimeter (0.01 meters). The smaller the step size, the higher the precision of the straight-line trajectory;jump_threshold = 0.0: Joint sudden-change jump threshold; setting it to 0.0 disables the sudden-change check.
xxxxxxxxxx def compute_cartesian_path(self, waypoints): """Call the /compute_cartesian_path service to compute the Cartesian trajectory""" request = GetCartesianPath.Request() request.header.frame_id = "base_link" request.header.stamp = self.get_clock().now().to_msg() request.group_name = "arm_group" request.link_name = "Gripping" request.waypoints = waypoints request.max_step = 0.01 # Interpolation micro step size: 1cm request.jump_threshold = 0.0 # Disable the jump threshold request.avoid_collisions = False request.start_state.joint_state.name = self.joint_names request.start_state.joint_state.position = [0.0] * 5 future = self._cartesian_client.call_async(request) rclpy.spin_until_future_complete(self, future) response = future.result() if response.error_code.val == response.error_code.SUCCESS: fraction = response.fraction self.get_logger().info(f"Cartesian path computed successfully, planning completion rate: {fraction*100:.1f}%") return response.solution else: self.get_logger().error(f"Cartesian path planning failed, error code: {response.error_code.val}") return NoneNote:
response.fractionrepresents the proportion of the path successfully solved by the planning algorithm (0.0 ~ 1.0). When the completion rate is 1.0 (100%), it indicates that the entire straight line lies within the reachable workspace of the robot arm, with no singularities or joint limit constraints encountered.
3.3 Trajectory Forward Kinematics (FK) and Green Line Visualization in RViz
The computed response.solution is a series of trajectory points containing the rotation angles of each joint. In order to present the spatial trajectory actually traversed by the end effector as a line in RViz, the program performs forward kinematics on each trajectory point through the /compute_fk service to obtain the spatial coordinates $(x, y, z)$ of the end effector Gripping, and organizes them into a Marker.LINE_STRIP:
xxxxxxxxxx    def publish_trajectory_line(self, trajectory):        """Compute the end-effector 3D point set through forward kinematics (FK) and publish a MarkerArray green line"""        joint_traj = trajectory.joint_trajectory        cartesian_points = []                for pt in joint_traj.points:            fk_request = GetPositionFK.Request()            fk_request.header.frame_id = "base_link"            fk_request.fk_link_names = ["Gripping"]            fk_request.robot_state.joint_state.name = joint_traj.joint_names            fk_request.robot_state.joint_state.position = list(pt.positions)                        future = self._fk_client.call_async(fk_request)            rclpy.spin_until_future_complete(self, future)            response = future.result()                        if response.error_code.val == response.error_code.SUCCESS:                pos = response.pose_stamped[0].pose.position                cartesian_points.append(Point(x=pos.x, y=pos.y, z=pos.z))
        # Build the MarkerArray        marker_array = MarkerArray()        marker = Marker()        marker.header.frame_id = "base_link"        marker.type = Marker.LINE_STRIP        marker.action = Marker.ADD        marker.scale.x = 0.005  # Line thickness 5mm        marker.color = ColorRGBA(r=0.0, g=1.0, b=0.0, a=1.0)  # Pure green        marker.points = cartesian_points        marker.lifetime = Duration(sec=30, nanosec=0)        marker_array.markers.append(marker)                self._marker_pub.publish(marker_array)
3.4 Full Task Flow Execution (run Method)
In the main flow, first return to the initial pose, then define two point poses (keeping the orientation unchanged, only modifying the spatial $x, y, z$ coordinates), solve and execute:
x def run(self): # 1. Move to the initial homing pose self.move_to_joints([0.0]*5, move_time=3.0)
# 2. Define the Cartesian waypoints waypoints = [] safe_orientation = {'x': 0.0, 'y': -0.70711, 'z': 0.0, 'w': 0.70711}
# Waypoint 1 p1 = Pose() p1.position.x, p1.position.y, p1.position.z = 0.111475, -0.003986, 0.381269 p1.orientation.x, p1.orientation.y, p1.orientation.z, p1.orientation.w = 0.0, -0.70711, 0.0, 0.70711 waypoints.append(p1)
# Waypoint 2 p2 = Pose() p2.position.x, p2.position.y, p2.position.z = -0.10527, 0.002169, 0.385409 p2.orientation.x, p2.orientation.y, p2.orientation.z, p2.orientation.w = 0.0, -0.70711, 0.0, 0.70711 waypoints.append(p2)
# 3. Solve the Cartesian path trajectory = self.compute_cartesian_path(waypoints) # 4. Visualize and send for execution if trajectory: self.publish_trajectory_line(trajectory) self.execute_trajectory(trajectory)