Welcome to ROSMASTER A1 PRO repository
3.Embodied Intelligent Robot System Architecture
Multi-Agent Embodied Architecture
Multi-Agent Embodied Architecture1. Course Content2. Introduction to multi_brains3. Multi-Layer Reasoning Architecture3.1 Advantages of Layered Reasoning3.1.1 Decoupling of Task Decision and Action Conversion3.1.2 Improving the Success Rate of Long-Flow Tasks3.2 Decision-Layer AI3.3 Execution-Layer AI3.4 Frame-Selection-Layer AI4 . Task Cycle5. Historical Context6. Map Mapping7. Action Function Library7.1 Common Basic Action Functions for Both Versions (Shared by USB and Nuwa)7.2 USB Camera Exclusive Action Functions (action_service_usb.py)7.3 Nuwa Depth Camera Exclusive Action Functions (action_service_nuwa.py)7.4 Technical Difference Comparison of the Two Camera Solutions
1. Course Content
Understand the multi_brains multi-agent embodied framework.
2. Introduction to multi_brains
multi_brains is an embodied intelligence framework developed in-house by Yahboom Intelligent that is compatible with general-purpose AI large models. It avoids the issues of VLA models and end-to-end models, which require dedicated hardware, local computing power support, and long data collection and training time. By merely integrating the general-purpose AI models of cloud model providers, the edge robot can gain powerful embodied intelligence capabilities.
multi_brains expands training samples through the RAG knowledge base, allowing the robot to quickly adapt to different scenario tasks. It can be deployed on the vast majority of small-scale host devices, placing the massive model inference in the cloud or on a local server.
The core philosophy of multi_brains is to decouple the different stages of a task through multiple AI models in a layered manner. The current package uses terminal text interaction as the default entry point:
terminal_client.pypublishes user text, andllm_agent_node.pycompletes Dify calls, action execution, and the feedback closed loop. Its main improvements are:A more stable text debugging entry point that does not rely on microphones, wake words, or ASR/TTS services, making it suitable for development, teaching, and experiment reproduction.
A more flexible decision-making mechanism with task routing added, enabling the AI agent to autonomously choose between multi-layer reasoning and simplified reasoning based on task difficulty, giving the AI higher autonomy and a better user experience.
An easily understandable visualized architecture flow. multi_brains builds visualized agents through Dify, and the data flow of the AI agent during operation can be observed in real time during debugging, allowing users to intuitively understand the specific process of multi-layer reasoning.
A fully localized RAG knowledge base, with no need to worry about sensitive data issues.
Seamless integration with most AI models worldwide. Through Dify's model supplier plugins, hundreds of AI models worldwide can be quickly and seamlessly integrated (if you need locally deployed models, local models can also be integrated).
Traceable historical records. By querying Dify's backend access history, users can query all the execution steps and history of every task instruction.
Terminal-traceable interaction process.
terminal_client.pydisplays progress, final replies, and executed actions, making it easy to determine whether Dify decisions and robot actions are consistent.A complete testing toolbox for quickly verifying core functional modules.
Simpler onboarding steps, with most operation steps streamlined and shortcut commands configured.
3. Multi-Layer Reasoning Architecture
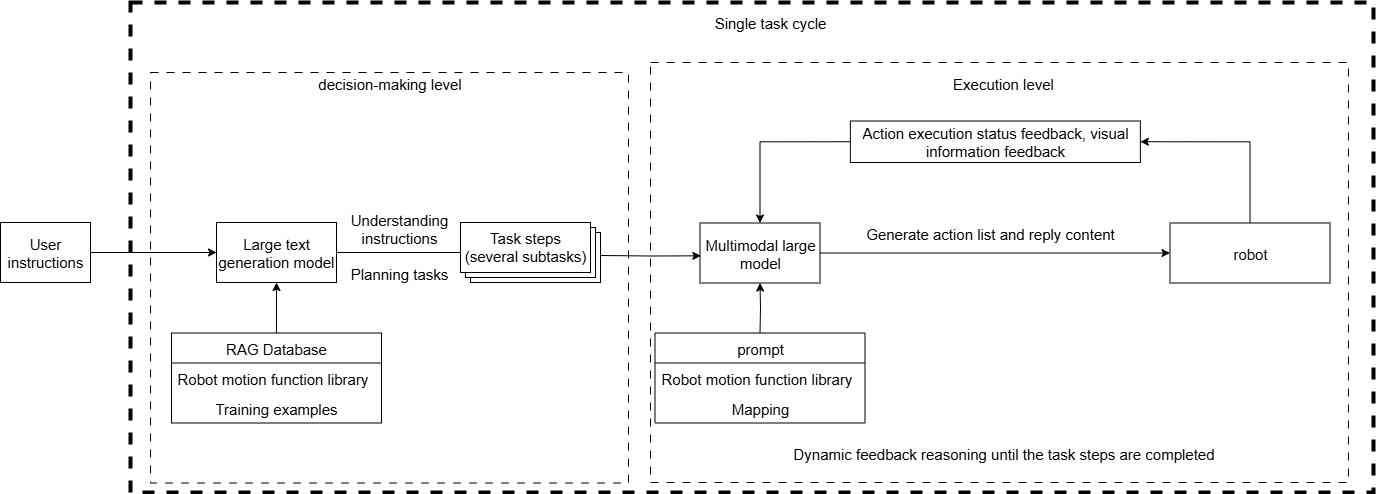
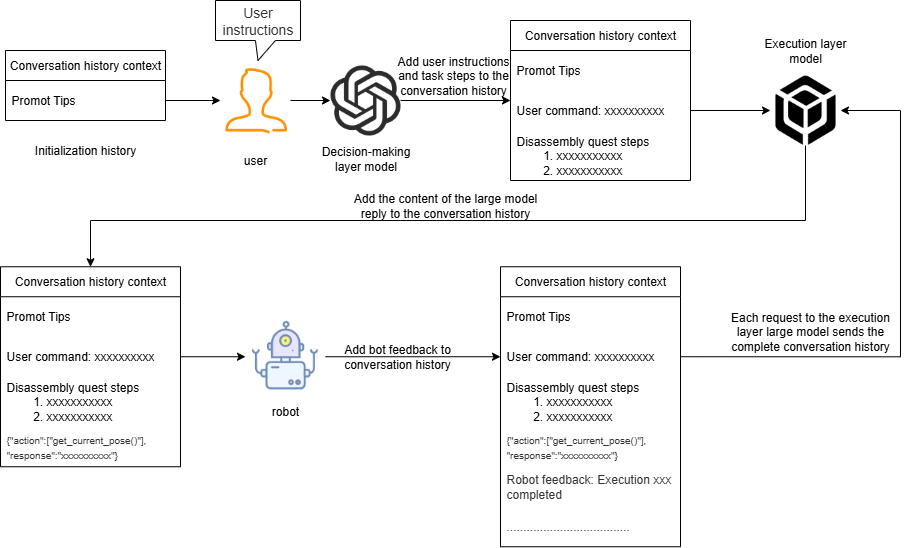
The current workflow is mainly composed of a decision layer and an execution layer, with a frame-selection layer newly added to visual tracking tasks. Ordinary actions still run through the "decision layer -> execution layer -> ROS action feedback" closed loop; when a task requires tracking a visual target in the frame, a "frame-selection layer -> execution layer starts tracking" visual branch is added.
The design of layered reasoning and dynamic feedback reasoning provides stronger system robustness than a single-model architecture.
3.1 Advantages of Layered Reasoning
3.1.1 Decoupling of Task Decision and Action Conversion
The decision-layer AI focuses on thinking, planning, and decomposing task instructions.
The execution-layer AI focuses on chat replies and converting task steps into JSON text.
The frame-selection-layer AI is only responsible for outputting bbox coordinates based on the image and the target description, and does not participate in task planning or action control.
3.1.2 Improving the Success Rate of Long-Flow Tasks
When reasoning with a single-model approach, "natural language understanding + environment perception + process decomposition + bbox estimation + action function output" must be performed simultaneously, which tends to cause modality interference (language ambiguity or overlong instructions leading to comprehension errors). Layered reasoning processes the task in stages, enabling the decision layer to focus on task planning, the execution layer to focus on action execution, and the frame-selection layer to focus on visual target localization.
3.2 Decision-Layer AI
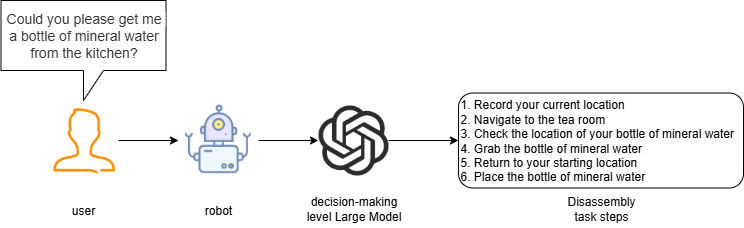
The decision-layer large model is mainly responsible for task planning. It can understand complex human instructions and decompose them into concrete task steps. For example, when it receives the instruction "Can you please get me a bottle of mineral water from the kitchen?", the large language model will decompose it into several tasks, as shown in the figure below.
3.3 Execution-Layer AI
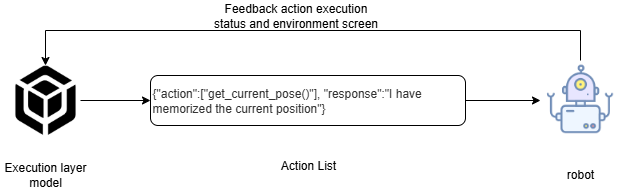
The execution-layer large model is mainly responsible for chat replies and converting task steps into JSON text. It continuously receives feedback (success/failure) and images from the results of the robot's action execution, and issues the next action instruction according to whether the executed action succeeded or failed.
The execution-layer large model acts as a supervisor that continuously monitors the progress of the robot in executing task steps, and, based on the result feedback and environment information after the robot executes an action, thinks and judges the next action to execute, until the task is successfully completed or is ended early due to special circumstances.
3.4 Frame-Selection-Layer AI
The frame-selection-layer AI only participates in work when visually tracking, locking on to, or following a target. It receives the current image, the user's original instruction, and the decision layer's current step, and outputs whether the target was found, the target name, bbox coordinates, confidence, and a brief reason.
The output format of the frame-selection layer is strictly JSON, for example:
{"found":true,"target":"Green square","bbox":[120,80,360,300],"confidence":0.86,"reason":"The goal is clearly visible"}After reading the frame-selection-layer output, the execution layer will output
track_kcf(x1,y1,x2,y2)only iffound=trueand the bbox is valid; if there is no frame-selection result or the target is ambiguous, the execution layer will end the task and explain the reason to the user.
4 . Task Cycle
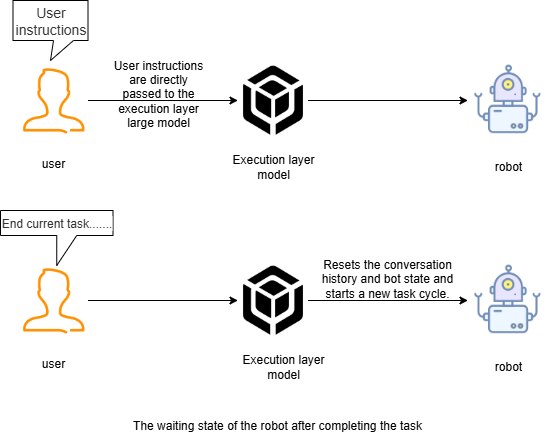
After the user inputs a natural language instruction in the terminal client, a task cycle begins. Within this cycle, the user instruction, action result feedback, and image feedback all continue reasoning in the same Dify
conversation_id, which acts as the temporary memory of the robot and allows it to "remember" what has happened in the current task.When the execution layer outputs
finishtask(), or the user entersresetin the terminal to reset the conversation, the robot resets the historical context of the AI model, which is equivalent to the robot "losing its memory" and forgetting what happened before.If a new instruction is entered during execution,
llm_agent_nodewill give priority to the new instruction and cancel the current navigation, line-following, or tracking actions as soon as possible.
5. Historical Context
The robot's conversation history is stored in the AI application variables of Dify, with a default maximum of 50 rounds of conversation memory.
6. Map Mapping
The robot uses a grid map for navigation. If the robot needs to understand position areas in the real world, a mapping relationship must be established between the grid map and the real-world environment areas; this relationship is called map mapping.
Suppose we use the robot to generate a grid map through SLAM mapping in a factory environment, and the real factory has several artificially divided areas, as shown in the figure below.
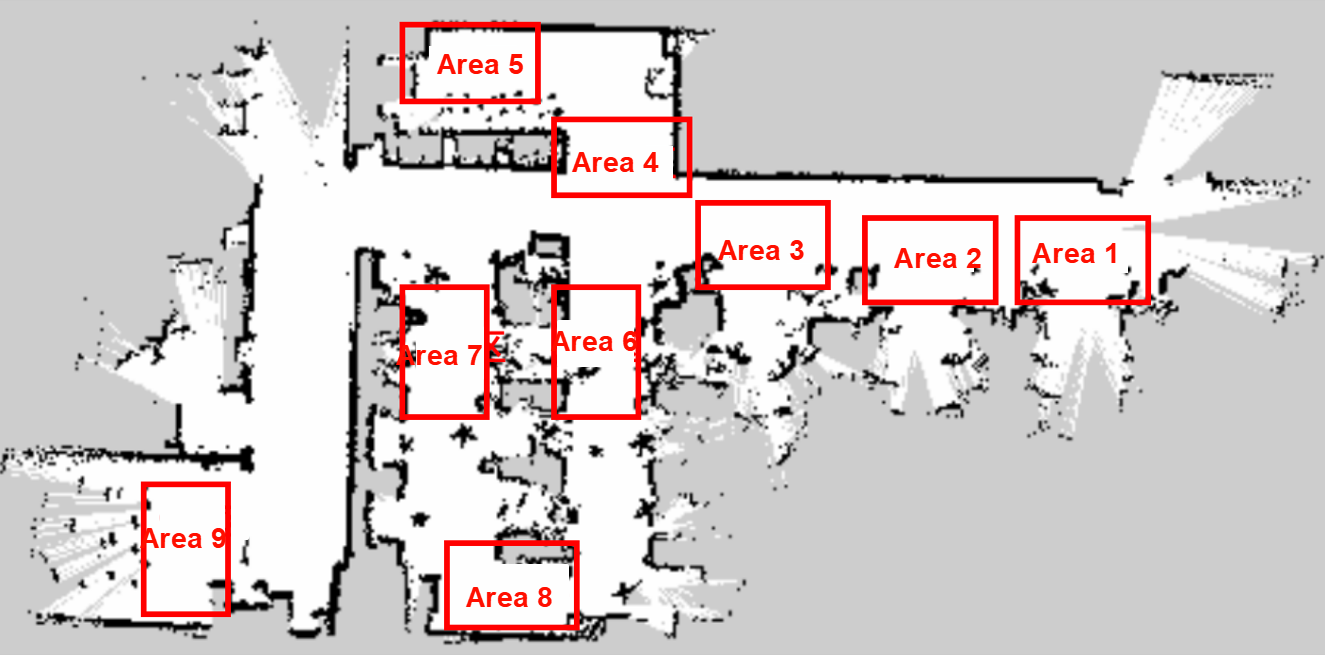
We establish a one-to-one correspondence between these real-world environment areas and letter symbols:
A: "Area 1", B: "Area 2", C: "Area 3", D: "Area 4", E: "Area 5", F: "Area 6", G: "Area 7", H: "Area 8", I: "Area 9"
Then, in the yaml file, the map coordinates are written for each letter symbol, for example:
xxxxxxxxxxA name'Area 1' position x4.4034953117370605 y0.4879316985607147 orientation x0.0 y0.0 z0.701498621044694 w0.7126708108744126When we ask the robot to go to a certain actual area, we only need the large model to convert it into the corresponding letter symbol, so that the robot can understand the location areas in the real environment.
7. Action Function Library
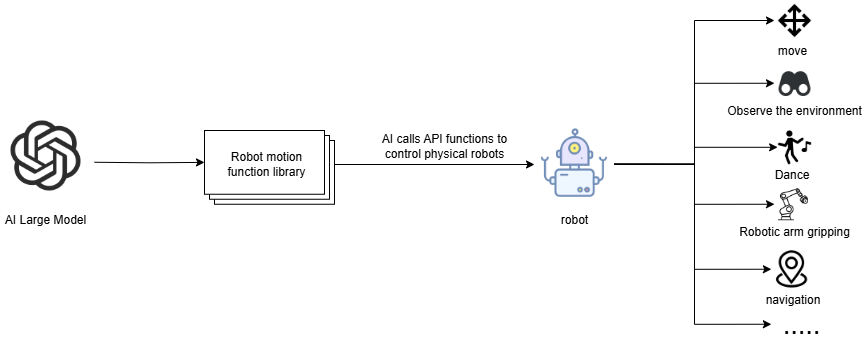
The API functions in the robot's action function library are the core bridge through which the large model controls the robot to interact with the real physical world.
These API functions define the smallest atomic action units that the physical robot can perform in the physical world.
The AI large model converts the action sequence after thinking and planning into strict JSON text and sends it to the robot base (e.g.,
{"action": "set_cmdvel(0.2, 0.0, 0.0, 2.0)"}). After parsing, the robot distributes the calls to the corresponding underlying ROS 2 services or actions.
According to the different vision sensor hardware installed, the system provides the USB camera version (action_service_usb.py) and the Nuwa depth camera version (action_service_nuwa.py) of the action service implementation. The specific function list and functions are as follows:
7.1 Common Basic Action Functions for Both Versions (Shared by USB and Nuwa)
The following actions are common basic motion, navigation, robotic arm interaction, and task lifecycle functions for both sets of vision hardware:
| Function Name and Call Format | Parameter Description | Function and Control Logic | Corresponding Natural Language Example |
|---|---|---|---|
set_cmdvel(linear_x, linear_y, angular_z, duration) | linear_x: forward linear velocity (m/s)linear_y: lateral linear velocity (m/s)angular_z: turning angular velocity (rad/s)duration: duration (seconds) | Omnidirectional chassis motion control: moves at the specified speed and in the specified direction for the specified duration, and automatically publishes zero velocity to stop after running | Move forward 0.2 meters per second for 2 seconds / drive forward for 3 seconds |
move_left(angle, angular_speed) | angle: left-turn angle (degrees)angular_speed: rotation angular velocity (rad/s) | Controls the car to rotate in place to the left by the specified angle (counterclockwise rotation) and then stop smoothly | Turn left 45 degrees / turn left 90 degrees |
move_right(angle, angular_speed) | angle: right-turn angle (degrees)angular_speed: rotation angular velocity (rad/s) | Controls the car to rotate in place to the right by the specified angle (clockwise rotation) and then stop smoothly | Turn right 45 degrees / turn right 90 degrees |
stop() / cancel() | No parameters | Emergency braking and action interruption: publishes zero velocity to the chassis and terminates the current visual tracking, line-following, or motion action | Stop / stop moving / emergency stop |
navigation(point_name) | point_name: the target code in the map mapping file (e.g., 'A', 'B', 'charge', or 'zero') | SLAM navigation control: calls the Nav2 navigation stack to drive the car to the preset target point with autonomous obstacle avoidance; passing 'zero' automatically returns to the task starting point | Navigate to point A / go to the charging pile / return to the origin |
get_current_pose() | No parameters | Reads the robot's current precise pose in the global map coordinate frame (map), and records it as 'zero' in the navigation dictionary | Remember your current position / mark the starting point |
seewhat() | No parameters | Visual perception capture: grabs the current camera frame, overlays a 640×480 pixel coordinate reference grid, saves it, and uploads it to the large model's visual cognition layer for analysis | Look at what's ahead / take a photo to observe the environment |
dance() | No parameters | Robotic arm fun interaction: controls the 6-DOF robotic arm to continuously execute a set of lively dance actions according to a preset choreographed trajectory, and automatically resets after finishing | Dance for me / show the robotic arm |
arm_up() | No parameters | Controls the robotic arm to raise upward to a high display pose | Raise the robotic arm / lift your arm up |
arm_down() | No parameters | Controls the robotic arm to lower downward to a low pose | Lower the robotic arm / arm down |
arm_shake() | No parameters | Controls the end effector of the robotic arm to continuously sway left and right (shaking action, repeated 3 times) | Please shake your head / the robotic arm shakes its head |
arm_nod() | No parameters | Controls the end effector of the robotic arm to continuously pitch up and down (nodding action, repeated 3 times) | Please nod your head / the robotic arm nods |
arm_applaud() | No parameters | Controls the gripper of the robotic arm end effector to open and close in applause (clapping action, repeated 3 times) | Give a round of applause / clap your hands |
putdown() | No parameters | Robotic arm center placement: lowers the robotic arm to a low position directly in front, opens the gripper to release the object, and automatically returns to the initial safe pose | Put the thing down / place it on the ground in front |
right_putdown() | No parameters | Robotic arm right-side placement: rotates the robotic arm to the right and lowers it to place the object held in the gripper, and automatically returns to the initial safe pose | Put the thing on the right / place it down on the right |
apriltag_sort(target_id) | target_id: AprilTag label ID (e.g., 1, 2, 3) | Automatic label sorting: visually identifies the AprilTag-labeled object with the specified ID within the field of view, drives the robotic arm to pick it up, and places it for sorting | Help me sort out the building block with label 1 |
apriltag_remove_higher(target_high) | target_high: abnormal height threshold (meters) | Abnormal height cleanup: detects AprilTag-stacked objects whose height exceeds the set threshold, and performs an overturn-pickup cleanup action | Clean up the blocks stacked too high |
follow_line_clear() | No parameters | Line following with obstacle clearance: the robot travels along the guide line while detecting obstacles on the line in real time and driving the robotic arm to automatically pick them up and clear the path | Follow the route and clear the obstacles on the road |
finishtask() | No parameters | Task completion marker: automatically called by the robot after executing the final task step, used to terminate the proactive status feedback loop to the execution-layer large model | (automatically output by the large model at the end of the task workflow) |
finish_dialogue() | No parameters | Dialogue reset marker: notifies the large model service to clear the current multi-turn historical dialogue context memory and restore the initial standby state | End the conversation / clear memory / reset the session |
7.2 USB Camera Exclusive Action Functions (action_service_usb.py)
For the regular 2D monocular USB camera solution, object tracking and fixed-height planar visual servo grasping are mainly achieved by relying on the 2D pixel bounding box and the KCF algorithm:
| Function Name and Call Format | Parameter Description | Function and Control Logic | Corresponding Natural Language Example |
|---|---|---|---|
wait(duration) | duration: waiting time (seconds) | Task delay suspension: pauses the current action sequence for the specified number of seconds and then continues with the next action | Stop and wait 5 seconds / wait 2 seconds before operating |
left_putdown() | No parameters | Robotic arm left-side placement: rotates the robotic arm to the left and lowers it, opens the gripper to place the object, and automatically resets | Put the thing on the left / place it down on the left |
track_mode() | No parameters | Tracking pose readiness: raises the robotic arm and adjusts it to a dedicated visual pitch tracking angle so that the camera can capture the moving target | Get ready to track the target / enter tracking pose |
track(x1, y1, x2, y2) | x1, y1, x2, y2: the target pixel coordinates selected by the Dify vision model in the 640×480 frame | Monocular KCF visual tracking: starts the arm_kcf_track node, initializes the KCF tracker with the selected region, and controls the robotic arm to rotate in coordination to continuously aim at the target | Keep an eye on this green box / track the block in the frame |
grasp_obj(x1, y1, x2, y2) | x1, y1, x2, y2: the pixel coordinates of the target in the 640×480 frame | Monocular 2D target grasping: combines KCF to detect the target position, drives the robotic arm close to the target, and executes a closed-loop visual servo grasping operation | Help me pick up this block in the frame |
7.3 Nuwa Depth Camera Exclusive Action Functions (action_service_nuwa.py)
The solution equipped with the Nuwa 3D depth camera (RGB-D) has spatial depth point-cloud perception capabilities and supports 3D physical-space positioning and inverse-kinematics (IK) 3D grasping and placement:
| Function Name and Call Format | Parameter Description | Function and Control Logic | Corresponding Natural Language Example |
|---|---|---|---|
get_dist(x, y) | x, y: the pixel coordinates on the image (0~639, 0~479) | Precise spatial distance measurement: using the depth point cloud of the Nuwa depth camera, measures the real physical distance (in meters) of the obstacle corresponding to the specified pixel point in the real world, and gives voice/text feedback | Measure how far the object directly in the middle is from me |
follow_line(color) | color: the guide line color, supporting 'red', 'green', 'blue', 'yellow' | Depth-camera visual line following: uses the color channel to detect the guide line and drives the car to continuously and autonomously follow the ground route of the specified color | Walk along the green line / start following the yellow line |
apriltag_follow() | No parameters | 3D dynamic label following: uses depth information to track the AprilTag in the field of view in real time; the car chassis keeps a constant distance while following and can automatically complete grasping | Follow that label / label-following grasping |
pick(x1, y1, x2, y2) | x1, y1, x2, y2: the target bounding box drawn by the frame-selection layer in the 640×480 image | 3D point-cloud spatial grasping: back-projects the depth map to extract the 3D point-cloud center of the target, the chassis automatically approaches the target, and the robotic arm solves inverse kinematics (IK) to precisely grasp the object | Pick up the yellow building block selected on the desktop |
GetPlacePoint(location)or GetPlacePoint(pixel_x, pixel_y) | Either a positional semantic description (e.g., 'empty space on the right side of the table') can be passed, or the specific pixel point pixel_x, pixel_y returned by the large model | 3D placement-point solving (two-stage): 1. Capture a high-definition image and have the vision large model designate the best placement area; 2. Combine with depth point-cloud back-projection to derive the actual 3D spatial coordinates (X, Y, Z) in the robotic arm base_link coordinate frame, and verify whether they are within the arm's workspace | Find a place on the table where the building block can be put down |
place(place_x, place_y, place_z) | place_x, place_y, place_z: the 3D spatial physical coordinates (in meters) verified by GetPlacePoint | 3D spatial-coordinate placement: the robotic arm solves inverse kinematics according to the target 3D coordinates, smoothly and precisely places the held object at the specified spatial point in the real world, and releases the gripper | Put the building block in your hand at the spot just found |
TargetTrack(x1, y1, x2, y2) | x1, y1, x2, y2: the target pixel bounding box, or pass 'cancel' to cancel | 3D dynamic target tracking and following: the chassis and the robotic arm coordinate in multi-DOF to follow the moving object; when the target stops or stabilizes, the robotic arm is automatically driven to perform 3D grasping | Keep tracking this figure and pick it up when you get close |
7.4 Technical Difference Comparison of the Two Camera Solutions
The following table intuitively summarizes the core differences between the USB camera and the Nuwa depth camera in multi-agent embodied control:
| Feature Dimension | USB Camera Solution (action_service_usb.py) | Nuwa Depth Camera Solution (action_service_nuwa.py) |
|---|---|---|
| Vision dimension | 2D pure-color planar image (RGB 640×480) | 3D RGB-D (color image + dense depth point cloud) |
| Target distance measurement method | Cannot directly measure physical distance; estimates only from the bounding box size in the image | Directly reads the real depth of the point cloud (get_dist, accurate to the centimeter level) |
| Grasping control algorithm | 2D image-plane KCF tracking + fixed-pose visual servo approach (grasp_obj) | 3D spatial back-projection + robotic arm kinematics inverse solving (IK) spatial grasping (pick) |
| Object placement method | Supports only fixed-angle orientation placement (putdown / left_putdown / right_putdown) | Supports large-model visual position search + precise placement at arbitrary 3D spatial coordinates (GetPlacePoint + place) |
| Dynamic tracking and following | Monocular KCF pure-angle tracking (track) | 3D spatial-position and depth coordinated closed-loop tracking (TargetTrack) |
| Applicable scenarios | Basic vision experiments, fixed-height desktop sorting, cost-sensitive applications | Complex unstructured environments, multi-height stacked grasping, precise spatial handling and placement |