Welcome to ROSMASTER A1 PRO repository
5.Face Detection
Face Detection
1. Content Description
This lesson implements acquiring the color image and using the MediaPipe framework to detect human faces. This section requires entering commands in the terminal, where the terminal is opened according to the mainboard type. This lesson uses the Raspberry Pi 5 as an example.
For the Raspberry Pi 5 mainboard, you need to open a terminal on the host machine, then enter the command to access the Docker container, and enter the commands mentioned in this lesson inside the terminal after entering the Docker container. For the tutorial on entering the Docker container from the host, please refer to 【Robot Configuration and Operation Guide】, section 【3.Enter Docker (For Raspberry Pi)】 in this product tutorial. For the Orin and RDK mainboards, simply open a terminal and enter the commands mentioned in this lesson.
2. Program Startup
The Raspberry Pi PI5 controller needs to enter the Docker container first; RDK X5 and Orin controllers do not need to.
To enter the Docker container (for steps, refer to 【Docker Course】 --- 【4. Docker Startup Script】),
All the docker terminals for the commands below need to enter the same Docker container before executing (for steps, refer to 【Docker Course】 --- 【3.Docker Submission and Multi-Terminal Access】)
First, enter the following command in the terminal to start the robot camera and low-level driver environment:
xxxxxxxxxxros2 launch dofbot_pro_driver A1pro_camera_arm.launch.pyNote
This command is the official all-in-one startup script for the A1Pro, which automatically launches the image stream node according to the camera hardware configuration (USB monocular camera or Nuwa 3D depth camera) and loads the low-level drivers. If you only need to start the camera stream separately, you can also run ros2 launch usb_cam camera.launch.py (USB camera) or ros2 launch ascamera hp60c.launch.py (Nuwa camera).
After the camera is started successfully, open another terminal and enter the following command in the terminal to start the face detection program:
xxxxxxxxxxros2 run yahboomcar_mediapipe 05_FaceDetection# Control the robotic arm to look forwardros2 topic pub /arm6_joints dofbot_pro_interface/msg/ArmJoints "{joint1: 90, joint2: 180, joint3: 0, joint4: 0, joint5: 90, joint6: 0, time: 1000}" --once
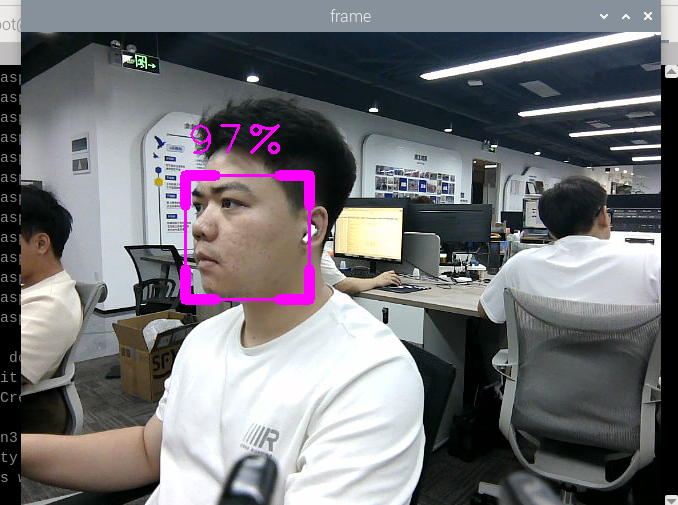
After the program runs, as shown in the figure below, detected faces will be boxed, and the detection score will be displayed. The higher the score, the more confident the algorithm is that the region is a human face.
3. Core Code Analysis
Program code path:
Raspberry Pi 5 mainboard
The program code is located in the running Docker. The path in the Docker is
/root/yahboomcar_ros2_ws/yahboomcar_ws/src/yahboomcar_mediapipe/yahboomcar_mediapipe/07_FaceDetection.pyOrin mainboard
The program code path is
/home/jetson/yahboomcar_ros2_ws/yahboomcar_ws/src/yahboomcar_mediapipe/yahboomcar_mediapipe/07_FaceDetection.pyRDK mainboard
The program code path is
/home/sunrise/yahboomcar_ros2_ws/yahboomcar_ws/src/yahboomcar_mediapipe/yahboomcar_mediapipe/07_FaceDetection.py
Import the required library files:
xxxxxxxxxximport timeimport rclpyfrom rclpy.node import Nodeimport cv2 as cvimport numpy as npimport mediapipe as mpfrom geometry_msgs.msg import Pointfrom yahboomcar_msgs.msg import PointArrayfrom sensor_msgs.msg import Imagefrom cv_bridge import CvBridge, CvBridgeErrorimport osInitialize the data and define the Publisher and Subscriber:
xxxxxxxxxxdef __init__(self, minDetectionCon=0.5): super().__init__('face_detector') # Use the class in the mediapipe library to define a face detection object self.mpFaceDetection = mp.solutions.face_detection self.mpDraw = mp.solutions.drawing_utils self.facedetection = self.mpFaceDetection.FaceDetection(min_detection_confidence=minDetectionCon) self.bridge = CvBridge() # Define the Subscriber for the color image topic camera_type = os.getenv('CAMERA_TYPE', 'usb') topic_name = '/ascamera_hp60c/camera_publisher/rgb0/image' if camera_type == 'nuwa' else '/usb_cam/image_raw' self.subscription = self.create_subscription( Image, topic_name, self.image_callback, 10)Color image callback function:
xxxxxxxxxxdef image_callback(self, msg): # Convert the color image message data into image data using CvBridge frame = self.bridge.imgmsg_to_cv2(msg, desired_encoding='bgr8') # Pass the obtained image into the defined findFaces function for face detection frame, _ = self.findFaces(frame) cv.imshow('Face Detection', frame)The findFaces function:
xxxxxxxxxxdef findFaces(self, frame): # Convert the color space of the input image from BGR to RGB for subsequent image processing img_RGB = cv.cvtColor(frame, cv.COLOR_BGR2RGB) # Call the process function in the mediapipe library for image processing; during init, the self.facedetection object was created and initialized self.results = self.facedetection.process(img_RGB) bboxs = [] # Determine whether self.results.detections exists, that is, whether a face has been detected if self.results.detections: # Iterate through the id and detection data for id, detection in enumerate(self.results.detections): # Obtain the bounding box coordinates bboxC = detection.location_data.relative_bounding_box ih, iw, ic = frame.shape bbox = int(bboxC.xmin * iw), int(bboxC.ymin * ih), \ int(bboxC.width * iw), int(bboxC.height * ih) # Store the detection results bboxs.append([id, bbox, detection.score]) # Call the fancyDraw function to draw the bounding box frame = self.fancyDraw(frame, bbox) # Display the face detection score on the image cv.putText(frame, f'{int(detection.score[0] * 100)}%',(bbox[0], bbox[1] - 20), cv.FONT_HERSHEY_PLAIN,3, (255, 0, 255), 2) return frame, bboxsThe fancyDraw function, which draws the bounding box according to the bbox value of the detection result:
def fancyDraw(self, frame, bbox, l=30, t=10): x, y, w, h = bbox x1, y1 = x + w, y + h cv.rectangle(frame, (x, y),(x + w, y + h), (255, 0, 255), 2) # Top left x,y cv.line(frame, (x, y), (x + l, y), (255, 0, 255), t) cv.line(frame, (x, y), (x, y + l), (255, 0, 255), t) # Top right x1,y cv.line(frame, (x1, y), (x1 - l, y), (255, 0, 255), t) cv.line(frame, (x1, y), (x1, y + l), (255, 0, 255), t) # Bottom left x1,y1 cv.line(frame, (x, y1), (x + l, y1), (255, 0, 255), t) cv.line(frame, (x, y1), (x, y1 - l), (255, 0, 255), t) # Bottom right x1,y1 cv.line(frame, (x1, y1), (x1 - l, y1), (255, 0, 255), t) cv.line(frame, (x1, y1), (x1, y1 - l), (255, 0, 255), t) return frame