Welcome to ROSMASTER A1 PRO repository
8.Trajectory Planning
Trajectory Planning
1. Content Description
In real robot applications, the robot arm often needs to continuously complete multi-stage process actions, such as moving from the initial standby point to the grasp preparation point, performing the grasp, moving to the transition relay point, and finally moving to the target placement point.
This course introduces how to implement continuous planning and execution of multi-segment joint trajectories in MoveIt2 (multi_track_motion). The program pre-draws the spatial motion trajectory lines of the robot arm's end effector between multiple stages in RViz through forward kinematics interpolation, and then sequentially schedules the controller to drive the simulated and physical robot arms to smoothly complete the target pose switches of each stage.
2. Launch and Operation Steps
2.1 Launching the MoveIt2 Simulation Environment
Enter the following command in the terminal to launch the MoveIt2 simulation environment:
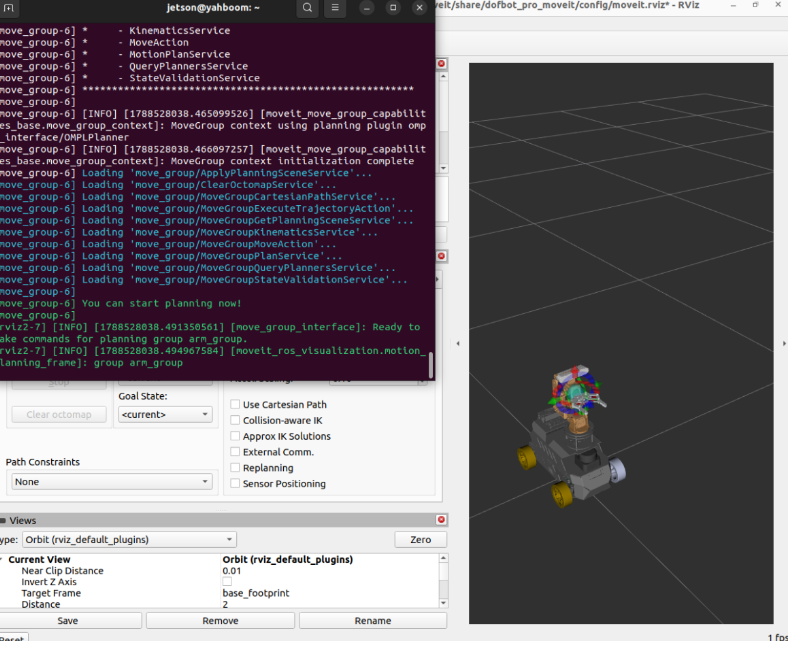
xxxxxxxxxxros2 launch dofbot_pro_moveit demo_3d.launch.pyOnce the program starts, when You can start planning now! is output in the terminal, it means the MoveIt2 core nodes are fully initialized, as shown in the figure below:
2.2 Starting Real-Machine Linkage (Optional)
If you want the simulated robot arm motion to synchronously drive the physical robot arm, open another terminal and run the real hardware control conversion node:
xxxxxxxxxxros2 run movelt_demo SimulationToMachine(It is recommended not to start this node during the initial test. First verify that the obstacle-avoidance trajectory is correct in the pure RViz simulation environment before connecting to the real machine).
2.3 Adding the Trajectory Visualization Plugin in RViz
In order to observe the green spatial lines planned for each stage trajectory in real time in RViz, the MarkerArray display plugin needs to be added:
Click the 【Add】 button in the lower left corner of the RViz interface, select 【MarkerArray】 in the list, and click 【OK】 to add it, as shown in the figure below:
In the Displays list on the left, expand 【MarkerArray】 and change its subscribed Topic to
/plan_point, as shown in the figure below:
2.4 Running the Multi-Segment Trajectory Planning Program
In another terminal, enter the following command to launch the multi-segment trajectory planning node:
xxxxxxxxxxros2 run movelt_demo multi_track_motionAfter the program starts, the robot arm will sequentially execute the target actions of 3 typical stages:
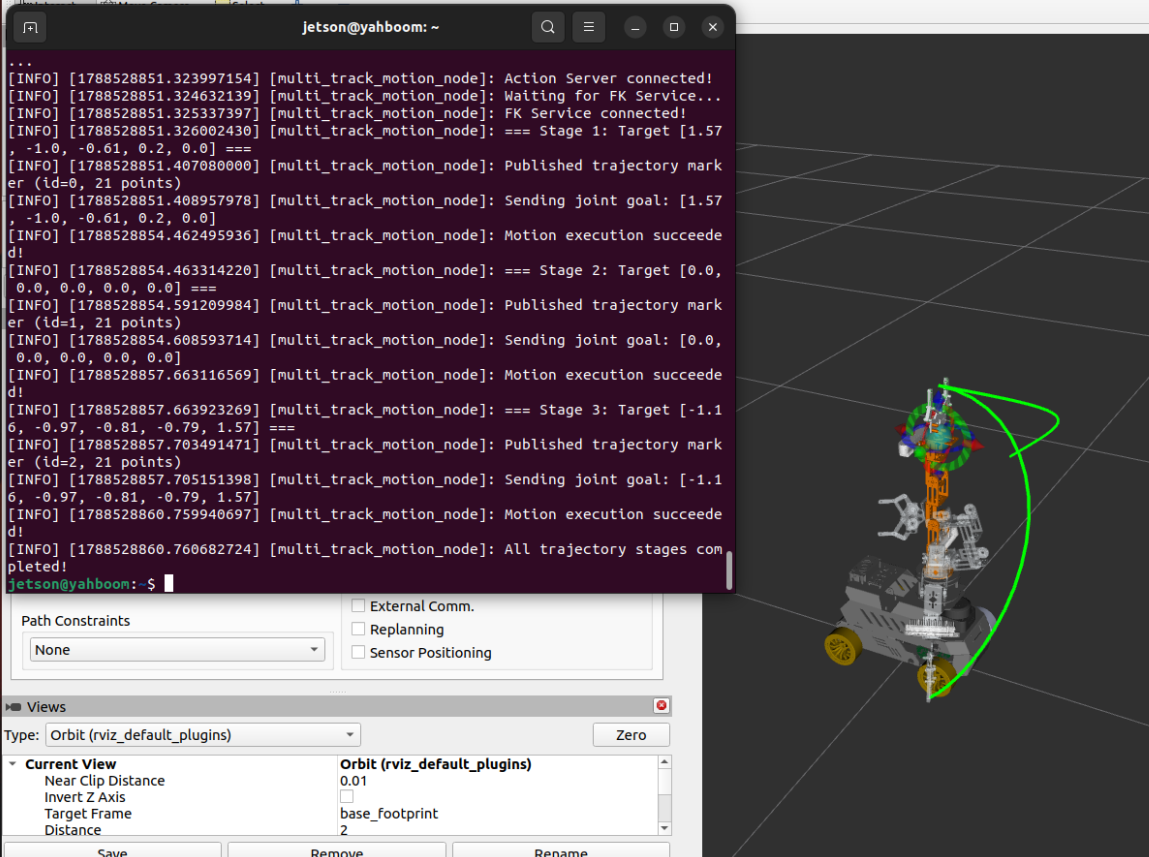
Stage 1: The robot arm bends and stretches forward to the left, and RViz draws the first green spatial trajectory line;
Stage 2: The robot arm smoothly returns to the vertical origin pose, drawing the second return trajectory;
Stage 3: The robot arm tilts backward to the right and rotates the end effector, drawing the third action trajectory.
The entire multi-segment motion process is coherent and smooth, and RViz will retain and dynamically display the motion trajectory lines of each stage, as shown in the figure below:
3. Core Code Analysis
Program source code path:
~/yahboomcar_ros2_ws/dofbot_pro_ws/src/movelt_demo/movelt_demo/multi_track_motion.py
3.1 Node Initialization and Communication Interfaces
The program is written in native ROS 2 Python. The class MultiTrackMotion initializes the trajectory execution Action client, the Marker visualization publisher, and the forward kinematics (FK) service client:
xxxxxxxxxximport mathimport rclpyfrom rclpy.node import Nodefrom rclpy.action import ActionClientfrom control_msgs.action import FollowJointTrajectoryfrom trajectory_msgs.msg import JointTrajectory, JointTrajectoryPointfrom builtin_interfaces.msg import Durationfrom geometry_msgs.msg import Pointfrom moveit_msgs.srv import GetPositionFKfrom visualization_msgs.msg import Marker, MarkerArrayfrom std_msgs.msg import ColorRGBA
class MultiTrackMotion(Node):    def __init__(self):        super().__init__('multi_track_motion_node')        self.get_logger().info("Initializing MultiTrackMotion node...")
        # 1. Trajectory execution Action client        self._action_client = ActionClient(            self,            FollowJointTrajectory,            '/arm_group_controller/follow_joint_trajectory'        )
        # 2. The 5 controlled joint names        self.joint_names = [            "arm1_Joint", "arm2_Joint", "arm3_Joint",            "arm4_Joint", "arm5_Joint"        ]
        # 3. MarkerArray trajectory line publisher (topic: /plan_point)        self._marker_pub = self.create_publisher(MarkerArray, '/plan_point', 10)        self._marker_id = 0
        # 4. Forward kinematics (FK) computation client (service: /compute_fk)        self._fk_client = self.create_client(GetPositionFK, '/compute_fk')
3.2 Joint-Space Interpolation and End-Effector Forward-Kinematics Trajectory Visualization
Before each segment of motion is executed, in order to present the future spatial walking path of the robot arm's end effector to the operator, the publish_trajectory_line function performs equidistant interpolation between the start joint angles and the target joint angles (20 discrete steps by default), calls the /compute_fk service to obtain the spatial 3D coordinates $(x, y, z)$ of the end link Gripping at each interpolation point, packages them as a Marker.LINE_STRIP green line, and publishes them to RViz:
xxxxxxxxxx    def compute_fk_point(self, joint_positions):        """Call the /compute_fk service to solve for the end-effector 3D spatial position at the given joint angles"""        fk_request = GetPositionFK.Request()        fk_request.header.frame_id = "base_link"        fk_request.header.stamp = self.get_clock().now().to_msg()        fk_request.fk_link_names = ["Gripping"]        fk_request.robot_state.joint_state.name = self.joint_names        fk_request.robot_state.joint_state.position = list(joint_positions)
        future = self._fk_client.call_async(fk_request)        rclpy.spin_until_future_complete(self, future)        response = future.result()
        if response.error_code.val == response.error_code.SUCCESS:            pos = response.pose_stamped[0].pose.position            return Point(x=pos.x, y=pos.y, z=pos.z)        return None
    def publish_trajectory_line(self, start_joints, target_joints, num_points=20):        """Linearly interpolate in joint space, compute the end-effector Cartesian trajectory, and publish a LINE_STRIP Marker"""        cartesian_points = []        for i in range(num_points + 1):            t = i / num_points            # Linear interpolation of joint angles            interp_joints = [                start_joints[j] + t * (target_joints[j] - start_joints[j])                for j in range(len(start_joints))            ]            pt = self.compute_fk_point(interp_joints)            if pt:                cartesian_points.append(pt)
        # Build the MarkerArray message        marker_array = MarkerArray()        marker = Marker()        marker.header.frame_id = "base_link"        marker.header.stamp = self.get_clock().now().to_msg()        marker.ns = "multi_track"        marker.id = self._marker_id        self._marker_id += 1        marker.type = Marker.LINE_STRIP        marker.action = Marker.ADD        marker.scale.x = 0.005  # Line width 5mm        marker.color = ColorRGBA(r=0.0, g=1.0, b=0.0, a=1.0)  # Bright green        marker.points = cartesian_points        marker.lifetime = Duration(sec=60, nanosec=0)  # Keep for 60 seconds for easy observation        marker_array.markers.append(marker)
        self._marker_pub.publish(marker_array)
3.3 Trajectory Execution and Synchronous Waiting
The target angles of each stage are sent to the trajectory controller by constructing a FollowJointTrajectory.Goal, with the motion duration set to 3.0 seconds. A synchronous waiting mechanism is used to ensure that the current stage action is fully executed before entering the next stage:
xxxxxxxxxx    def move_to_joints(self, joint_positions, move_time=3.0):        """Send the joint goal and synchronously wait for the execution result"""        goal_msg = FollowJointTrajectory.Goal()        trajectory = JointTrajectory()        trajectory.joint_names = self.joint_names
        point = JointTrajectoryPoint()        point.positions = joint_positions        point.velocities = [0.0] * len(joint_positions)        point.time_from_start = Duration(            sec=int(move_time),            nanosec=int((move_time % 1) * 1e9)        )
        trajectory.points.append(point)        goal_msg.trajectory = trajectory
        send_goal_future = self._action_client.send_goal_async(goal_msg)        rclpy.spin_until_future_complete(self, send_goal_future)
        goal_handle = send_goal_future.result()        if not goal_handle.accepted:            self.get_logger().error("The target trajectory was rejected by the controller!")            return False
        result_future = goal_handle.get_result_async()        rclpy.spin_until_future_complete(self, result_future)        return result_future.result().result.error_code == 0
3.4 Multi-Stage State Machine Scheduling (run Method)
In the main execution logic, stage parameters for 3 different poses are defined, and the trajectories are drawn, sent for execution, and the current joint angles of the state machine are maintained sequentially:
    def run(self):        # Define the joint target radians of the 3 stages        motions = [            {"name": "Stage 1", "joints": [1.57, -1.00, -0.61, 0.20, 0.0]},            {"name": "Stage 2", "joints": [0.0,   0.0,   0.0,  0.0,  0.0]},            {"name": "Stage 3", "joints": [-1.16, -0.97, -0.81, -0.79, 1.57]},        ]
        current_joints = [0.0] * 5
        for motion in motions:            target = motion["joints"]            name = motion["name"]            self.get_logger().info(f"=== Executing {name}: target angles {[round(j, 2) for j in target]} ===")
            # 1. Pre-compute and visualize the trajectory line            self.publish_trajectory_line(current_joints, target)
            # 2. Send the motion for execution (motion duration 3.0s)            success = self.move_to_joints(target, move_time=3.0)            if not success:                self.get_logger().error(f"{name} failed to execute, terminating subsequent actions!")                return
            current_joints = target[:]
        self.get_logger().info("All multi-segment trajectory planning tasks completed successfully!")