Welcome to ROSMASTER A1 PRO repository
11.Fingertip Trajectory Recognition
Fingertip Trajectory Recognition
1. Content Description
This lesson implements acquiring the color image and using the MediaPipe framework to detect the fingertip, using gestures to start and stop recording the trajectory of the fingertip in the image. After recording ends, a fingertip trajectory image is generated, and the trajectory is recognized. This section requires entering commands in the terminal, where the terminal is opened according to the mainboard type. This lesson uses the Raspberry Pi 5 as an example.
For the Raspberry Pi 5 mainboard, you need to open a terminal on the host machine, then enter the command to access the Docker container, and enter the commands mentioned in this lesson inside the terminal after entering the Docker container. For the tutorial on entering the Docker container from the host, please refer to 【Robot Configuration and Operation Guide】, section 【3.Enter Docker (For Raspberry Pi)】 in this product tutorial.
For the Orin and RDK mainboards, simply open a terminal and enter the commands mentioned in this lesson.
2. Program Startup
The Raspberry Pi PI5 controller needs to enter the Docker container first; RDK X5 and Orin controllers do not need to.
To enter the Docker container (for steps, refer to 【Docker Course】 --- 【4. Docker Startup Script】),
All the docker terminals for the commands below need to enter the same Docker container before executing (for steps, refer to 【Docker Course】 --- 【3.Docker Submission and Multi-Terminal Access】)
First, enter the following command in the terminal to start the robot camera and low-level driver environment:
xxxxxxxxxxros2 launch dofbot_pro_driver A1pro_camera_arm.launch.pyNote
This command is the official all-in-one startup script for the A1Pro, which automatically launches the image stream node according to the camera hardware configuration (USB monocular camera or Nuwa 3D depth camera) and loads the low-level drivers. If you only need to start the camera stream separately, you can also run ros2 launch usb_cam camera.launch.py (USB camera) or ros2 launch ascamera hp60c.launch.py (Nuwa camera).
After the camera is started successfully, open another terminal and enter the following command in the terminal to start the fingertip trajectory recognition program:
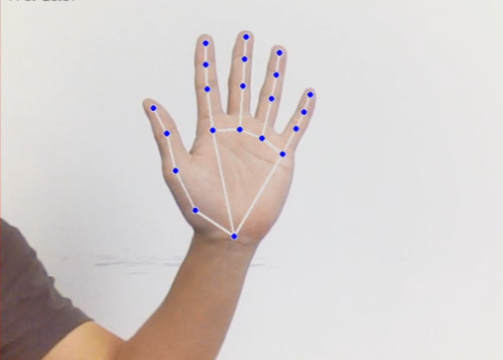
xxxxxxxxxxros2 run yahboomcar_mediapipe 12_FingerTrajectory# Control the robotic arm to look forwardros2 topic pub /arm6_joints dofbot_pro_interface/msg/ArmJoints "{joint1: 90, joint2: 180, joint3: 0, joint4: 0, joint5: 90, joint6: 0, time: 1000}" --onceAfter the program runs, as shown in the figure below, place the palm flat in the camera image with the fingers spread open and the palm facing the camera, similar to the number 5 gesture. The image will draw all the joints of the entire palm. Adjust the position of the palm so that it is as close to the upper middle part of the screen as possible:
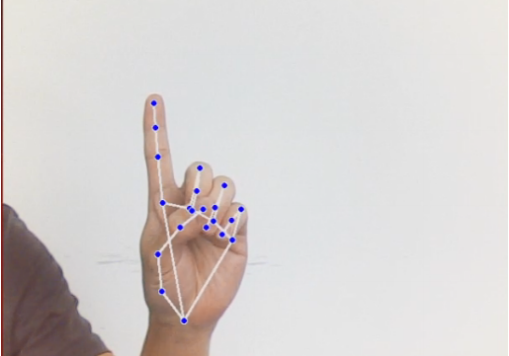
At this time, keep the index finger unchanged and retract the other fingers, similar to the number 1 gesture:
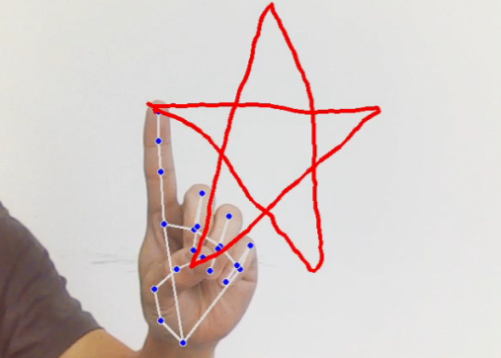
While maintaining the gesture 1 posture without change, move the position of the finger, and a red line appears on the screen, drawing the path of the index finger movement:
After the graphic is drawn, spread all the fingers, similar to the number 5 gesture, and the drawn graphic will be generated below:
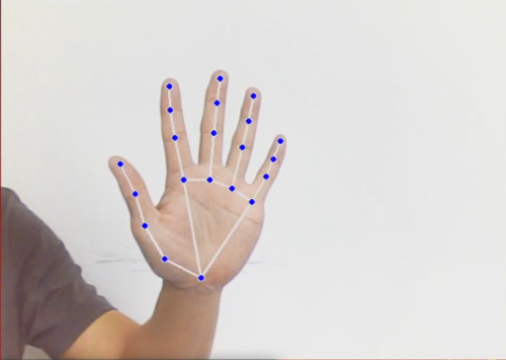
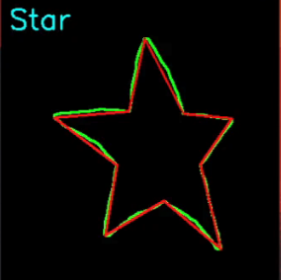
Note: The drawn graphic needs to be in a closed state, otherwise part of the content may be missing.
There are currently four trajectory patterns that can be recognized, namely: triangle, rectangle, circle, and five-pointed star.
3. Core Code Analysis
Program code path:
Raspberry Pi 5 mainboard
The program code is located in the running Docker. The path in the Docker is
/root/yahboomcar_ros2_ws/yahboomcar_ws/src/yahboomcar_mediapipe/yahboomcar_mediapipe/12_FingerTrajectory.pyOrin mainboard
The program code path is
/home/jetson/yahboomcar_ros2_ws/yahboomcar_ws/src/yahboomcar_mediapipe/yahboomcar_mediapipe/12_FingerTrajectory.pyRDK mainboard
The program code path is
/home/sunrise/yahboomcar_ros2_ws/yahboomcar_ws/src/yahboomcar_mediapipe/yahboomcar_mediapipe/12_FingerTrajectory.py
Import the required library files:
xxxxxxxxxximport osimport enumimport cv2import time,mathimport numpy as npimport mediapipe as mpimport rclpyfrom rclpy.node import Nodeimport queuefrom sensor_msgs.msg import Imageimport gcfrom cv_bridge import CvBridgeInitialize the data and define the Publisher and Subscriber:
xdef __init__(self): super().__init__('finger_trajectory') self.drawing = mp.solutions.drawing_utils self.timer = time.time()
self.hand_detector = mp.solutions.hands.Hands( static_image_mode=False, max_num_hands=1, min_tracking_confidence=0.05, min_detection_confidence=0.6 ) self.bridge = CvBridge()
# Define the Subscriber for the color image topic camera_type = os.getenv('CAMERA_TYPE', 'usb') topic_name = '/ascamera_hp60c/camera_publisher/rgb0/image' if camera_type == 'nuwa' else '/usb_cam/image_raw'
self.subscription = self.create_subscription( Image, topic_name, self.image_callback, 10)Color image callback function:
xxxxxxxxxxdef image_callback(self,msg):    frame = self.bridge.imgmsg_to_cv2(msg, desired_encoding='bgr8')    rgb_image = cv2.flip(frame, 1) # Horizontal flip    result_image = np.copy(rgb_image)    if self.timer <= time.time() and self.state == State.RUNNING:        self.state = State.NULL    try:        # Call the process function to detect the palm        results = self.hand_detector.process(rgb_image) if self.state != State.RUNNING else None        # Determine whether a palm has been detected; if results is not 0, a palm has been detected        if results is not None and results.multi_hand_landmarks:            gesture = "none"            index_finger_tip = [0, 0]            # Record the current time for timeout handling            self.no_finger_timestamp = time.time()              # Iterate through the detection results            for hand_landmarks in results.multi_hand_landmarks:                self.drawing.draw_landmarks(                    result_image,                    hand_landmarks,                    mp.solutions.hands.HAND_CONNECTIONS)                landmarks = get_hand_landmarks(rgb_image, hand_landmarks.landmark)                # Call hand_angle to calculate the bending angle of each finger                angle_list = (hand_angle(landmarks))                # Call the h_gesture function to determine the gesture made by the fingers                gesture = (h_gesture(angle_list))                index_finger_tip = landmarks[8].tolist()
            if self.state == State.NULL:                 # Detect that only the index finger is extended while the other fingers are clenched into a fist                if gesture == "one":                     self.start_count += 1                    if self.start_count > 20:                        self.state = State.TRACKING                        self.points = []                else:                    self.start_count = 0
            elif self.state == State.TRACKING:                # Spread the five fingers to finish drawing                if gesture == "five":                     self.state = State.NULL                                        # Generate the black-and-white trajectory image                    track_img = get_track_img(self.points)
                    contours = cv2.findContours(track_img, cv2.RETR_EXTERNAL, cv2.CHAIN_APPROX_NONE)[-2]
                    contour = get_area_max_contour(contours, 300)                                    contour = contour[0]                    # Recognize the drawn graphic according to the trajectory image                    # cv2.fillPoly draws and fills the polygon on the image                    track_img = cv2.fillPoly(track_img, [contour,], (255, 255, 255))
                    for _ in range(3):                        # Erosion function                        track_img = cv2.erode(track_img, cv2.getStructuringElement(cv2.MORPH_RECT, (5, 5)))
                        # Dilation function                        track_img = cv2.dilate(track_img, cv2.getStructuringElement(cv2.MORPH_RECT, (5, 5)))
                    contours = cv2.findContours(track_img, cv2.RETR_EXTERNAL, cv2.CHAIN_APPROX_NONE)[-2]
                    contour = get_area_max_contour(contours, 300)
                    contour = contour[0]                    h, w = track_img.shape[:2]
                    track_img = np.full([h, w, 3], 0, dtype=np.uint8)                    track_img = cv2.drawContours(track_img, [contour, ], -1, (0, 255, 0), 2)
                    # Perform polygon fitting on the image contour points                    approx = cv2.approxPolyDP(contour, 0.026 * cv2.arcLength(contour, True), True)
                    track_img = cv2.drawContours(track_img, [approx, ], -1, (0, 0, 255), 2)
                    graph_name = 'unknown'                                        # Determine the graphic according to the number of vertices of the contour envelope                    if len(approx) == 3:                        graph_name = 'Triangle'                    if len(approx) == 4 or len(approx) == 5:                        graph_name = 'Square'                    if 5 < len(approx) < 10:                        graph_name = 'Circle'                    if len(approx) == 10:                        graph_name = 'Star'                    cv2.putText(track_img, graph_name, (10, 40),cv2.FONT_HERSHEY_SIMPLEX, 1.2, (255, 255, 0), 2)                    cv2.imshow('track', track_img)
                else:                    if len(self.points) > 0:                        if distance(self.points[-1], index_finger_tip) > 5:                            self.points.append(index_finger_tip)                    else:                        self.points.append(index_finger_tip)
                draw_points(result_image, self.points)            else:                pass        else:            if self.state == State.TRACKING:                if time.time() - self.no_finger_timestamp > 2:                    self.state = State.NULL                    self.points = []
    except BaseException as e:        print(e)            #result_image = cv2.cvtColor(result_image, cv2.COLOR_RGB2BGR)    cv2.imshow('image', result_image)    key = cv2.waitKey(1)      # Press the space bar to clear the recorded trajectory    if key == ord(' '):        self.points = []    if time.time() > self.gc_stamp:        self.gc_stamp = time.time() + 1        gc.collect()
The hand_angle function, which calculates the bending angle of each finger:
xxxxxxxxxxdef hand_angle(landmarks): angle_list = [] # thumb angle_ = vector_2d_angle(landmarks[3] - landmarks[4], landmarks[0] - landmarks[2]) angle_list.append(angle_) # index angle_ = vector_2d_angle(landmarks[0] - landmarks[6], landmarks[7] - landmarks[8]) angle_list.append(angle_) # middle angle_ = vector_2d_angle(landmarks[0] - landmarks[10], landmarks[11] - landmarks[12]) angle_list.append(angle_) # ring angle_ = vector_2d_angle(landmarks[0] - landmarks[14], landmarks[15] - landmarks[16]) angle_list.append(angle_) # pink angle_ = vector_2d_angle(landmarks[0] - landmarks[18], landmarks[19] - landmarks[20]) angle_list.append(angle_) angle_list = [abs(a) for a in angle_list] return angle_listThe h_gesture function, which determines the gesture made by the fingers through two-dimensional features:
xxxxxxxxxxdef h_gesture(angle_list): thr_angle, thr_angle_thumb, thr_angle_s = 65.0, 53.0, 49.0 if (angle_list[0] < thr_angle_s) and (angle_list[1] < thr_angle_s) and (angle_list[2] < thr_angle_s) and ( angle_list[3] < thr_angle_s) and (angle_list[4] < thr_angle_s): gesture_str = "five" elif (angle_list[0] > 5) and (angle_list[1] < thr_angle_s) and (angle_list[2] > thr_angle) and ( angle_list[3] > thr_angle) and (angle_list[4] > thr_angle): gesture_str = "one" else: gesture_str = "none" return gesture_strThe get_track_img function, which generates the trajectory image:
def get_track_img(points): points = np.array(points).astype(dtype=np.int32) x_min, y_min = np.min(points, axis=0).tolist() x_max, y_max = np.max(points, axis=0).tolist() track_img = np.full([y_max - y_min + 100, x_max - x_min + 100, 1], 0, dtype=np.uint8) points = points - [x_min, y_min] points = points + [50, 50] draw_points(track_img, points, 1, (255, 255, 255)) return track_img