Welcome to ROSMASTER A1 PRO repository
10.3D Perception Obstacle‑Avoidance
3D Perception Obstacle Avoidance (OctoMap Dynamic Point Cloud Obstacle Avoidance and A-B Point Planning)
1. Content Description
In the previous chapters, we learned how to inject predefined fixed geometries (such as cuboid obstacles and shelves) into the MoveIt2 scene through code for obstacle-avoidance planning. However, in real unstructured environments, the position, size, and shape of obstacles are usually unknown and dynamically changing.
This course introduces MoveIt2's 3D environment perception and dynamic collision avoidance solution:
The system uses the HP60C depth camera in front of the robot arm to acquire dense 3D point cloud data in real time;
MoveIt2's occupancy map monitoring plugin (
PointCloudOctomapUpdater) dynamically maps the point cloud into a 3D octree voxel grid map (OctoMap);MoveIt2's collision detection library (FCL) incorporates the OctoMap grid as real-time collision bodies into the planning computation. When the robot arm performs trajectory planning, the motion planning algorithm (OMPL) automatically senses the real obstacles in the field of view (such as cardboard boxes, desktop objects, and human arms), and searches in real time for collision-free motion trajectories that go around the real obstacles;
Combined with the A-B point round-trip avoidance node (
two_point_avoidance) and the real-machine linkage node, the robot arm can automatically cruise back and forth between two preset workstations, dynamically sensing obstacles along the way and autonomously avoiding them in real time by moving upward or to the side.
2. Coordinate Frame Basics and Fast Acquisition of A/B Points
Quick Drag Teaching to Acquire A and B Points
Following the method in the preceding tutorials, use the following two commands to quickly acquire the joint values of the two workstations A and B:
Terminal 1 starts the low-level hardware communication:
ros2 launch dofbot_pro_driver A1pro_camera_arm.launch.pyTerminal 2 runs the pose monitor:
xxxxxxxxxxros2 run movelt_demo arm_pose_monitorAcquiring the points:
Hold the robot arm with your hand and press [Spacebar] to release the servo torque;
Manually move the robot arm to workstation A and workstation B for avoidance, and directly copy the bracketed array following
【Joint angles (rad)】from the terminal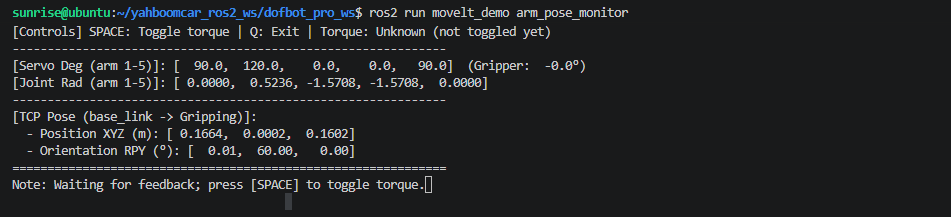
Press [Spacebar] again to resume locking, then press [Q] to exit. Close the two terminals above.
Fill in the A and B point radians in
xxxxxxxxxx~/yahboomcar_ros2_ws/dofbot_pro_ws/src/movelt_demo/config/two_point_avoidance.yamlModify the two points below
xtargets:- name: Atype: jointsunit: rad # rad: radians in URDF; deg: degrees in URDF; servo_deg: servo anglesvalues: [0.7505, -1.1868, -0.3142, -0.3142, 0.0] # arm1_Joint ... arm5_Joint- name: Btype: jointsunit: radvalues: [-0.8029, -1.2566, -0.3142, -0.3142, 0.0]Build to apply the changes
xxxxxxxxxxcd ~/yahboomcar_ros2_ws/dofbot_pro_ws/colcon build --packages-select movelt_demo
3. Launch and Operation Steps
Note
Core command set for running 3D perception obstacle avoidance:
ros2 launch dofbot_pro_moveit demo_3d.launch.py: Starts the MoveIt2 planning core, the HP60C camera point cloud driver, TF conversion, and the OctoMap plugin;ros2 run movelt_demo two_point_avoidance: Runs the A-B two-point round-trip obstacle-avoidance planning node;ros2 run movelt_demo SimulationToMachine(optional): Real-robot arm linkage driving.
3.1 Launching the MoveIt2 3D Perception Environment
Enter the following command in the terminal to launch the integrated launch file:
xxxxxxxxxxros2 launch dofbot_pro_moveit demo_3d.launch.py 3d_perception:=true start_camera:=true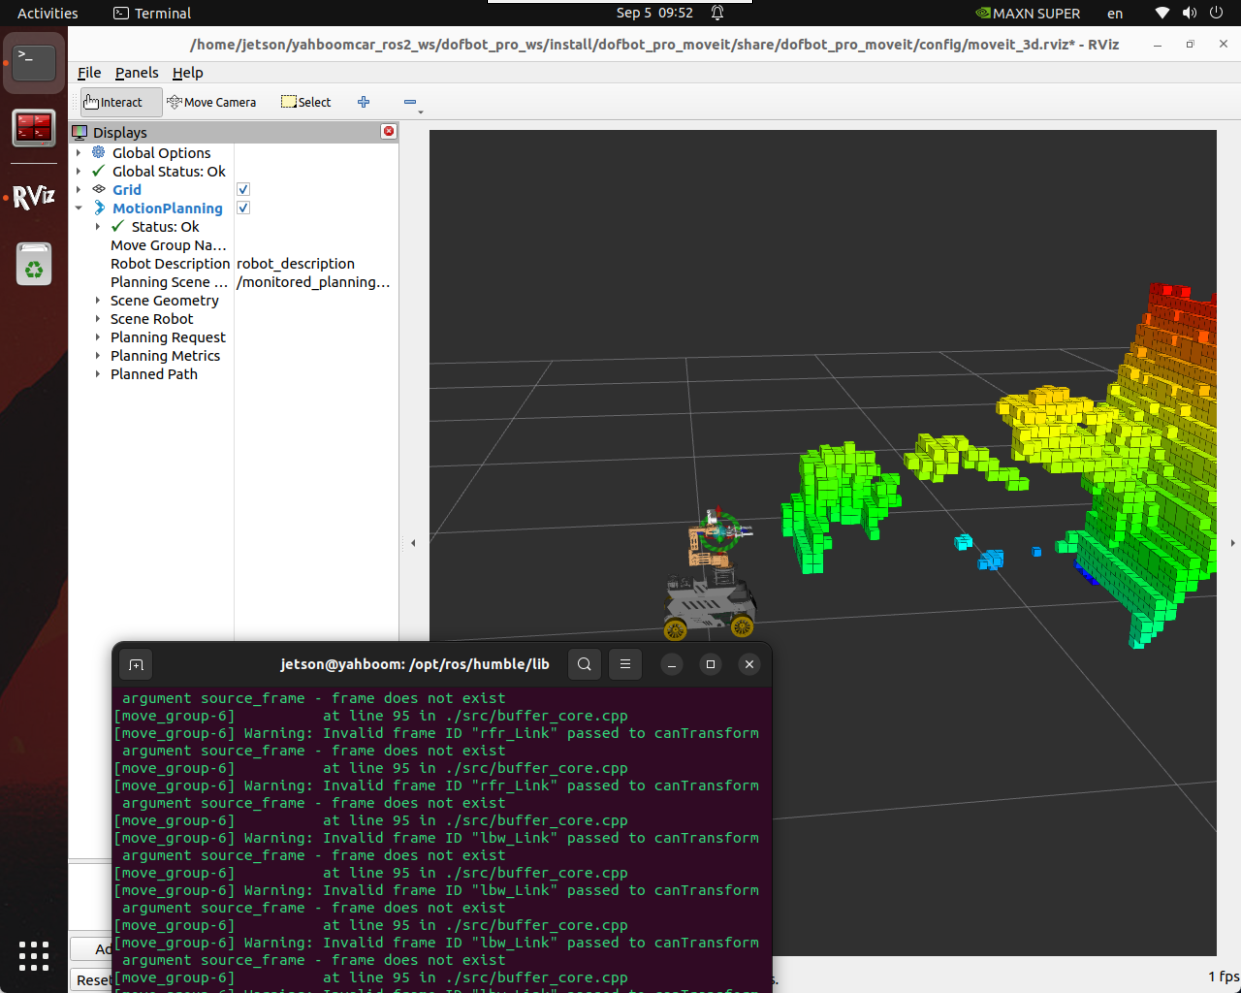
When You can start planning now! is output in the terminal and the RViz interface has loaded, it means the MoveIt2 planning core and the camera driver are both ready. At this point, the depth camera's point cloud data is automatically passed into MoveIt, generating OctoMap voxel obstacles composed of green/gray blocks in front of the robot arm in real time.
3.2 Starting Real-Machine Hardware Linkage (Optional)
If you need the simulated obstacle-avoidance motion to synchronously control the real physical robot arm in real time, open another terminal and run the hardware control conversion node:
xxxxxxxxxxros2 run movelt_demo SimulationToMachineAfter this node starts, each servo of the robot arm will be enabled and centered, and it will continuously listen to the joint angles published by MoveIt planning, sending the trajectories to the low-level servo driver board in real time. (It is recommended not to start this node during the initial test. First verify that the obstacle-avoidance trajectory is correct in the pure RViz simulation environment before connecting to the real machine).
3.3 Performing Obstacle Avoidance Planning and Testing
Running the A-B Two-Point Automatic Obstacle Avoidance Node (two_point_avoidance)
In real industrial or logistics transport scenarios, the robot arm typically needs to travel back and forth repeatedly between workstation A (grasping point) and workstation B (placement point). The two_point_avoidance node is designed specifically for this scenario, and its execution sequence is: current pose → point A → point B → point A.
Open a new terminal and run it in the mode you need:
1. Default Single Round Trip Execution
Plan and execute a complete current → A → B → A cycle, then exit automatically:
xxxxxxxxxxros2 run movelt_demo two_point_avoidance2. Running with a Custom Configuration File
If the points have been modified on site or you want to load a different YAML configuration, specify the file path via the --config parameter:
xxxxxxxxxxros2 run movelt_demo two_point_avoidance --config ~/yahboomcar_ros2_ws/dofbot_pro_ws/src/movelt_demo/config/two_point_avoidance.yaml3.4 Obstacle Avoidance Effect Verification and Experiment Steps
To intuitively observe the obstacle avoidance effect, it is recommended to conduct the experimental comparison according to the following steps:
Stage 1 (baseline test without obstacles):
Keep the area in front of the robot arm open with no obstacles;
Run
ros2 run movelt_demo two_point_avoidance;Observe the motion trajectory of the robot arm between point A and point B: at this time the trajectory is basically a smooth straight line or a gentle shortcut arc.
Stage 2 (obstacle avoidance test with an added obstacle):
Place a cardboard box about 15-20 cm high on the path that the robot arm must traverse between point A and point B (be careful not to place it too close to the camera, staying out of the blind zone within 20 cm of the camera);
Observe the RViz window: within about 1-2 seconds, the depth camera will capture the point cloud of the cardboard box and generate corresponding green octree voxel blocks (OctoMap) in space;
At this point,
two_point_avoidancetriggers the next segment of planning, and MoveIt automatically detects this voxel collision body;Expected result: The planner will generate a noticeably upward-arching trajectory or a large outward detour safe path, going around the cardboard box to successfully reach the target point!
If the obstacle is too large and completely blocks the entire channel or the target point, the terminal will prompt
MoveIt goal failed: NO_IK_SOLUTIONorPLANNING_FAILED, and the robot arm stops safely, never forcing its way into the obstacle.
4. Two-Point Obstacle Avoidance Parameters and Custom Point Configuration
Configuration file path:~/yahboomcar_ros2_ws/dofbot_pro_ws/src/movelt_demo/config/two_point_avoidance.yaml
4.1 Configuration File Content and Parameter Description
xxxxxxxxxx# Default: Plan current state -> A -> B -> A. Octomap in MoveIt participates in collision checking.# Default: Plan from the current state to A, then to B -> A. The OctoMap in the MoveIt scene participates in collision detection in real time.settings cycles1 # 1: Execute one round trip; 0: Run continuously until Ctrl-C pause_seconds3.0 # Pause duration in seconds to wait for point cloud updates before planning each segment velocity_scale0.1 # Motion velocity scaling factor (0.0 ~ 1.0) acceleration_scale0.1 # Acceleration scaling factor (0.0 ~ 1.0)
targetsnameA typejoints unitrad # rad: radians in URDF; deg: degrees in URDF; servo_deg: servo angles values0.7505 -1.1868 -0.3142 -0.3142 0.0 # arm1_Joint ... arm5_JointnameB typejoints unitrad values-0.8029 -1.2566 -0.3142 -0.3142 0.04.2 Three Configuration Modes for Custom A/B Points
The targets list must contain both target points A and B. Directly paste the real servo angles sampled during the teaching in section 2 into values:
xxxxxxxxxxtargetsnameA typejoints unitrad # rad: radians in URDF; deg: degrees in URDF; servo_deg: servo angles values0.7505 -1.1868 -0.3142 -0.3142 0.0 # arm1_Joint ... arm5_JointnameB typejoints unitrad values-0.8029 -1.2566 -0.3142 -0.3142 0.05. In-Depth Analysis of Core Configuration and Code
5.1 Analysis of the 3D Perception Configuration File
Path: ~/yahboomcar_ros2_ws/dofbot_pro_ws/src/dofbot_pro_moveit/config/sensors_3d_hp60c.yaml
xxxxxxxxxxoctomap_resolution0.03octomap_framebase_footprint
sensorscamera_pointcloud
camera_pointcloud sensor_pluginoccupancy_map_monitor/PointCloudOctomapUpdater point_cloud_topic/ascamera_hp60c/camera_publisher/depth0/points max_range1.5 point_subsample3 padding_offset0.02 padding_scale1.0 max_update_rate3.0 filtered_cloud_topic/filtered_pointsoctomap_resolution: 0.03: The voxel grid resolution is 3 cm. It balances obstacle avoidance precision and the real-time computational load of the embedded industrial computer;max_range: 1.5: The maximum measurement distance is truncated at 1.5 meters to filter out irrelevant distant clutter;point_subsample: 3: The downsampling ratio; 1 out of every 3 points is taken, reducing the point cloud bandwidth pressure;padding_offset: 0.02: The safe avoidance filter buffer (2 cm) for the robot arm's own links, preventing its own links from being misjudged as obstacles by the camera point cloud.
5.2 Analysis of the Core Logic of the Two-Point Obstacle Avoidance Node
Source code path: ~/yahboomcar_ros2_ws/dofbot_pro_ws/src/movelt_demo/movelt_demo/two_point_avoidance.py
two_point_avoidance.py communicates with the MoveIt core based on the ROS 2 Action client. The core flow is as follows:
Environment and perception self-check (
wait_ready): At node startup, it strictly checks:Whether the
/move_actionserver is ready;Whether valid
/joint_statesjoint angles and/ascamera_hp60c/.../pointsraw point clouds have been received;Through the
/get_planning_sceneservice, it confirms that the OctoMap octree data has actually been established in the MoveIt scene. If the camera outputs nothing or there is no point cloud, the node will wait or report an error, avoiding blind motion without perception that could cause a crash.
Point cloud update pause mechanism (
spin_wait(pause_seconds)): Before submitting each stage goal to MoveIt, it forcibly waits forpause_seconds(3 seconds by default) so that the HP60C camera has sufficient time to capture the newly added obstacles and generate the voxel map.Goal constraints and dynamic re-planning (
build_goal): The joint angles or end-effector positions configured in the YAML are constructed intoMoveGroup.Goalconstraints, enabling MoveIt's dynamic re-planning mechanism:xxxxxxxxxxoptions.replan = not plan_onlyoptions.replan_attempts = config['replan_attempts']options.replan_delay = config['replan_delay']If someone suddenly inserts a cardboard box obstacle while the robot arm is running a trajectory, MoveIt will brake urgently before the collision and trigger re-planning in place, recomputing a collision-free branched path.
Safety protection and cancellation (
cancel_active): When the user pressesCtrl-Cor planning completely fails, the node proactively sends acancel_goal_asynccancellation command to the MoveIt action server, ensuring that the robot arm brakes smoothly.
5.3 Principles of Simulation-to-Real-Robot Linkage
Source code path: ~/yahboomcar_ros2_ws/dofbot_pro_ws/src/movelt_demo/movelt_demo/SimulationToMachine.py
xxxxxxxxxx# Subscribe to the joint states published by MoveItself.subscription = self.create_subscription( JointState, '/joint_states', self.joint_state_callback, 10)In the callback function, the joint radians output by MoveIt planning are mapped to the bus servo angles ($0^\circ \sim 180^\circ$) proportionally and by direction, and tiny mechanical jitters are filtered out through the dead zone threshold angle_threshold = 0.5. The commands are then sent to the low-level driver board with a 1000ms dynamic smoothing time, enabling the real robot arm to precisely follow the simulated planned trajectory.